Temperature Zone Definition:
1. Select the zone that is to be connected to the Interface. ONLY ZONES 1 THRU 16 ON THE M1 OR
ZONES 1 THRU 8 ON THE M1EZ8 MAY BE USED WITH THE ZONE TEMPERATURE SENSORS.
2. Program the definition of this zone to: 33 -Temperature Zone.
3. Under the Zone Definitions menu enable the "Fast Loop Response" option ONLY. Disable all other
options.
VERY IMPORTANT: A zone defined as Temperature MUST also be enabled for Fast Loop
Response with the response time set to 200ms or less.
4. Under the Global Definitions menu and go to the "Zones" tab and verify the "Fast Loop Response"
option to be 200ms or less. The factory default is 040 ms., requiring no change.
View Temperature:
It takes ~30 seconds after power up for the Temperature Interface to stabilize and
transmit a reading to the Control. Updates are transmitted every 17 seconds.
The Control stores each
temperature reading but discards rapidly changing readings as follows: If a reading is more than 20
degrees higher or 9 degrees lower than the last reading, it will be regarded as a possible error and
discarded.
If the control is turned off or reset it takes ~30 seconds to display the temperature.
1. To view temperature from the keypad, press the ELK key (enter code if prompted), then press the
RIGHT arrow key to select the View/Control Automation menu.
2. Press the 4 key (or scroll up) to display: 4-Temperature Sensor, then press the RIGHT arrow key.
3. The first temperature zone will be displayed with its Name, Zone Number, and reading.
4. Additional Temperature zones (if any) may be displayed by entering their 3 digit number OR by
scrolling with the UP or DOWN arrow keys. To exit from this menu press the * key.
Using a Temperature Sensor in a Rule:
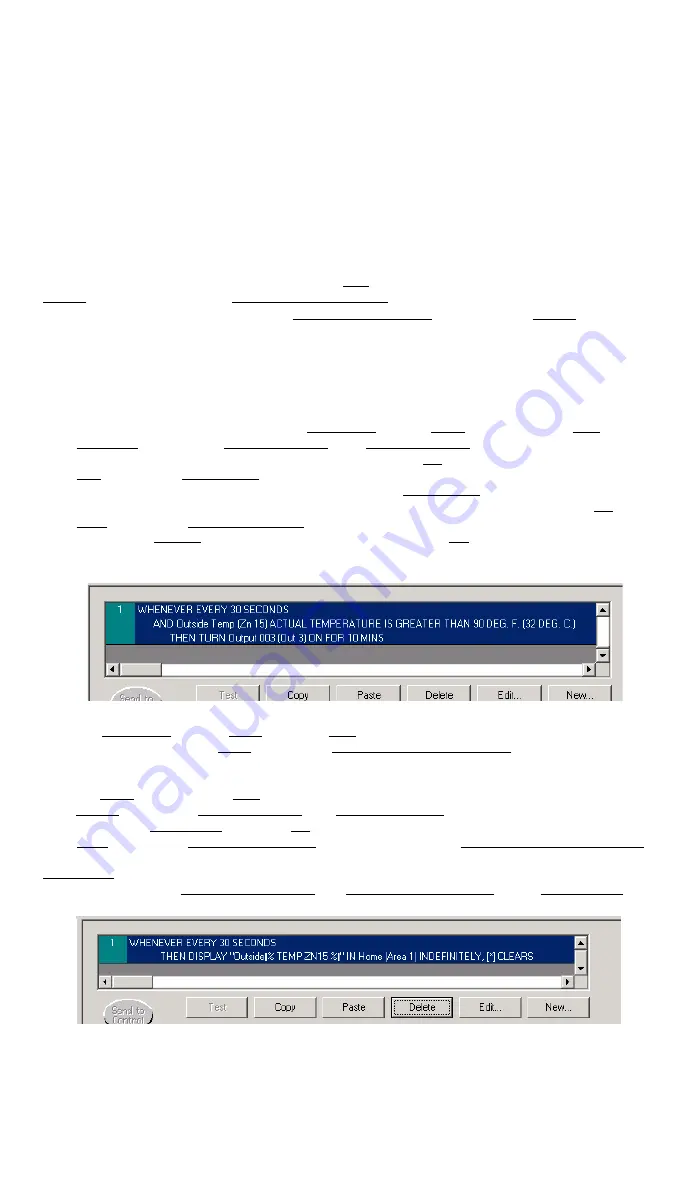
This ELK-RP Whenever/And/Then Rule example turns on
Output 3 for 10 minutes whenever the temperature exceeds 90 degrees.
1. Open the account in ELK-RP. Click on the Automation tab, the Rules tab, and then on New.
2. Click Whenever, then point to Time Occurrence, then Every X Seconds, and then click done. **
3. In the block beside the words Fixed Value, type in 30 and click OK.
4. Click And, followed by Temperature which is located near the bottom of the drop down list.
5. Highlight the temperature sensor zone (by name), click the Greater than button, and change the
temperature selection number to 90. Make sure the button beside F is selected, and click OK.
6. Click Then, followed by Turn Output On/Off. Highlight Output 3 (use the scroll down arrow), make sure
the button beside Turn on is selected, then select the box labeled For. Highlight the hrs:mins:secs
window and enter 00:10:00 (10 minutes). Click OK. Double check everything and click Done. The
Rule should resemble the example below.
Temperature Text String Displayed on a Keypad
1. From the Automation tab click Texts, then click New. In the text string box type the word
Outside
.
2. Click the down arrow on the Insert box. Select Temperature Sensor Reading from the list, then click
the down arrow on the next box. Select the temperature sensor zone by name. Click OK. The text
block should resemble:
Outside|% TEMP ZN15 %|
This causes the current temperature to display.
3. Click the Rules tab followed by New to write a rule for sending this text string to a keypad.
4. Click Trigger, followed by Time Occurrence, and Every X Seconds. Enter a value of 30 In the block
beside the words Fixed Value, then click OK. **
5. Click Then, followed by Send Text to Keypad. Make sure the button Display the following message is
selected, then choose the text
Outside|% TEMP ZN15 %|
using the drop down box and arrow.
6. Select Area must match where the keypad is located. Three (3) other options determine whether the
text message: may be Cleared with the * key, will Display for a time period, or will Beep Keypad when
the message displays. Select any options and click OK. Double check everything and click Done.
**
Numerous triggers may be used for a temperature type rule, i.e., time occurence, arming of the security system,
opening of a zone, etc. However, the Control does not allow a temperature reading to be used as a trigger. This
helps prevent a false activation "runaway" that could occur simple because the temperature has fluctuated by a
degree or fraction of a degree. Instead, the AND command is used to compare or "test" a temperature sensor
reading against a target value, each time the trigger occurs. The target value is programmable and the compare
options are "Equal to, Not equal to, Less than, and Greater than". The "Equal to" is not recommended as a compare
opton because it may be impossible for a temperature reading to be exactly at the target value when the trigger
occurs.


