background image

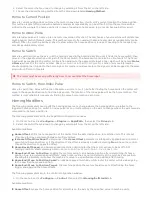
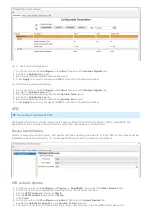
2.  Select the motor that you need to change by selecting it from the list on the left side.

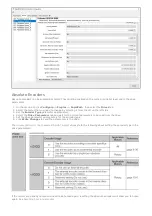
3.  Choose the desired homing method from the drop down labeled Homing Method.

Home to current position does not move the motor in any direction. It will call it's current location the home position.

This method is most often used with absolute encoders as repeatability can be difficult. Often the machine will be

scribed to show where the home position is in case of needing to home again (eg. encoder backup battery error).

Home to index pulse will create up to one motor revolution of motion. The mechanics of your machine will dictate how

much physical motion this will create. This method is most often used with absolute encoders as repeatability can be

difficult. Often the machine will be scribed to show where the home position is in case of needing to home again (eg.

encoder backup battery error).

Home to switch will move the axis in at the homing speed in the homing direction until it finds the home switch, then

moves in the opposite direction until just off the home switch. The home switch can also be a limit switch. The home

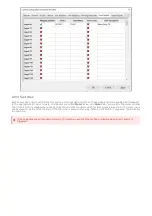
input must be mapped in the control configuration window to the appropriate input signal, which will be named Motor
# Home
, where # is the motor number. Se

Home Switches

 in the 

I/O Configuration

 section for more information

about assigning the I/O point to the home signal. For master and slave motors, the signals can be mapped to the same

I/O point or different I/O points.

Home to switch then index will function the same a

Home to Switch

, but after finding the home switch the motor will

move in the opposite direction to find the index pulse. The location of the index pulse will be the home location. This

method is most reliable for repeatedly finding the same home location each time.

The following parameters can modify the homing sequence to change where the home position is relative to the

triggered home position (i.e. switch or index pulse) or can create motion on the axis to change where the axis moves to

compared to it's home position is.

The following parameters are in the RapidPath configuration window:

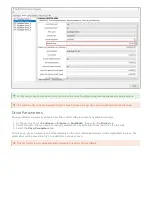
1.  On the menu bar, click Configure -> Plugins -> RapidPath, then select the Drives tab.

2.  Select the motor that you need to change by selecting it from the list on the left side.

Available modifiers:

Home Offset: shifts the home position of the motor from the detected position, in machine units. This is most

often used for slave alignment between multiple motors.

Is Home Offset Directional?: determines if the Home Offset parameter is intelligently applied based on motor

polarity and home direction, or if the direction of the offset is already included. Selecting No will have the control

choose the direction to apply the offset.

Home Backoff Speed: an absolute speed (machine units/minute) that the motor will use to back off of it's
homing condition. Most commonly used in 

Home to Switch

 or 

Home to Switch, then Index Pulse

.

Home End: Move to Position: enables the motor moving to an absolute position after determining it's home

position. Due to accelerations and offsets, many home routines do not end directly at the machine zero position.

Enabling this parameter will allow the machine to move to a specified machine position after homing.

Home End: Move to Position Speed: an absolute speed (machine units/minute) the motor will use when going

to the specified home end position.

Home End: Move to Position Target: the machine position the motor should move to after finding the home

trigger and applying the home offsets.

The following parameters are in the control configuration window:

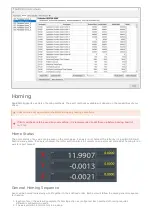
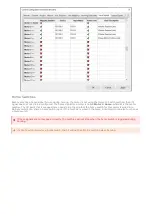
1.  On the menu bar, click Configure -> Control, then select the Homing/SoftLimits tab.

Available modifiers:

Home Offset: moves the home position for all motors on the axis by the specified value in machine units.

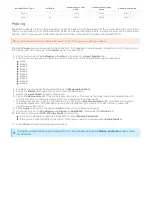
Home to Current Position

Home to Index Pulse

Home to Switch

The motor must be moving sufficiently slow to not overshoot the home input.

Home to Switch, then Index Pulse

Homing Modifiers

Summary of Contents for 2000 Series

Page 1: ...of the next node The in port of the first node is attached to the EtherCAT port on the back of the control The out port of the last node will be empty and unconnected This will create a chain of devi...

Page 2: ...he motors are labeled starting at zero The first motor is the first motor on the network and sequentially added from there All motors must be enabled before they can be assigned to an axis See the Ser...

Page 3: ...can support up to five slave motors 1 On the menu bar click Configure Control then select the Axis Mapping tab 2 Enable the needed axes by checking the checkbox in the first column next to the axis na...

Page 4: ...nd Acceleration values to fit your motor capabilities and machine comfort 4 Press Apply to save any changes For the axes to move the correct distance the counts per unit must be calibrated correctly F...

Page 5: ...ibrate 3 Select Commanded Distance 4 Enter the distance to move the axis and the feedrate to move at 5 Press the Enable button to enable the machine for motion 6 Press the Move button to start motion...

Page 6: ...move the axis a specific distance in the positive direction 5 Move the axis the same distance in the negative direction 6 The backlash value is the amount that the dial indicator is off from zero 2 On...

Page 7: ...e Parameters tab On this page you can view and edit all parameters on the drive Edited parameters will be highlighted in green The parameters can be saved to a file or loaded from a previous save At t...

Page 8: ...axis to report homed Axes can be homed individually or all together in their defined order Each axis will follow the same general sequence for homing 1 Each motor on the axis will complete it s homin...

Page 9: ...to be inside normal travel of the axis The axis does not move this distance without a separate parameter being set elsewhere Home Speed the percentage of max velocity for the axis to travel towards it...

Page 10: ...s relative to the triggered home position i e switch or index pulse or can create motion on the axis to change where the axis moves to compared to it s home position is The following parameters are in...

Page 11: ...propriately 4 Select the Drive Parameters tab and wait for the current parameters to be read from the drive 5 Set the drive parameter appropriately for the encoder type 6 Click Write Changes to send t...

Page 12: ...nes When a gcode file is loaded if any part of the toolpath renders outside of the soft limits check your file or fixture offsets First Homing If homing is incorrectly configured the machine could cra...

Page 13: ...imits on the desired axes by checking theSoft Enable checkmark on their row 7 Enter the corresponding recorded positions for each axis intoSoft Min and Soft Max Soft Min must be less thanSoft Max Zero...

Page 14: ...minal will be one the top right terminal will be two All terminals will be marked on the slice So the full path to an example I O point would be EK1100 1 DO 03 04 which translates to the first coupler...

Page 15: ...e motor number The I O point that is mapped here needs to be the one that the limit switch for that motor is wired into The same input can be used for both ends of an axis if the machine is wired in t...

Page 16: ...t is mapped here needs to be the one that the home switch for that motor is wired into Multiple motors can share a home switch input if the machine is wired in that way A limit switch can also functio...

Page 17: ...oint from the drop down 5 Select the Output Name from the drop down 6 Check the Active Low box if the output is wired active low This means the signal will be active when the I O point is low 7 Give t...

Page 18: ...ling 1 On the menu bar click Configure Control then select the Analog Inputs tab For analog outputs select the Analog Outputs tab instead 2 Select the Device that owns the I O point from the drop down...

Page 19: ...ignal and if the signal is or only positive voltage The maximum value for the signal range will be 2 bits 1 and the minimum value will either be 0 or 2 bits 1 For the 16 bit 0 10V that works out to 2...

Page 20: ...bled 4 Select the Device that owns the I O point from the drop down 5 Select the Input Name from the drop down 6 Check the Active Low box if the input is wired active low This means the signal will be...

Page 21: ...put signals can be turned on manually by double clicking on them in the list I O points can be manually added to the I O list 1 Right click on the list and selectConfigure Widget 2 Select the device t...

Page 22: ...are for configuring a servo spindle as the main spindle on the machine Some machines such as centerless grinders may be using a servo spindle as an auxiliary spindle or subspindle See Auxiliary Spindl...

Page 23: ...t the Input Signals tab 12 Enable the Spindle At Speed and the Spindle At Zero signals 13 The device name for both signals will be the same name that was in the RapidPath spindles device list 14 Map S...

Page 24: ...ary 5 Set the Max Motor Speed RPM appropriately for your motor 6 Click Close RapidPath has support for one analog spindle which must be the main spindle 1 Properly map the analog output in the control...

Page 25: ...Ds V1000 A1000 GA500 and GA800 The RapidPath motion controller can also work in conjunction with modbus controlled VFDs Similar to servo drives and couplers VFD objects will index up along the network...

Page 26: ...set 2 Type an RPM into the spindle speed DRO on the main page 3 Press FWD or REV on the operator panel 4 The light on the button will blink until the spindle gets up to speed then turn solid 5 Press S...

Page 27: ...Select I O for the type field 3 Select the name of your VFD for the second field 4 Select IoDeviceReverse for the third field 5 Click OK to save your setting 9 Set the Sub Spindle CW Output parameter...

Page 28: ...al for the second field It will show the user description if one was added 4 Click OK to save your setting 10 Set the parameters for Grind Wheel Max Speed Range 0 Grind Wheel Max Speed Range 1 and Gri...

Page 29: ...to appropriately for your device 10 Set the Regulating Wheel Input parameter to the input signal that has the At Speed input mapped to it 1 Double click the value field to open a selector window 2 Se...

Page 30: ...Click Save to save your settings and close the window There are many custom configurations available for all machine types Some more common options are covered below Full documentation for setting up...

Page 31: ...terface tab 2 Select the operator panel or pendant you want to configure from the list on the left Some operator panels will list the available function buttons on the screen Others will have a Custom...

Page 32: ...s EtherCAT Commanded Position Core Commanded Position Actual Position Position Error Current Motor RPM Current Motor Torque Percentage All positions are listed in encoder counts The network diagnostic...

Page 33: ...aligned to prevent runaway motion when enabling This page has a button for each axis to sync it s motors If an axis has no slaved motors the button will not be enabled When an absolute encoder alarm...

Reviews: