background image

40 

Chapter 7    SCPI Command Reference 

7.1    SCPI Language Profile 

SCPI (Standard Command for Programmable Instruments) is an ASCII-based instrument programming language 

for test and measurement instruments. SCPI commands use a hierarchical structure, also known as a tree system. 

The related commands are grouped into a shared node or root, which forms the subsystem. The following section 

of the SENSe subsystem illustrates this. 

SENSe: 

VOLTage: 

                              DC:RANGe {<range>|MIN|MAX|DEF} 

                              DC:RANGe? [MINimum|MAXimum|DEFault] 

SENSe is the root level keyword of the command, VOLTage is the second level keyword, and DC is the third level 

keyword. The colon (: ) separates consecutive keywords. 

7.1.1    Grammatical conventions 

The command syntax is as follows: 

VOLTage: DC:RANGe {<range>|MIN|MAX|DEF} 

Most  commands  (and  some  parameters)  are  a  mixture  of  uppercase  and  lowercase  letters.  Uppercase  letters 

indicate  abbreviations  for  commands,  making  program  lines  shorter.  Long  format  commands  can  be  used  for 

better program readability. 

For  example,  consider  the  keyword  VOLTage  in  the  previous  section.  You  can  type  VOLT  or  VOLTage  with  a 

combination of uppercase and lowercase letters. Therefore, VolTaGe, volt and Volt are acceptable. Other formats, 

such as VOL and VOLTAG, will generate an error. 

Braces ({ }) contain parameter options. Braces are not sent with the command string. 

The  vertical  line  (|)  separates  the  parameter  selection.  For  example,  {<range>|MIN|MAX|DEF}  in  the  above 

command indicates that you can specify a numeric range parameter or "MIN", "MAX" or "DEF". The bar chart is 

not sent with the command string. 

The angle brackets (< >) indicate that a value must be specified for the parameters in parentheses. For example, 

the above syntax statement indicates the <range> parameter in angle brackets. The angle brackets are not sent with 

the command string. You must specify a value for this parameter (for example "VOLT:DC:RANG 10") unless you 

select one of the other options shown in the syntax (for example "VOLT:DC:RANG MIN"). 

Optional parameters are placed in square brackets ([ ]). Square brackets are not sent with the command string. If 

you do not specify a value for an optional parameter, the instrument will use the default value. 

7.1.2    Command separator 

The  colon  (:  )  separates  consecutive  keywords.  Spaces  must  be  inserted  to  separate  the  parameters  from  the 

command keyword. If a command requires multiple parameters, separate the adjacent parameters with a comma: 

CONF: VOLT: DC 10, 0.003 

A semicolon (;) separates two commands in the same subsystem and minimizes input. For example, the following 

string: 

TRIG: SOUR EXT; COUNT 10 

Equivalent to the following two commands: 

Summary of Contents for ST1963

Page 1: ...SOURCETRONIC Quality electronics for service lab and production ST1963 6 Digit Multimeter User Manual...

Page 2: ...urement 14 3 2 1 DC Voltage 14 3 2 2 DCV Ratio 15 3 2 3 AC Voltage 15 3 2 4 DC Current 17 3 2 5 AC Current 18 3 2 6 Resistance 2W 19 3 2 7 Resistance 4W 21 3 2 8 Capacitance Measurement 22 3 2 9 Diode...

Page 3: ...MIN MAX and DEF parameters 41 7 1 4 Query Parameter Settings 41 7 1 5 Parameter Type 41 7 2 Subsystem commands 42 7 2 1 CONFigure Subsystem 42 7 2 2 MEASure subsystem 45 7 2 3 TRIGger subsystem 48 7 2...

Page 4: ...750V peak value of 1000V AC DC voltage from 1 V to 750V RMS DC current from 10nA to 10A AC current from 10nA to 10A Resistance measurement from 0 01m to 120M Frequency from 2Hz to 1MHz Some additional...

Page 5: ...ally before shipment After unpacking all items from the shipping carton please check for any obvious signs of physical damage that may have occurred during transportation Report any damage to the ship...

Page 6: ...y to fuses software or problems arising from normal wear or failure to follow instructions THIS WARRANTY IS IN LIEU OF ALL OTHER WARRANTIES EXPRESSED OR IMPLIED INCLUDING ANY IMPLIED WARRANTY OF MERCH...

Page 7: ...0020 0 0006 0 0030 0 0007 0 0040 0 0007 0 0005 0 0001 10 00000V 10uV 0 0015 0 0004 0 0020 0 0005 0 0035 0 0005 0 0005 0 0001 100 0000V 100uV 0 0020 0 0006 0 0035 0 0006 0 0045 0 0006 0 0005 0 0001 100...

Page 8: ...re coefficient C Continuity 1k 1mA 0 002 0 030 0 008 0 030 0 010 0 030 0 0010 0 0020 Diode test specification Function Range Test current 24 hours TCAL 1 C 90 days TCAL 5 C 1 year TCAL 5 C Temperature...

Page 9: ...035 0 006 10Hz 5kHz 0 10 0 04 0 10 0 04 0 10 0 04 0 015 0 006 5kHz 10kHz 0 30 0 04 0 30 0 04 0 30 0 04 0 030 0 006 3A range 2 0V 3Hz 5Hz 1 00 0 02 1 00 0 02 1 00 0 04 0 100 0 006 5Hz 10Hz 0 35 0 02 0...

Page 10: ...stance measurements When zero clearing is not activated the 2 wire resistance measurement will introduce an additional error of 0 2 9 Specifications are valid when the sine wave input is 0 3 of the ra...

Page 11: ...Reading rate at 60 Hz and 50 Hz operating conditions turning off auto zero within a fixed range 2 The number of display digits in the case of automatically displaying the number of digits If a fixed n...

Page 12: ...100 Default 10 PLC Automatically adjusts the range by default NPLC 0 02 0 2 1 10 100 Default 10 PLC Auto zero setting OFF or ON default ON ACV ACI To configure the ACV AC voltage Range Auto default 1...

Page 13: ...separately Shift Cont diode Diode configuration Test voltage range 0 5V Test current 1mA Buzzer ON default or OFF CAP MATH Capacitance measurement configuration Range Auto default 1nF 10F 100nF 1uF 10...

Page 14: ...automatically selects the appropriate range for measurement based on the input signal The auto range is adjusted upwards to 120 of the current range and down to 10 of the current range Step 4 Set the...

Page 15: ...integration time The red mark is indicating the auto zero is ON If the OFF state is required it will change from ON to OFF as long as the corresponding button is pressed The default state is ON Step 6...

Page 16: ...eter s ACV input or when the signal has been connected enough extra delay should be given to stabilize the signal If the DC bias remains the same a completely accurate subsequent measurement can be ma...

Page 17: ...test signal If you select 10A input terminal there is only 10A range If you select 3A input terminal there are multiple ranges At this time you can select auto range test The range that can be select...

Page 18: ...g This avoids the effect of the offset voltage in the input circuit of the digital multimeter on the measurement accuracy In the case of auto zeroing the digital multimeter measures the offset once an...

Page 19: ...ose should be less than the frequency of your test signal In order to get stable data faster the filter is best chosen to be close to the test frequency of your input signal For example if the input s...

Page 20: ...he measurement 1PLC 10PLC 100PLC can inhibit the power supply noise Selecting 100PLC can provide the best noise rejection but at a slower rate Step 5 Auto Zero Auto zeroing results in more accurate te...

Page 21: ...ange for measurement based on the input signal The auto range is adjusted upwards to 110 of the current range and down to 10 of the current range Step 4 Set the integration time The setting of the int...

Page 22: ...nt panel to enter the capacitance test interface Step 3 Select the range Press Range and select the range Auto range Auto can automatically selects the appropriate range for measurement based on the i...

Page 23: ...panel to enter the capacitance test interface Beeper is the switch menu of the buzzer If it is ON the buzzer is turned on When converted to a 0 3V to 0 8V threshold the instrument beeps if a beep is...

Page 24: ...ollows Step 2 Press Cont on the front panel to open a menu that specifies whether the digital multimeter will beep to indicate the continuity The continuity measurement method is as follows 10 Display...

Page 25: ...a zero measurement With auto zero enabled the digital multimeter internally measures the offset after each measurement This prevents the offset voltage on the digital multimeter DMM input circuit fro...

Page 26: ...signal The auto range is adjusted upwards to 110 of the current range and down to 10 of the current range Step 4 AC Filter Selection The instrument offers three filter options of 3Hz 20Hz and 200Hz T...

Page 27: ...not display the secondary display BeforeMath Display the raw data before math calculations AC Voltage Display the measured voltage Period Display the period in frequency measurement Frequency Display...

Page 28: ...d the minimum Min maximum Max peak to peak P P average Average standard deviation Std dev and total number of samples in the current reading buffer The reading buffer can hold up to 10 000 data When t...

Page 29: ...f reading Y on screen is performed as follows Where X is the reading that would normally be displayed on screen m and b are the user entered values Y is the actually displayed result 4 7 Percent If th...

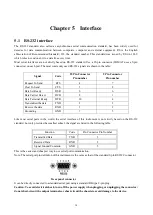
Page 30: ...arrier Detect DCD 8 1 Data Terminal Ready DTR 20 4 Transmitted the data TXD 2 3 Receive the data RXD 3 2 Grounding GND 7 5 Like most serial ports in the world the serial interface of this instrument i...

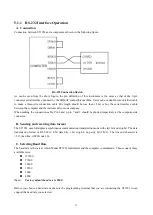
Page 31: ...connection cable Pin 4 and 6 pin 7 and 8 should be shorted respectively at the computer side connector B Sending and receiving data format The ST1963 uses full duplex asynchronous communication trans...

Page 32: ...character from the serial interface at the same time So any character sent by controller will be ignored In order to make sure the whole command is sent and received correctly any character without a...

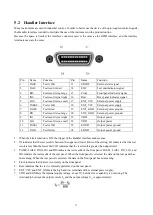
Page 33: ...LO1 Test result is too small 22 VDD Output power 11 PASS1 Test is OK 23 EGND Output power ground 12 FAIL1 Test failed 24 EGND Output power ground 1 When the Limit function is ON the trigger of the Ha...

Page 34: ...width of T1 to trigger the test The difference between edge trigger and pulse width trigger edge trigger only needs the corresponding edge and then delay a period of time longer than the set delay tim...

Page 35: ...hock turn off the power supply when plugging or unplugging the connector do not short circuit the output terminals or short circuit with the chassis to avoid damage to the device 5 3 1 USB Host The in...

Page 36: ...ol command system is open so that user can use the PC operation interface provided by ST1963 or take measurements by the control command system The control command system supports most functions of th...

Page 37: ...nction the MTA is cancelled no listening function RL1 Remote control local function DC1 Device clear function DT1 Device trigger function C0 No controller function E1 Open collector drive 5 5 2 Settin...

Page 38: ...cal control and the buttons on the panel are active DCL CLEAR Clear all instrument input and output buffers SDC CLEAR 8 Clear the input and output buffer of ST1963 GET TRIGGER 8 Trigger the instrument...

Page 39: ...the buzzer and brightness Press Menu Utility System User Settings to enter into the setup menu to set the sound and brightness Beeper and Key Click are independent of each other and do not affect eac...

Page 40: ...rmats such as VOL and VOLTAG will generate an error Braces contain parameter options Braces are not sent with the command string The vertical line separates the parameter selection For example range M...

Page 41: ...OUN MIN TRIG COUN MAX 7 1 5 Parameter Type The SCPI language defines several data formats used for program information and response information 7 1 5 1 Numerical Parameter Commands that require numeri...

Page 42: ...ouble quotes can be used The quote delimiter can also be part of a string just type it twice and don t add any characters in the middle The following command uses string parameters DISPlay TEXT quoted...

Page 43: ...mpty state of each function Forbidden 7 2 1 1 CONFigure Description Returns a quoted string indicating the current function range and resolution Syntax CONFigure Parameters none Example conf Typical r...

Page 44: ...A 10 A Default AUTO Example CONF CURR AC 100m 7 2 1 6 CONFigure CONTinuity Description Configure the instrument for continuity measurement setting all measurement parameters and trigger parameters to...

Page 45: ...t parameters and trigger parameters to default values Syntax CONFigure PERiod range MIN MAX DEF Parameters range 100m 1 10 100 750 Default AUTO Example CONF PER 10MA 7 2 1 12 CONFigure TEMPerature Des...

Page 46: ...o default values Syntax MEASure VOLTage AC DC range AUTO MIN MAX DEF Parameters AC range 100m 1 10 100 750 Default AUTO DC range 100m 1 10 100 1000 Default AUTO Example MEAS VOLT DC 100 Typical respon...

Page 47: ...100 1k 10k 100k 1MA 10MA 100MA Default AUTO Example MEAS FRES 100 Typical response 8 53210000E 01 7 2 2 6 MEASure FREQuency PERiod Description Configure the instrument to perform frequency or period...

Page 48: ...the trigger system from idle to wait for trigger and then clears the previous set of measurement result from the reading memory When the specified trigger condition is met after receiving the INIT com...

Page 49: ...3 4 R Description Read and erase all measurements from the reading memory Syntax R Parameters none Example R Typical response 4 98748741E 01 4 335163427E 01 4 33118686E 01 3 48109378E 01 7 2 3 5 READ...

Page 50: ...ce type Example Return ten sets of five DC voltage measurements and start each measurement group with an external trigger CONF VOLT DC SAMP COUN 5 TRIG COUN 10 TRIG SOUR EXT READ Typical response 1 00...

Page 51: ...170000E 00 4 27200000E 00 7 2 3 10 SAMPle COUNt Description Specifies the number of measurements number of samples taken each time the instrument is triggered You can use the specified sample count wi...

Page 52: ...ited by the filter cutoff frequency The 3Hz filter only supports slow SLOW the 20Hz filter supports slow SLOW and medium speed MEDium and the 200Hz filter supports slow SLOW medium speed MEDium and fa...

Page 53: ...MAX SENSe VOLTage DC NPLC MIN MAX DEF Parameters plc 0 02 0 2 1 10 100 Example VOLT NPLC 10 7 2 4 7 SENSe VOLTage DC IMPedance AUTO Description Enable or disable the automatic input impedance mode fo...

Page 54: ...quencies result in longer settling times Syntax SENSe CURRent AC BANDwidth filter MIN MAX SENSe CURRent AC BANDwidth MIN MAX DEF Parameters filter 3 20 200 Default 20 Example CURR AC BAND 200 7 2 5 2...

Page 55: ...N OFF SENSe CURRent AC DC RANGe AUTO Parameters ON 1 OFF 0 Example CURR AC RANG AUTO ON 7 2 5 6 SENSe CURRent AC DC TERMinals Description Enable or disable autoranging for AC and DC current measuremen...

Page 56: ...reads a new zero reading whenever you change the function range or integration time Syntax SENSe CURRent DC ZERO AUTO ON OFF SENSe CURRent DC ZERO AUTO Parameters ON 1 OFF 0 Example CURR ZERO AUTO ON...

Page 57: ...SENSe RESistance FRESistance SECondary Parameters OFF BEForemath Example RES SEC BEF 7 2 6 5 SENSe RESistance ZERO AUTO Description Enable or disable the auto zero mode for 2 wire resistors ON The DMM...

Page 58: ...ed by this command the instrument selects a slow 3 Hz medium 20 Hz or fast 200 Hz filter Specify the lowest frequency you want to encounter Lower frequencies result in longer settling times Syntax SEN...

Page 59: ...he measurement speed is slower Syntax SENSe TEMPerture NPLC plc MIN MAX SENSe TEMPerture NPLC MIN MAX DEF Parameters plc 0 02 0 2 1 10 100 Example TEMP NPLC 10 7 2 8 2 SENSe TEMPerture TRANsducer FRTD...

Page 60: ...it from affecting the measurement accuracy OFF The instrument uses the last measured zero return measurement and subtracts it from each measurement It reads a new zero reading whenever you change the...

Page 61: ...itance SECondary Parameters OFF BEForemath Example CAP BEF 7 2 10 SYSTem Subsystem I O Configuration 7 2 10 1 SYSTem COMMunicate RS232 BAUDrate Description Set the serial port baud rate Syntax SYSTem...

Page 62: ...T COMM LAN DNS1 192 168 1 4 7 2 10 6 SYSTem COMMunicate LAN GATeway Description Set the default route for the instrument Syntax SYSTem COMMunicate LAN GATeway address SYSTem COMMunicate LAN GATeway Pa...

Page 63: ...mmand 7 2 11 1 SYSTem BEEPer IMMediate Description Issue a single beep Syntax SYSTem BEEPer IMMediate Parameters none Example SYST BEEP 7 2 11 2 SYSTem BEEPer STATe Description Disable or enable the b...

Page 64: ...SYSTem DATE Syntax SYSTem TIME hour minute second SYSTem TIME Parameters hour 0 23 minute 0 59 second 0 59 Example SYST TIME 13 59 10 7 2 11 6 SYSTem VERSion Description Query the current software ver...

Page 65: ...n See 7 3 12 for the possible value of function To use a null value you must turn on the null state function NULL STATe ON Specifying a null value disables automatic null selection function NULL VALue...

Page 66: ...formed by the calibration function The DB performs a relative dB calculation The result is the difference between the input signal and the stored DB relative reference value CALCulate SCALe DB REFeren...

Page 67: ...tax CALCulate SCALe OFFSet offset CALCulate SCALe OFFSet Parameters offset Example CALC SCAL OFFSet 5 7 2 14 6 CALCulate SCALe REFerence Description Sets the reference value for the PCT function in CA...

Page 68: ...UPPer DATA Description Set the upper limit of the limit test Syntax CALCulate LIMit UPPer DATA value CALCulate LIMit UPPer DATA Parameters value set upper limit Example CALC LIM UPP 50 7 2 15 3 CALCul...

Page 69: ...me the statistics were cleared The query CALCulate AVERage ALL do not return the counts and peak to peak statistics The other six queries listed above return a single value 7 2 16 8 CALCulate AVERage...

Page 70: ...www sourcetronic com SOURCETRONIC GMBH Fahrenheitstrasse 1 28359 Bremen Germany T 49 421 2 77 99 99 F 49 421 2 77 99 98 info sourcetronic com www sourcetronic com skype sourcetronic...

Reviews: