2–16
Chapter 2: Getting Started with the Stratix V Hard IP for PCI Express
Qsys Design Flow
Stratix V Hard IP for PCI Express
June 2012
Altera Corporation
f
For more information about Avalon interfaces, refer to the
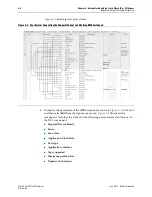
3. Connect the following Avalon Conduit interfaces using the technique described in
■
lmi
■
config_tl
■
power_mgmt
■
hip_status
■
rx_bar_be
■
tx_cred
■
hip_rst
■
reconfig_to_xcvr
■
reconfig_from_xcvr
■
int_msi
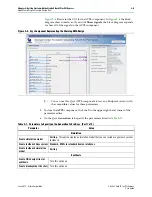
4. Follow these steps to connect the clocks:
a. In the
Clock
column right-click on the DUT
pld_clk
interface and select
APPS.pld_clk_hip
from the
DUT.pld_clk Connections
list.
b. To connect the APPS
pld_clk_hip
interface to the DUT
pld_clk
interface,
right-click on
APPS.pld_clk_hip
and select
DUT.pld_clk
from the
APPS.pld_clk_hip Connections
list.
c. To connect the DUT
coreclkout_hip
interface to the APPS
coreclkout_hip
interface, right-click on
DUT.coreclkout_hip
and select
APPS.coreclkout_hip
from the
DUT.coreclkout_hip Connections
list.
5. To save your work, on the File menu, select
Save
and type
pcie_de_gen1_x8_ast128
r
in the Save dialog box.
6. To remove the default clock, on the
System Contents
tab, click
clk_0
and then click
the
X
button.
Generating the Simulation Model Using Qsys
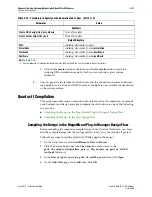
Follow these steps to generate the chaining DMA testbench:
1. On the Qsys
Generation
tab, specify the parameters listed in
Table 2–15. Parameters to Specify on the Generation Tab in Qsys (Part 1 of 2)
Parameter
Value
Simulation
Create simulation model
Verilog
Create testbench Qsys system
Standard, BFMs for standard Avalon interfaces or None
Create testbench simulation model
Verilog

