background image

 
Method 2: Compiling a .hex from source 
 

This method is a bit more involved, especially on Windows. We recommend compiling from 

source in the following cases: 
 

1. You want to create new firmware retaining Unicode input or other functionality supported 

by TMK but not by the Keyboard Firmware Builder site 

2. You are familiar with C and/or Makefiles, including the necessary dev tools 
3. You are curious what the source code used to create Mathkeeb’s firmware looks like 


Before modifying any Mathkeeb keymap files you will need to set up a development 

environment. Linked below is the documentation website for TMK, the open-source firmware 
builder tool on which Mathkeeb and many other custom keyboards are based.  


https://github.com/tmk/tmk_keyboard/blob/master/tmk_core/doc/build.md


Click this link and follow Step 1: Install Tools. After doing this, you should have the necessary 
“toolchain” to compile a .hex for Mathkeeb. Note that the Mathkeeb does use the PJRC Teensy, and 
you will need the Teensy Loader to flash any new .hex files onto Mathkeeb (this is covered in the 
“Reprogramming” section above). 
 
You do not need to bother with Step 2, as all of the source files for Mathkeeb are provided as a .zip 
on the advanced users page of our website. All you need to do is download and extract this .zip to a 
location of your choice. 
 

NOTE:

 You should avoid working in a directory that has spaces in the file path (e.g. “Program Files”) 

as this can cause problems. Stick to a path like C:\Users\Apogee\... instead. 
 

For most changes that you might want to make to Mathkeeb’s layout, you will need to open 

and edit one of the keymap.c files. Which one you choose will depend on your operating system: the 
keymap.c located in the ‘windows’ folder has macros for Alt codes, whereas the one in the ‘linux’ 
folder has macros for Unicode input. 
 
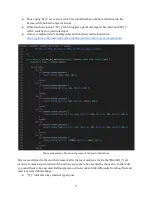
First, open the keymap.c file in your text editor of choice. You should see something similar to the 
figure below. What you are looking at is each layer of Mathkeeb, expressed as a matrix of keycodes. 
You will notice that the default firmware only uses the first 8 layers, although TMK supports a 
maximum of 32 layers. 

Summary of Contents for Mathkeeb

Page 1: ...Mathkeeb Advanced User s Guide 2019 2020 edition...

Page 2: ...Table of Contents Table of contents Welcome Getting Started page number 1 2 Reprogramming Custom Firmware Troubleshooting 3 5 10 1...

Page 3: ...you ve decided to take the next step and download the Advanced Users Kit With this kit you will be able to load different hex files onto the keyboard s controller allowing it to speak different langu...

Page 4: ...pressing a few buttons The first button is located on the Mathkeeb itself To access this button flip the keyboard over and set it down on its keys You should see a small pinhole near the usb port at...

Page 5: ...rd Finally you can press the third button with the green arrow pointing to the right to reboot the keyboard NOTE you will have to unplug the Mathkeeb and plug it back in to turn it back on You should...

Page 6: ...Firmware Builder Why these recommendations The Linux MacOS version of Mathkeeb s firmware types certain symbols using Unicode input This option while supported by the TMK firmware base is not availab...

Page 7: ...ate to the SETTINGS tab Here you can rename your new layout and download a new json file using the Save Configuration button NOTE always save your json file It will be required if you wish to edit you...

Page 8: ...y and you will need the Teensy Loader to flash any new hex files onto Mathkeeb this is covered in the Reprogramming section above You do not need to bother with Step 2 as all of the source files for M...

Page 9: ...c files using VSCode There are different types of keycodes Ones beginning with KC_ are letters or symbols that would appear on a normal keyboard KC_TRANS indicates that the key is transparent and will...

Page 10: ...ound here https github com tmk tmk_keyboard blob master tmk_core doc keymap md The same keymap c file showing some of the macro definitions Macros are defined in the switch statement after the layer m...

Page 11: ...types f x etc We are not really sure if there is a maximum number of macros allowed so if you would like to test that and make 100 macros please be our guest and let us know how it goes When satisfie...

Page 12: ...layer and that your layer toggle functions are on the right keys Q Key is acting like it s held down even though I only pressed it once A Double check your macros You may have accidentally used the h...

Reviews: