background image


User’s Guide

following. 


ƒ


Set the motor torques to one fourths of its max value. 

ƒ


Set the motor speeds to one eighths of its max value. 

ƒ


If the U button is pressed, move the arm up. 

ƒ


If the D button is pressed, move the arm down. 

ƒ


If the L button is pressed, turn the AUX LED off and release the power in the arm. 

ƒ


If  the  R  button  is  pressed,  turn  the  AUX  LED  back  on  and  engage  power  back  to 

the arm. 


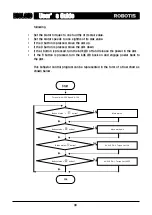
This behavior control program can be represented in the form of a flow chart as 

shown below. 


Start 

Torque limit 

Å

 256, Speed 

Å

 128 


End 

Button status = 

 button?

Button status = 

button?


Button status=

 button?


Button status = 

button?


Move arm up 

Move arm down


AUX LED 

Å

0, Torque limit 

Å

0


AUX LED 

Å

1, Torque limit 

Å

255


Yes 

No 

Yes 

No 

Yes 

No 

Yes 

No 

39

Summary of Contents for Robotis

Page 1: ...Ver 1 00 BIOLOID User s Guide Closer to Real...

Page 2: ...tines Page 35 3 4 Assembling Robot Arm Page 37 4 Behavior Control Programmer 4 1 Opening a File Page 43 4 2 Editing Function of the Behavior Control Programmer Page 44 4 3 Syntax of the Behavior Contr...

Page 3: ...Controlled by the RF Wireless Remote Control Page 105 8 Management Mode 8 1 Setting the ID and Dynamixel Search Page 108 8 2 Other Commands Page 111 9 Information for Advanced Users 9 1 Boot Loader Pa...

Page 4: ...r finger be caught between the joints The product is not waterproof so be cautious when handling near water Only operate the robot indoors Do not operate or store it in under direct sunlight Do not op...

Page 5: ...e robot on the ground If the robot is damaged due to a fall it will be ineligible for free repair The joints of the robot and the gears inside the Dynamixel are susceptible to wear After a period of t...

Page 6: ...rms of robots can be built Examples of Bioloid Robots Function With the use of a distance sensor sound sensor and feedback from the joints the robot can be programmed to operate autonomously For examp...

Page 7: ...s the robot units The Dynamixel can be connected together with the use of the frame Also the frame connects the Dynamixel and the CM 5 Software There are three pieces of software supplied for use with...

Page 8: ...t five chapters are intended for beginners The User s Guide presents examples of developing the Robot Arm and the Walking Droid two legged robot Once you have completely understood the User s Guide yo...

Page 9: ...e the behavior control program of the robot Behavior control is simply telling the robot to take some kind of action when it enters a certain state For example when the robot is walking forward throug...

Page 10: ...r Windows XP Required CPU Intel Pentium III 1GHz or AMD Athlon XP 1GHz or higher Recommended RAM 256MB or higher Recommended Graphic Card 3D acceleration function Direct 3D supported Required HDD free...

Page 11: ...6 CABLE 6 CABLE 10 2 Nuts screws and cables shown below are the same as the actual size Place and measure the parts against the below illustration to choose the correct assembly part STICKER 32 S3 20...

Page 12: ...ables shown below are the same as the actual size Place and measure the parts against the below illustration to choose the correct assembly part STICKER 32 S3 20 F2 10 F4 6 F5 6 F6 12 F9 5 F10 20 F11...

Page 13: ...ess the mode change button the mode LED will change sequentially Currently it is in standby mode Operating Modes The operating modes of the CM 5 unit is as follows Manage mode This is used when you wa...

Page 14: ...serial port thus you will have to purchase and use a USB to serial converter device USB2Serial can be purchase at local computer stores Status Display LED There are the four LEDs that indicate the sta...

Page 15: ...rol program Installation You can install following three programs Behavior Control Programmer Motion Editor Robot Terminal The following screen appears when you run the behavior control programmer Inp...

Page 16: ...em 2 occurs then execute output B Thus understanding what types of input and output items are available is important to writing a behavior control program Learning how to use the Bioloid is to learn a...

Page 17: ...h purposes in Behavior Control Programmer AUX LED Start button Mode button Direction buttons Top view of the CM 5 Let s create a behavior control program as the following Make a program that will turn...

Page 18: ...TART command does not instruct a specific action but rather it tells that the program is starting You can see that the first cell is used for commands There are around ten commands that are available...

Page 19: ...ommand If compares two items so it requires several parameters Let s implement the input command IF U is pressed using several parameters IF button status U button then As mentioned earlier in order t...

Page 20: ...uble click the parameter on the opposite side and check the location of the U button The next step is to select the operator that compares the two parameters Select the equal sign Finally select the u...

Page 21: ...seems difficult at first but after practicing several times it should become natural Load The behavior control program expresses the command Turn on the LED as Load LED 1 Loading 1 mean ON and loading...

Page 22: ...shift button and click on a sentence and then another sentence down the list then both sentences and all the sentences between the two will be selected altogether After you have selected the sentences...

Page 23: ...at we have done so far To save a program you can either use the menu or click on the tool bar icon Saving is done in the same way as in any other computer program The figure below shows how this is do...

Page 24: ...con The following dialog box will show up If the CM 5 unit and the behavior control programmer are not connected properly then the following error message will show up In such cases check the followin...

Page 25: ...all and the robot is still in standby mode But actually the robot did indeed enter the play mode for a very short period of time and then exit back to the standby mode Program Editing If you think abo...

Page 26: ...mple Button and LED bpg from the provided CD This file is the source file for the example shown above TIP We have pressed the play button and execute the program by entering the play mode while the PC...

Page 27: ...addresses Data Data is the value of each input and output item If you look at the behavior control program created previously Button and LED bpg you can see that the LED is located in the LED item Add...

Page 28: ...t ou tput 26 Wireless data to be sent Wireless data to be sent input ou tput 28 Received wireless data Received wireless data input 30 New wireless data Arrival of new wireless data When received 1 wi...

Page 29: ...ance sensor Input 28 Value of right side distance sensor Value for sensing distance of right side distance sensor Input 29 Left side light brightness Value for left side light brightness Input 30 Cent...

Page 30: ...ler data Input 50 Remote controller data to be sent The value of remote controller data to be sent Input Output 52 Standard value of distance for the distance sensor Becomes the standard for the data...

Page 31: ...23 Input Output 36 Current position Value of current position 0 1023 Input 38 Current speed Value of current speed 0 1023 Input 40 Current load Value of external load 0 1023 Input 42 Supplied voltage...

Page 32: ...wever the robot will also become heavy and slow and will become hard to operate The recommended size of a Bioloid robot is as follows Robot weight No heavier than 2 kg Robot height No higher than 350...

Page 33: ...of the problems that may occur latter problem mostly occurs due to users wanting to assemble robot in uncluttered fashion wiring the cable in narrow joint s space Also self made cables are often the c...

Page 34: ...shows how the connector expansion board is used in wiring Connector expansion board Arrangement of Pins The figure below shows how the pins on a Dynamixel unit are arranged Two of the connectors insi...

Page 35: ...ent flow affecting joint adversely for instance it may burn out the fuse in CM 5 You can check whether the horn is assembled correctly by taking a closer look at the groove of both horn and AX 12 Addi...

Page 36: ...item onto print screen As we need to examine the values in detail execute the print repeatedly After downloading and running above program bring your hands closer You will get the following results D...

Page 37: ...e all connected properly After you are finished building the arm apply power to the CM 5 unit Plug in the power jack into the SMPS and turn the power switch on The blinking of the Dynamixel s LED mean...

Page 38: ...rging Low Battery Sign The power LED will blink when the robot is low in battery power Let s create a behavior control program that makes the robot arm do the following Set the Dynamixel so that it ca...

Page 39: ...AUX LED off and release the power in the arm If the R button is pressed turn the AUX LED back on and engage power back to the arm This behavior control program can be represented in the form of a flo...

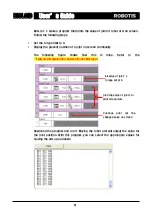
Page 40: ...written here are only for the user It will not affect the execution of the program The following figure shows the comments for the flow chart from above You can slove the problem step by step if you...

Page 41: ...lowing figure shows how this is done Refer to the Examples Example Joint position Robot Arm bpg Download the program and run it Moving the robot arm will output the value for the joint position With t...

Page 42: ...e of joint position ID 3 860 Appropriate joint position values for moving down the arm Value of joint position ID 1 512 Value of joint position ID 2 815 Value of joint position ID 3 512 Input these va...

Page 43: ...ave Open New file Recent file New This function creates a new behavior control program file Several program files can be opened at the same time and copying and pasting between files is possible Open...

Page 44: ...ing of the sentence To select several sentences at the same time press the SHIFT key and click on the numbers The following figures show how this is done Step 1 Click on the line number at the beginni...

Page 45: ...ng the paste function Interval that has been cut Copy When you copy a sentence it might look like nothing is happening but actually the selected sentences are being saved To use paste function it can...

Page 46: ...nsert Insert Instruction in two lines selected state makes two blank line Erase Use this function when you want to delete a sentence Parameter input If you double click a block for the parameters the...

Page 47: ...n inputting a variable type in an appropriate variable name Just remember that for the variable names the first word has to start with a letter numbers 0 9 should not be used as the first character Af...

Page 48: ...uide Correcting To correct an element of a parameter command after you are done editing first left click the sentence that you want to correct and then right click to see the first menu again to corre...

Page 49: ...ntence The basic unit of a behavior control program is the command sentence Each line tells what the robot should do Command sentence Inputting a Sentence You can create a command sentence by clicking...

Page 50: ...en the start and the end command as the program that will actually be used The command sentences that are above the start command or below the end command will be ignored Also if there are two start c...

Page 51: ...reen If the signal is orange the robot does not have to check whether the lights are red or green Using the ELSE IF and the ELSE command we can simplify the program by eliminating this need for checki...

Page 52: ...rent position or 20 Compute This command is used when executing an operator The command sentence has the structure as the following Compute Parameter1 Parameter2 Operator Parameter3 The format of the...

Page 53: ...difference is that for the CALL command after executing the subroutine the execution will go back to where the CALL was executed using the RETURN command When using the CALL command the subroutine sho...

Page 54: ...one with enabling or disabling the code segments This function can be very useful in programming and can speed up the development process The only parts of the program that are changeable are the part...

Page 55: ...User s Guide Portion that will be ignored Enable Disable Code Portions that will be ignored 55...

Page 56: ...called robot interaction TIP The interaction between a robot and human is called HRI Human Robot Interaction Voice and face recognition is also part of HRI In order to have robots live with humans the...

Page 57: ...ft parameter and sensor 1 of the Dynamixel as the right parameter The finished program should look like the following Refer to the Examples Example Read IR sensor value bpg inside the CD A beeping sou...

Page 58: ...r more information 5 3 Sound Sensing Function The AX S1 can also sense sound from the surroundings and can count how many claps it hears Let s create a program that will demonstrate this As in the exa...

Page 59: ...r it is necessary AX S1 Caution While working with the robot never put your face close to the robot The behavior control of above can be divided into the following Set the max joint speed to 128 and t...

Page 60: ...part 1 If either of the left or right distance sensors has a value greater than 30 then part 2 will be executed To do this several condition statements need to be used together This can be done by co...

Page 61: ...too much and damaging the wires If we create the code for this it will look like the following Finally we have to finish part 4 The difficult part here is that the arm bending has to be started after...

Page 62: ...igure below shows the entire program by putting together all the codes developed so far Refer to the Examples Example Attacking Duck bpg inside the CD Main routine Routine for front side left side rea...

Page 63: ...User s Guide Arm bending straightening routine to front side reaction Routine that waits until one motion is finished 63...

Page 64: ...Dynamixel as the right parameter The program will look like the following Refer to the Examples Example Read light sensor value bpg inside the CD Depending on the brightness of light it will take valu...

Page 65: ...nside and there are 27 melody sounds that can be played by AX S1 To play the special melody sound the buzzer sound value must be set to 255 first Next input the value between 0 and 26 to produce the s...

Page 66: ...ogram that plays the special melody sounds from 0 to 26 and that print the numbers corresponding to the sounds The program will look like the following Refer to the Examples Example Play special melod...

Page 67: ...anging from 0 to 253 it will make a sound lasting O 1 X Buzzer sound That is if you input the value of 10 the sound will last for one second 0 1 X 10 1 However if you input the value of 0 instead of 0...

Page 68: ...follows If the left sensed distance value is greater than 200 it will make left turn while making melody sound If the right sensed distance value is greater than 200 it will make right turn while maki...

Page 69: ...200 No 1 Right turn while making melody sound Right sensed distance Yes 200 No 1 Move back while making melody sound Center sensed distance Yes 200 No Move while making melody sound 1 Wheel end Sound...

Page 70: ...you look closely however you will notice that there is no CCW angle limit item For items not available use Custom ID item to directly control the behavior In this case to use continuous turn mode you...

Page 71: ...sa AX 12 Continuous Turn Mode Control When the AX 12 is in continuous turn mode it will be controlled in the motion speed not desired position If you input the value from 0 to 1023 in motion speed AX...

Page 72: ...urn mode To do so refer to Examples Example Change endless turn mode bpg inside the CD Next will be the intelligent car behavior control program For that refer to Examples Example Intelligent Car bpg...

Page 73: ...User s Guide Move routine Stop Backward Left turn Right turn Melody sound routine 73...

Page 74: ...motion editor has a graphical user interface so it is easy for beginners to use The robot terminal uses text mode so it lets users see all information all at once thus more useful to advanced users Fo...

Page 75: ...tandby mode If the connection fails go to the start menu and set the Com port correctly and check if the Com port is in use or not Robot Profile If you cannot see above screen when the motion editor i...

Page 76: ...een selected after installing the program then the robot profile file called default rbt will be selected by default Default rbt contains the information for 1 AX S1 and 18 AX 12s and the names of the...

Page 77: ...Droid rbt executed in the Behavior Control Programmer Pose The pose is an instance of a motion For example in the figure right you will need many poses to make the robot move one side step Creating a...

Page 78: ...program plays the motion using its page number The numbers in the joint information window are the position values of the robot joints The robot inside the pose task window is the picture of the actua...

Page 79: ...window Let s create some more poses using the ON OFF commands Play Now let s connect the inputted poses to create a motion If you press the play button the motion will be played using the poses saved...

Page 80: ...as shown below Take note however that the previous pose will be overwritten Drag Drop Pose Move and Insertion As you can see from the pictures shown below you can move the pose by dragging to applicab...

Page 81: ...ay button Save Page During editing the motion data is stored inside the CM 5 s RAM When you are finished creating the motion use the save command to save the motion page to the flash memory Page infor...

Page 82: ...leration ramp up time plus ramp down time Reducing the acceleration time will make the motors acceleration faster and stress on the joints Increasing the acceleration time might create an interval whi...

Page 83: ...Motion Data Upload If you created the motion with the motion editor and saved the motion there is a chance of data loss as modified motion data is inside the robot To save in more secure fashion it i...

Page 84: ...ll allow you to input and output information using your the PC The information outputted from the CM 5 will go to the PC through the serial cable and then printed on screen through the Robot Terminal...

Page 85: ...o do this go into program mode by pressing the MODE button and then press the START button The following screen should appear Dynamixel ID The position of the currently connected 7 poses The first col...

Page 86: ...smoothly Command The following commands are available Commands related to creating poses ON OFF WRITE SET STEP PLAY GO INSERT MOVE NAME SAVE Commands related to editing pages PAGE BEFORE NEXT COPY NEW...

Page 87: ...ed pose is by the Step line TIP You can play another motion page by typing in Play page number For example Play 3 will play the motion of page number 3 Step Line Playing from Pose 0 to Pose 3 Go After...

Page 88: ...ve a name to a page This will be useful later Save During editing the motion data is stored inside the CM 5 s RAM When you are finished creating the motion use the save command to save the motion page...

Page 89: ...ther items below PauseTime Sometimes you will want to pause for a short time after a pose For example you might want the robot to pause for a while after it has finished doing a bowing motion If you g...

Page 90: ...default value is 0 If you set the value for Link to Next as the number of the current page then playback will continue infinitely in a loop In this case you can input the key stop the playback Playbac...

Page 91: ...o have any problems with it But there will be several problems when you run it as is The first problem is the position configuration of the humanoid robot when the program is started The robot could b...

Page 92: ...en making the robot execute a motion it will be almost impossible to set each joint value individually to create the many motions required A flow chart to solve the first and second problems looks lik...

Page 93: ...ing For that you first need to know whether the motion execution is completed By checking the Robot Motion Status you can find out If the Robot Motion Status is set to 0 it means that the motion execu...

Page 94: ...e To create above program follow the following steps Refer to the Examples Example Walking Droid bpg inside the CD Main routine Button reaction routine for the center reaction handclap reaction to the...

Page 95: ...6 Foot stamping motion Motion page 7 Dancing motion The Bioloid has motion pages from 1 to 127 When you create the desired motion onto the page and call this page from the behavior control program the...

Page 96: ...king Droid mtn data The figure below shows how to download a motion After download is complete execute the play mode by clicking a button Go ahead and test by handclapping and putting a hand closer to...

Page 97: ...R Communication In AX S1 there is a transmitter receiver built in that allows IR communication Although IR communication is often used for short distance as it is strongly influenced by the direction...

Page 98: ...smission As previously mentioned AX S1 is the one that actually handles the communication Following that you have to load the data to AX S1 in order to send the data The values that can be sent are be...

Page 99: ...havior control program Check the arriving new date flag if it is not going to be change to o should read value of remote control data address what you received Example Let s take a look at the simple...

Page 100: ...User s Guide Transmitter behavior control program Receiver behavior control program 100...

Page 101: ...to transmit the data and control the robots in various ways CM 5 and ZIG 100 By default CM 5 the central control device of Bioloid does not have ZIG 100 Thus for the IR wireless communication between...

Page 102: ...gram Both CM 5s must have ZIG 100 built in and must know the unique IDs of each others Additionally both must set and save the IDs of each others through behavior control program before communicating...

Page 103: ...avior control program you write the value 0 65535 in to be sent data address When receiving data similar to AX S1 you first check the new wireless data arrival address If it changes to value other tha...

Page 104: ...pand what we have learned before when we created program that turn on and off AUX LED by pressing a button Here let s create a program that can control AUX LED by wireless Refer to Examples Example IR...

Page 105: ...Additionally prepare by purchasing the pair of ZIG 100 not included and additional CM 5 Attach ZIG 100 to CM 5 Before creating behavior control program we have to set the IDs of ZIG 100s accordingly B...

Page 106: ...of CM 5 is pressed it will send 2 When the L button of CM 5 is pressed it will send 3 When the R button of CM 5 is pressed it will send 4 When the Start button of CM 5 is pressed it will send 5 The ac...

Page 107: ...otion When received wireless data is 5 it will take dancing motion The actual behavior control program is shown below Refer to the Examples Example RF control of Walking Droid bpg inside the CD Before...

Page 108: ...een will show up in the Robot Terminal CM 5 program version Here you can see the number and the IDs of the connected Dynamixels If what appears on the screen is different from the actual configuration...

Page 109: ...10 Dump WR 10 1 RD 10 2 HELP Type in help to see the available functions in manage mode CID CID is the abbreviation of Control ID This shows the ID of the Dynamixel that the CM 5 is controlling CID i...

Page 110: ...re when you use the ID command make sure that there is only one Dynamixel connected to the CM 5 When you use the ID command make sure that there is only one Dynamixel connected to the CM 5 ID 254 Usin...

Page 111: ...imes you will want to check the ID of each Dynamixel connected to the CM 5 Type in LED ID and the LED of the Dynamixel of the selected ID will blink Type B and N to change the ID Typing Q will end the...

Page 112: ...ddress Data Data Data In the example below you can verify that the LED turns on and off when 1 and 0 is written to Address 25 Dump This shows the control table values of the Dynamixel The following sh...

Page 113: ...namixel will return a packet even when it receives a Broadcasting ID with this command Usage PING ID REG_WR This command registers the command WRITE The command is only registered not executed The for...

Page 114: ...sting ID Baud This command is used to change the baud rate of the CM 5 Dynamixel controlling UART The baud rate is calculated using the following equation Speed BPS 2000000 Parameter Value 1 Parameter...

Page 115: ...sage reset ID RESET H The H command will send the numbers that are typed into the Robot Terminal as text to the Dynamixels in binary format The H command is useful when testing the packet communicatio...

Page 116: ...s executed The CM Boot Loader program does not have as many functions as a PC operating system but it has the following basic features uploading and executing user created programs to the CM 5 unit me...

Page 117: ...address 0 Next select Transmit file in the Files menu from the Robot Terminal program as shown below It is recommended to check the Add bytesum menu item in the Setup menu as shown below Selecting a F...

Page 118: ...The CM 5 unit not only has 128 Kbytes of flash memory but also 4 Kbytes of RAM and 4 Kbytes EEPROM There is a function in the CM 5 boot loader where you can check the contents in these memory spaces T...

Page 119: ...a Location of the user made behavior control program 0X0E000 0X1DFFF Motion Data Area for storing motion data for the robot 0X1E000 0X1FFFF Boot Loader Location of the Boot Loader program for verifyin...

Page 120: ...compiler instead The CM 5 unit also uses the AVR GCC compiler Compiler and Editor Windows OS users are familiar with compilers that have an editor function built in But for compilers that run on text...

Page 121: ...o structure the program by dividing the source file into a number of smaller files by its contents The Project File is a higher level file that contains the list of the entire source files associated...

Page 122: ...m the File menu and give it any name as you wish Here the C source file is named SimpleMain c Next the source file named SimpleMain c needs to be added to the project file named simple On the left sid...

Page 123: ...directory folder location as the project file and the main source file that contains the Main function The name of the file has to be Makefile without an extension and cannot be changed Thus the files...

Page 124: ...s the main file name section and the other is the C C Source file s section First set the name of the main file name to simple This is used for the file names the compiler creates Source codes can be...

Page 125: ...will appear at the bottom of the output window If the compile was successful with no error the Errors none message will appear Simple hex Download Now let s verify and download the file simple hex Us...

Page 126: ...he CM 5 to directly control the Dynamixel actuators Using these routines one can easily develop a program for controlling them Select Open Project s from the File menu on the MinAVR Programmers Notepa...

Page 127: ...Files Open Double click the Example c on the left and the contents of it appear on the screen Compile Select Make All from the Tools menu to compile The output after the compile should look like the f...

Page 128: ...ed to the CM 5 unit Example 2 demonstrates the use of the Read command It reads the data from Address 2 of the Control Table of the Dynamixel actuator with the ID of 1 The data from Address 2 is the F...

Page 129: ...180 degree is written to address 0x1e of the Control Table The Goal Speed value of 0x100 is written to address 0x20 of the Control Table as well Note that both values Goal Position and Goal Speed can...

Page 130: ..._LOAD_H 41 define P_PRESENT_VOLTAGE 42 define P_PRESENT_TEMPERATURE 43 define P_REGISTERED_INSTRUCTION 44 define P_PAUSE_TIME 45 define P_MOVING 46 define P_LOCK 47 define P_PUNCH_L 48 define P_PUNCH_...

Page 131: ...r 1 TxDString r n Return Error TxD8Hex gbpRxBuffer 4 TxDString r n Firmware Version TxD8Hex gbpRxBuffer 5 TxDString r n n Example 3 LED ON Any Key to Continue RxD8 gbpParameter 0 P_LED Address of LED...

Page 132: ...ion byte bParameterLength byte bCount bCheckSum bPacketLength gbpTxBuffer 0 0xff gbpTxBuffer 1 0xff gbpTxBuffer 2 bID gbpTxBuffer 3 bParameterLength 2 Length Paramter Instruction Checksum gbpTxBuffer...

Page 133: ...if bPort SERIAL_PORT0 UBRR0H 0 UBRR0L bBaudrate UCSR0A 0x02 UCSR0B 0x18 if bInterrupt RX_INTERRUPT sbi UCSR0B 7 RxD interrupt enable UCSR0C 0x06 UDR0 0xFF sbi UCSR0A 6 SET_TXD0_FINISH Note set 1 then...

Page 134: ...hile bData return RXD1_DATA TxD8 bData SIGNAL UART0 Rx Interrupt write data to buffer SIGNAL SIG_UART0_RECV RxD81 read data from UART1 RxD81 return Read data gbpRxInterruptBuffer gbRxBufferWritePointe...

Page 135: ...er and Dynamixel AX 12 We recommend that you visit Robotis site www robotis com and download the latest version 10 1 CM 5 Program Update CM 5 program is updated through behavior control programmer Fol...

Page 136: ...e Step 3 From Manage menu select CM 5 update as shown below Step 4 If you see Can not connect to CM 5 message set Com port properly and click CM 5 connect button Step 5 After connection click Download...

Page 137: ...obotis homepage www robotis com and download the latest version We recommend that you periodically check out the homepage for the latest updates Step 7 You will see the update progress bar While updat...

Page 138: ...ul you will get the message indicating so if not start once again from the beginning IF CM 5 does not operate properly as a result of update problem refer to the 9 1 Boot Loader of 9 Information for A...

Page 139: ...Thus if you have versions below Ver 1 13 go to www robotis com and download the latest CM 5 program and run the CM 5 upgrade by referring to the 10 1 CM 5 Program Upgrade To see the version of CM 5 r...

Page 140: ...Step 2 Execute the behavior control programmer Step 3 From Manage menu select AX 12 update as shown below tep 4 If you see Can not connect to CM 5 message set Com port properly and S click CM 5 connec...

Page 141: ...AX 12 program file Go to Robotis homepage w and download the latest version We tep 7 You will see the update progress on the print screen window recommend that you periodically check out the homepage...

Page 142: ...User s Guide Step 8 If you get the message indicating update completion click close button to close the AX 12 program update 142...

Reviews: