background image


Hardware Integration Guide 

LoRa/Bluetooth Low Energy (BLE) Module 

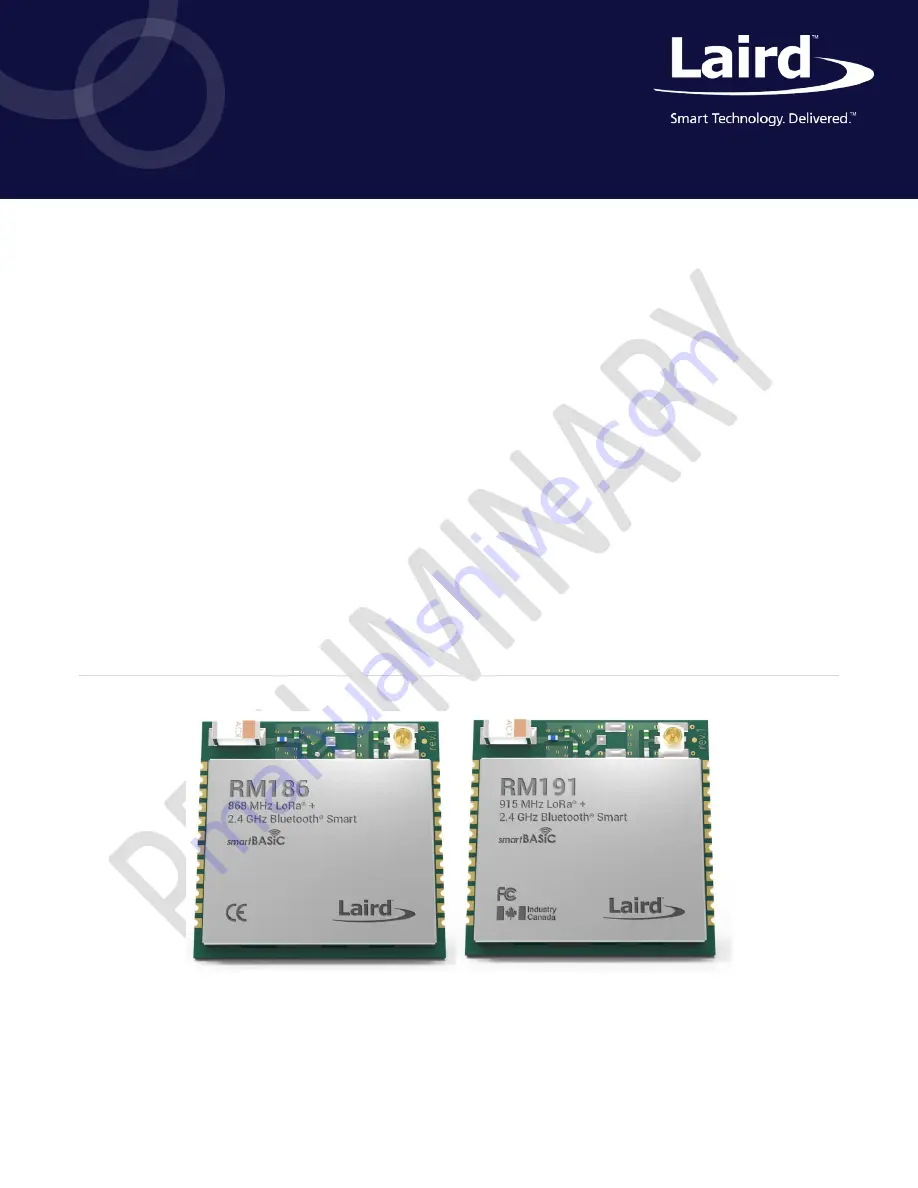
Part Numbers: RM186 and RM191 

Preliminary Version 0.03 


Summary of Contents for DVK-RM191-SM-01

Page 1: ...A Hardware Integration Guide LoRa Bluetooth Low Energy BLE Module Part Numbers RM186 and RM191 Preliminary Version 0 03 ...

Page 2: ... 2320 Europe 44 1628 858 940 Hong Kong 852 2923 0610 REVISION HISTORY Version Date Notes Approver 0 01 28 Mar 2016 Preliminary Release Jonathan Kaye 0 02 31 Mar 2016 Deleted Note 3 for power supply rise time in section Recommended Operating Parameters Modified section FCC and IC Regulatory Statements John Talley 0 03 28 April 2016 Updated Max Transmit power temperatures and DVK descriptions Jonath...

Page 3: ...ludes brown out and power on reset 17 Clocks and Timers 18 Memory for smartBASIC Application Code 18 RF 18 UART Interface 18 SPI Bus 19 I2C Interface 20 General Purpose I O ADC and PWM FREQ 20 nRESET Pin 21 nAutoRUN Pin 21 Two Wire SWD Programming Debug Interface 21 RM1xx on board chip antenna characteristics 22 Hardware Integration Suggestions 22 Circuit 22 PCB Layout on Host PCB General 24 LoRa ...

Page 4: ...sumption with outstanding wireless range using the LoRa radio link and local BLE connections via 3 dBm of transmit power This document should be read in conjunction with the smart BASIC user manual Note This is a PRELIMINARY version of the RM1xx Hardware Integration Guide Information in this document is subject to change Please contact Laird to obtain the most recent version of this document http ...

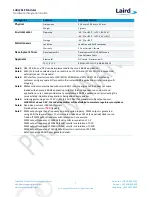
Page 5: ...a Rates over the air 250 bps 50 kbps RM186 980 bps 21 9kbps RM191 BLE Wireless Specification Bluetooth BLE V4 0 Central Mode Frequency 2 402 2 480 GHz Maximum Transmit Power Setting 3 dBm into 1 5 dBi chip antenna Minimum Transmit Power Setting 20 dBm in 4 dB steps with smartBASIC command 16 dBm 12 dBm 8 dBm 4 dBm 0 dBm TX Whisper Mode 1 Transmit Power 30 dBm min with smartBASIC command TX Whisper...

Page 6: ... Programming Debug Interface Programmability smartBASIC On board programming language similar to BASIC smartBASIC application download 1 Via UART 2 Via 2 Wire SWD Programming Debug Interface Control Protocols Any User defined via smartBASIC Operating Modes Self contained Run mode Selected by nAutoRun pin status nAutoRun LOW 0V Then runs autorun smartBASIC application script if it exists Interactiv...

Page 7: ...ing any spare SIO pin within their smartBASIC application script allowing multi dropping Note 4 RM1xx module comes loaded with smart BASIC runtime engine FW but does not come loaded with any smart BASIC application script as that is dependent on customer end application or use Laird provides many sample smart BASIC application scripts covering the services listed Additional applications being adde...

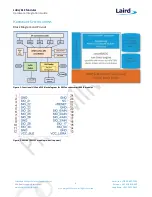
Page 8: ...m www lairdtech com wireless 8 Copyright 2016 Laird All Rights Reserved Americas 1 800 492 2320 Europe 44 1628 858 940 Hong Kong 852 2923 0610 HARDWARE SPECIFICATIONS Block Diagram and Pin out Figure 1 Functional HW and SW block diagram for RM1xx series smartBASIC modules Figure 2 RM186 RM191 module pin out top view ...

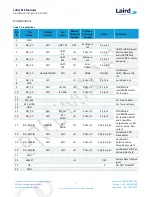
Page 9: ...DIO IN NONE IN ONLY Laird Devkit UART_DSR via J10 J12 7 SIO_28 DIO IN PULL UP 13 1 2 6 Laird DevKit J6 8 GND 9 SIO_29 DIO I2C SCL IN PULL UP 1 2 6 11 I2COPEN in smartBASIC selects I2C function 10 SIO_30 DIO I2C SDA IN PULL UP 1 2 6 11 11 GND 12 VCC_BLE Vcc for BLE Radio 13 VCC_LORA Vcc for Lora Radio 14 GND 15 SIO_00 DIO SPI CLK IN PULL UP 1 2 6 11 SPIOPEN in smartBASIC selects SPI function MOSI a...

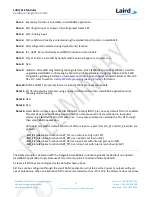
Page 10: ...ule Note11 SPI CS is created by customer using any spare SIO pin within their smartBASIC application script allowing multi dropping Note12 N A Note13 N A Note14 smart BASIC runtime engine has DIO Default Function INPUT pins have by default PULL UP enabled This was done to avoid floating inputs which can also cause current consumption in low power modes e g StandbyDoze to drift with time In any cas...

Page 11: ...of nAutoRUN during power up or reset If it is low and if there is a smartBASIC application script named autorun then the smartBASIC runtime engine FW executes the application script automatically hence the name Self contained Run Mode Electrical Specifications Absolute Maximum Ratings Absolute maximum ratings for supply voltage and voltages on digital and analogue pins of the module are listed bel...

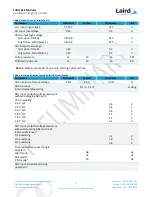
Page 12: ...ll up resistance 11 13 16 kΩ Pull down resistance 11 13 16 kΩ Note 1 Maximum number of pins with 5mA high drive is three Table 6 SIO pin alternative function AIN ADC specification Parameter Minimum Typical Maximum Unit ADC Internal reference voltage 1 5 1 2 V 1 5 ADC pin input internal selectable scaling 1 1 1 3 2 3 Scaling ADC input pin AIN voltage maximum without damaging ADC w r t VCC Prescalin...

Page 13: ... to be an open circuit The moment ADC is sampling ADC AIN impedance is 200k 600k nAutoRUN Pin and Operating Modes Operating modes refer to the smartBASIC manual for details Self contained mode Interactive Development mode Table 7 nAutoRUN pin Signal Name Pin I O Comments nAutoRUN SIO_25 6 I Input with active low logic Operating mode selected by nAutoRun pin status If Low 0V runs autorun if it exis...

Page 14: ...mA mA mA mA mA Note 1 At VCC 3 3V the DCDC converter will be active BLE POWER CONSUMPTION Data taken at VCC 3 3V see Note1 and 25ºC Table 9 Power consumption Parameter Min Typical Max Unit Active Mode peak current Note 1 Connection TX only run peak current TXpwr 3 dBm TX only run peak current T pwr 0 dBm TX only run peak current TXpwr 4 dBm TX only run peak current TXpwr 8 dBm TX only run peak cur...

Page 15: ...ipheral block current consumption 4 3 Note 3 In Deep Sleep everything is disabled and the only wake up sources are reset and changes on pins on which sense is enabled A reset is required to exit Deep Sleep Note 4 Data taken with TX power 3 dBm and all peripherals off UART OFF after radio event Average current consumption depends on a number of factors including TX power VCC and accuracy of 16 MHz ...

Page 16: ...onditions Note In the above picture UART is ON X axis time 1 mS per square Y axis current 2 mA per square Peripheral Block Current Consumption The values below are calculated for a typical operating voltage of 3 V Table 10 UART Power Consumption Parameter Min Typ Max Unit UART Run current Max Baud Rate 230 uA UART Run current 115200 bps 220 uA UART Run current 1200 bps 210 uA UART Baud rate 1200 4...

Page 17: ... integrated high performance BLE antenna combined with the RF and base band circuitry provides the Bluetooth Low Energy wireless link to connect to local BLE sensors The RM1xx SIO lines provide the OEM s chosen interface connection to the wired serial SPI I2C analog sensors The user s smartBASIC application binds the sensors to the LoRa and BLE wireless functionality The variety of hardware interf...

Page 18: ...tions GetTickCount and GetTickSince Refer to the smartBASIC user guide for more information Memory for smartBASIC Application Code User has up to TBD Kbytes of data memory available for smartBASIC application script RF 865 870MHz 250 11000 bps over the air data rate RM186 protocol can optionally employs 50kbps FSK when enabled by the gateway RM191 Lora radio 902 928MHz 980 21900 bps over the air d...

Page 19: ...nal receive buffers will overflow which could lead to an internal processor crash This will drop the connection and may require a power cycle to reset the module Laird recommends that the correct CTS RTS handshaking protocol be adhered to for proper operation Table 14 UART Interface Signal Name Pin I O Comments SIO_21 UART_TX 2 O SIO_21 alternative function UART_TX is an output set high in FW SIO_...

Page 20: ... master and SDA is a bi directional data line which can be driven by any device on the bus IMPORTANT It is essential to remember that pull up resistors on both SCL and SDA lines are not provided in the module and MUST be provided external to the module Table 16 I2C Interface Signal Name Pin I O Comments I2C_SDA 10 I O This interface is an alternate function on each pin configurable by smartBASIC I...

Page 21: ...h pin FREQ output signal frequency can be set over a range of 0Hz to 4MHz with 50 mark space ratio nRESET Pin Table 18 nRESET pin Signal Name Pin No I O Comments nRESET 22 I HW reset active low Pull the nRESET pin low for minimum 100mS in order for the RM1xx to reset nAutoRUN Pin Refer to section nAutoRUN pin and Operating Modes regarding operating modes and the nAutoRUN pin Self contained Run mod...

Page 22: ...ion of RM1xx Add decoupling capacitors for filtering the external source Power on reset circuitry within RM1xx series module incorporates brown out detector thus simplifying power supply design Upon application of power the internal power on reset ensures module starts correctly AIN ADC and SIO pin IO voltage levels RM1xx SIO operating voltage levels are from 0V to VCC Ensure input voltage levels ...

Page 23: ...ing SIO_24 alternative function UART_CTS is an input set with internal weak pull down in FW This pull down ensures the default state of the UART_CTS will be asserted which means can send data out of the UART_TX line In the case when UART_CTS is not connected which we do not recommend nAutoRUN pin and operating mode selection nAutoRUN pin needs to be externally held high or low to select between th...

Page 24: ... digital traces Ensure no exposed copper beneath the module refer to land pattern of RM1xx development board Antenna Keep out on Host PCB Ensure there is no copper in the antenna keep out area on any layers of the host PCB Keep all mounting hardware and metal clear of the area to allow proper antenna radiation For best antenna performance place the RM1xx module on the edge of the host PCB preferab...

Page 25: ...nd Proximity to Metal or Plastic Checklist for metal plastic enclosure Minimum safe distance for metals without seriously compromising the antenna tuning is 40mm top bottom and 30mm left or right Metal close to the RM1xx chip monopole antenna bottom top left right any direction will have degradation on the antenna performance How much that is entirely system dependent which means some testing by c...

Page 26: ...external antennas with a maximum gain of 2dBi The required antenna impedance is 50 ohms See Table 19 Table 19 LoRa External antennas for the RM1xx External Antenna Part Number Laird Part Number Mfg Type Gain dBi Connector Type RM1xx Part number RFDPA131015IMBB301 TBD Walsin Dipole 0 9 U FL RM191 RM186 WPANTDP036 R5A World Products Dipole 2 0 U FL RM191 RM186 S152CL L PX 915S Nearson Dipole 2 0 U F...

Page 27: ...rably in the corner with the antenna facing the corner If RM1xx is not placed in corner but on edge of host PCB the antenna Keep Out Area is extended see Note 4 4 RM1xx development board has an RM1xx placed on the edge of the PCB board and not in corner the Antenna keep out area is extended out to the corner of the development board see section PCB Layout on Host PCB General This was used for modu...

Page 28: ... manufacturing processes Shipping Figure 8 RM1xx Shipping Tray Details Reflow Parameters Prior to any reflow it is important to ensure the modules were packaged to prevent moisture absorption New packages contain desiccate to absorb moisture and a humidity indicator card to display the level maintained during storage and shipment If directed to bake units on the card see Table 20 and follow instru...

Page 29: ...g Temp 40 C 5 RH Baking Temp Saturated 30 C 85 Floor Life Limit 72 hours 30 C 60 Saturated 30 C 85 Floor Life Limit 72 hours 30 C 60 Saturated 30 C 85 Floor Life Limit 72 hours 30 C 60 3 9 hours 7 hours 33 hours 23 hours 13 days 9 days Laird surface mount modules are designed to be easily manufactured including reflow soldering to a PCB Ultimately it is the responsibility of the customer to choose...

Page 30: ...ust be installed such that a minimum separation distance of 30mm is maintained between the radiator antenna and all persons at all times 2 The transmitter module must not be operating in conjunction with any other antenna or transmitter except in accordance with FCC multi transmitter product procedures As long as the two conditions above are met further transmitter testing will not be required How...

Page 31: ...ilities WARNING The OEM must ensure that FCC and Industry Canada labelling requirements are met This includes a clearly visible label on the outside of the OEM enclosure specifying the appropriate Laird FCC identifier for this product Contains FCC ID SQG RM191 Contains IC 3147A RM191 The OEM of the RM191 SM module must only use the approved antenna s listed above which have been certified with thi...

Page 32: ... off and on the user is encouraged to correct the interference by one or more of the following measures Re orient or relocate the receiving antenna Increase the separation between the equipment and the receiver Connect the equipment to an outlet on a circuit different from that to which the receiver is connected Consult the dealer or an experienced radio TV technician for help FCC Warning THIS DEV...

Page 33: ...nces the OEM integrator will be responsible for re evaluating the end product including the transmitter and obtaining a separate Canada authorization NOTE IMPORTANTE Dans le cas où ces conditions ne peuvent être satisfaites par exemple pour certaines configurations d ordinateur portable ou de certaines co localisation avec un autre émetteur l autorisation du Canada n est plus considéré comme valid...

Page 34: ...esentative for more information regarding adding antennas Item LoRa Antenna Part artNumber Mfg Type Gain dBi 1 RFDPA131015IMBB301 Walsin Dipole 0 9 2 WPANTDP036 R5A World Products Dipole 2 0 3 S152CL L PX 868S Nearson Dipole 2 0 The BLE transmitter on board the RM186 has been approved with an on board 1 5dBi chip antenna Item Part Number Mfg Type Gain dBi RM1xx Part Number 1 AT5020 E3R0HBANT LF AC...

Page 35: ...pect to electromagnetic compatibility EN 301 489 1 V1 9 2 2011 09 EN 301 489 17 V2 2 1 2012 09 Emissions EN55022 2006 A1 2007 Class B Immunity EN61000 4 2 2009 EN61000 4 3 2006 A1 2008 A2 2010 3 2 Means of the efficient use of the radio frequency spectrum EN 300 328 V1 8 1 2012 06 Declaration We Laird declare under our sole responsibility that the essential radio test suites have been carried out ...

Page 36: ...rough the qualification process even when referencing a Bluetooth Design that already has its own Declaration ID The Qualification Process requires each company to register as a member of the Bluetooth SIG www bluetooth org The following is a link to the Bluetooth Registration page https www bluetooth org login register For each Bluetooth Design it is necessary to purchase a Declaration ID This ca...

Page 37: ... listed under TBD or TBD the qualification process follows the New Listing route without referencing a Qualified Design When creating a new design it is necessary to complete the full qualification listing process and also maintain a compliance folder for the design If your design is based on un modified RM1xx hardware follow these steps 1 Reference the existing RF PHY test report from the RM1xx l...

Page 38: ...rates any standard SIG LE profiles such as Heart Rate Profile refer to section External to the Core Current and Qualifiable GATT based Profile and Service Test Requirements it is necessary to test these profiles using PTS or other tools where permitted the results are added to the compliance folder You are required to upload your test declaration and test reports where applicable and complete the ...

Reviews: