background image

32

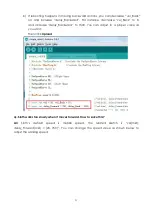
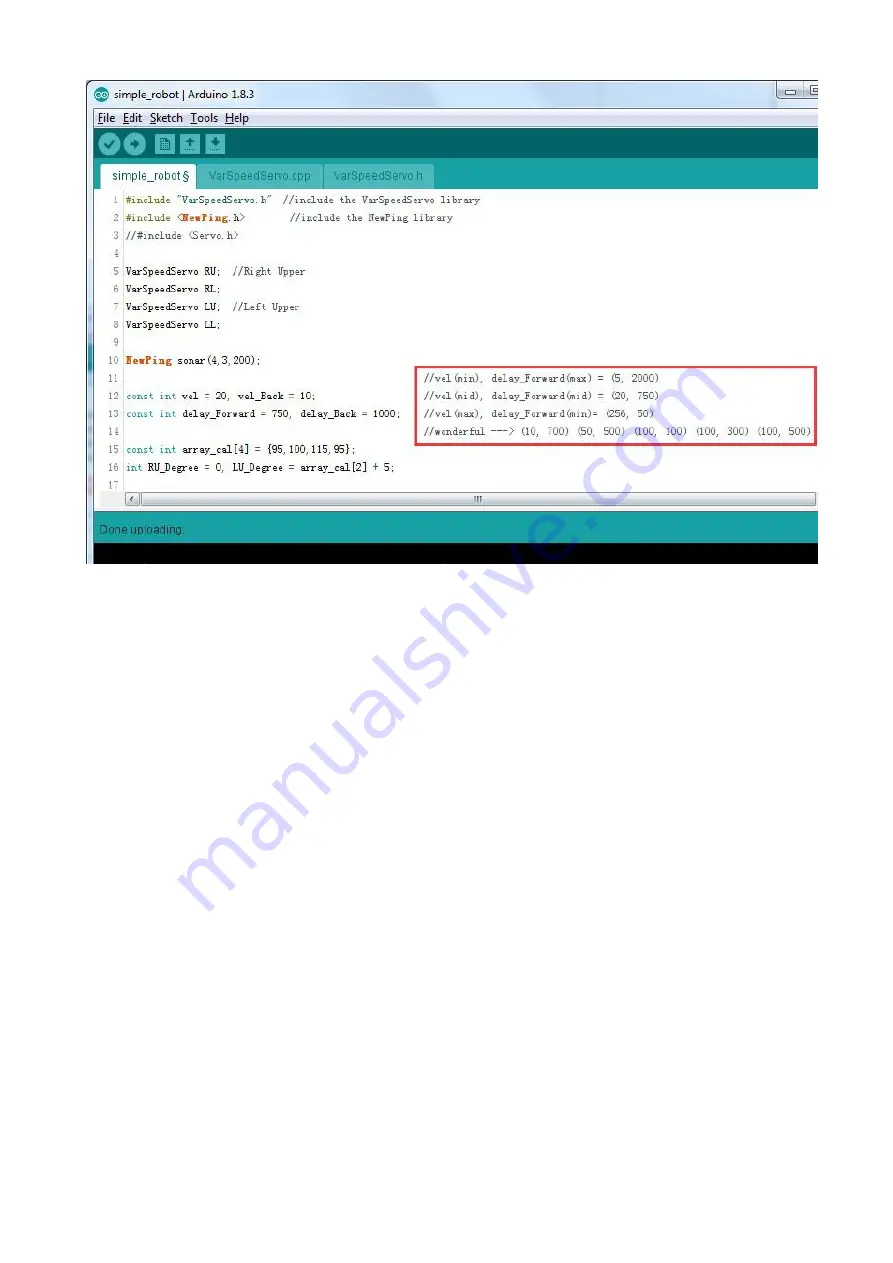
change the value of vel and delay_Forward in line12 and 13 to as shown:

vel = 50, delay_Forward = 500

Then click

Upload

.

Note: If you adjust the robot to a high walking speed, it may fall down and break. Thus it’s

better to do some protection for the Sloth.

Q4: Sloth walks too slowly when it moves backward. How to solve this?

A4

: Considering the structure of Sloth, it’s better do adjust a slow speed for backward

walking. If you want to adjust the walking speed, refer to Q3 to adjust the value. DO NOT
adjust a high speed for walking backward to avoid possible falling down.

Q5: How to make the sloth more stable in walking?

A5

: Cut to get two paper cushion for the robot feet, and stick them on the Sloth soles to

maintain enough friction for a stable walking.

Summary

In this manual, having learned the related components for building the robot kit, you’ve

gone through the assembly of the mechanical parts and electrical modules with the
knowledge of Arduino as well as a brief introduction of the key parts like servo, ultrasonic,
etc. Also you’ve got a lot of software and coding, which lays a solid foundation for your
futrue journey of exloring open-source field.

Summary of Contents for Sloth Learning Kit

Page 1: ...bout This Kit This cute learning kit focuses on the popular open source platform Arduino You can learn the knowledge of the Arduino servo and ultrasonic ranging module by applying this kit In this book we will show you how to build the biped robot via description illustrations of physical components in both hardware and software respects You may visit our website www sunfounder com to download the...

Page 2: ...IDE 5 Install the Driver 6 Add Libraries 6 Test for Servos and Ultrasonic Module 7 i Servo Test 7 ii Ultrasonic Test 11 Assembly 13 i Head Assembly 13 ii Electrical Module Assembly 14 iii Servo Assembly 15 iv Servo INSTALL Test 20 v Foot Assembly 21 vi Battery Assembly 23 vii Servo CALIBRATION Test 24 viii Ultrasonic Connecting 27 ix Servo RUN Test 28 x Wire Arrangement 29 Q A 30 ...

Page 3: ...Summary 32 Copyright Notice 33 ...

Page 4: ...1 Components i Structural Plate ii Mechanical Fasteners Parts Name Qty ...

Page 5: ...Screw 12 M3 5 Screw 18 M3 8 Countersunk Screw 8 M1 4 Nut 6 M2 Nut 12 M3 Self locking Nut 8 M3 8 Bi pass Copper Standoff 4 M3 25 Bi pass Copper Standoff 4 iii Electrical Components Parts Name Qty SF006C Servo 4 Ultrasonic Module 1 SunFounder Nano Board 1 ...

Page 6: ... Battery Not Included Parts Name Qty 9V battery 1 Note Please check the above list and structural plate drawings against the product you received to check for missing components If the above two situations occur please take pictures of all the components you have received and inform us of the missing parts and send E mail to service sunfounder com ...

Page 7: ... servo One 9V chargeable lithium batteries are to supply the bot when the SunFounder Nano is used as the control board compatible with the Arduino Nano A servo control board connects with the batteries servos SunFounder Nano and the HC SR04 ultrasonic ranging module Sloth can move forward and detect the range to make a turn when encountering an obstacle In addition when learning to program you can...

Page 8: ...download the Arduino IDE upload the sketches i e the code files to the board and then you can see experimental phenomena For more information refer to http www arduino cc Arduino Board SunFounder Compatible Arduino senses the environment by receiving inputs from many sensors and affects its surroundings by controlling lights motors and other actuators In this kit SunFounder Nano board is used Inst...

Page 9: ...all the Arduino Software After installing you will see Arduino icon on your desk and double click to open it Install the Driver If the driver is not installed the Nano board will not be able to be recognized by your computer Therefore before using it please install appropriate driver For Windows users run PL2303_Prolific_DriverInstaller_v1180B in the folder Driver For Mac users refer to the folder...

Page 10: ...our libraries indicating the library has been included successfully Test for Servos and Ultrasonic Module Before assembling you need to test the servos and the ultrasonic module according to the following steps i Servo Test 1 Physical Test ...

Page 11: ...e servo does not work properly we believe that the servo has been damaged 2 Software Test Insert SunFounder Nano board into the Servo Control Board Note The USB port should be at the same side with blue power supply terminal Connect the Nano board to computer with a USB cable you can see a notification in system tray Then open the program Test_robot ino and go to line 21 In the code four servos ar...

Page 12: ...e to the expansion board Connect four servos to pin 9 to pin 12 of the expansion board Note The yellow red and brown wires connect to Signal VCC and GND on the expansion board respectively Select the right board to Nano board in IDE ...

Page 13: ...10 Then select the right port and upload the sketch After waiting for a few seconds the download process is successful The following window will prompt Done uploading ...

Page 14: ...o can work Then press the power button again to turn it off Keep the Test_robot ino file open and ii Ultrasionic Test still needs to use this file in the next step ii Ultrasonic Test Connect the ultrasonic connecting cable to the ultrasonic module it has an anti reversing port Here the 4 pins are marked with labels on the modules ...

Page 15: ...u can see that TRIGGER_PIN is defined as 5 and ECHO_PIN is defined as 4 And connect the pin TRIG to pin 4 of the servo control board ECHO to pin 3 VCC to V and GND to G Go to Line 16 disable the SERVO and activate the ULTRASONIC ...

Page 16: ...le and make the two ultrasonic eyes facing an obstacle move the robot back and forth and observe the data shown on serial monitor If the data changes with the robot s moving it proves the ultrasonic module is good At last turn it off and unwire the battery Assembly i Head Assembly Insert the ultrasonic module into No 1 board and secure it with M1 4 8 screws and M1 4 nuts ...

Page 17: ... M3 8 two way hexagonal copper post on No 1 board ii Electrical Module Assembly Use a M3 5mm screw to mount the previously installed circuit board on No 1 board Use M3 5 screws to fix M3 25 Bi pass Copper Standoff under the No 1 board ...

Page 18: ...uts to mount the servo on the corresponding position on the No 2 board Note the direction of the servo installation Secure the No 1 and No 2 boards with M3 5 screws Note that the side of the servo shaft should be mounted on the side of the USB port ...

Page 19: ...16 Use two M1 5 5 self tapping screws to fix the 2 arm rocker arm to the No 4 board and use the same method to install another No 4 board ...

Page 20: ...holes on the 4th and 5th boards with M3 8 Countersunk screws Use the same method to secure the other round hole on the 4th and 5th boards as shown Use two M1 5 5 self tapping screws to secure the 1 arm rocker arm on the No 4 board ...

Page 21: ...18 nd M3 self locking nuts in the following figure Install another No 4 board in the same way ...

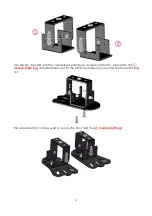
Page 22: ...ith the countersunk side down and secure the No 6 board to the module right leg described above with the M3 8 countersunk screw and the M3 selflocking nut The same method can be used to secure the No 7 and the module left leg ...

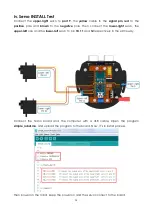
Page 23: ...hen connect the lower right servo the upper left one and the lower left servo to pin 10 11 and 12 respectively in the same way Connect the Nano board and the computer with a USB cable Open the program simple_robot ino and upload the program to the board Now it s in install process Then power on the robot keep the power on and the servo connect to the board ...

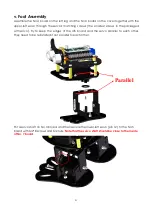
Page 24: ...est screws in the packaged with servo Try to keep the edges of the 4th board and the servo parallel to each other They need to be reinstalled if not parallel to each other Parallel Put a servo shaft on No 3 board and then secure the lower left servo pin 12 to the No 5 board with M2 8 screws and M2 nuts Note that the servo shaft should be close to the inside of No 7 board ...

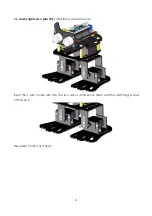
Page 25: ...22 The lower right servo pin 10 is installed in the same way Insert the 1 arm rocker arm into the two servos and secure them with the matching screws of the servo The effect chart is as follows ...

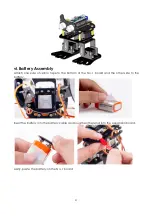
Page 26: ...tach one side of velcro tape to the bottom of the No 1 board and the other side to the battery Insert the battery into the battery cable and plug the other end into the expansion board Lastly paste the battery on the No 1 board ...

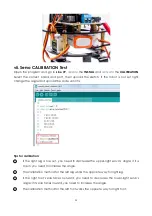
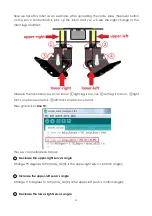
Page 27: ...ps for calibration 1 If the right leg is toe out you need to decrease the upper right servo s angle if it is toe in you need to increase the angle 2 The calibration method for the left leg works the opposite way for right leg 3 If the right foot s sole faces outward you need to decrease the lower right servo s angle if its sole faces inward you need to increase the angle 4 The calibration method f...

Page 28: ...ht leg is toe out left leg is toe out right foot s sole faces outward left foot s sole faves outward Then go back to Line 15 Thus we can calibrate as follows 1 Decrease the upper right servo s angle Change 95 degrees to 90 array_cal 0 is the upper right servo s rotation angle 2 Increase the upper left servo s angle Change 115 degrees to 120 array_cal 2 is the upper left servo s rotation angle 3 De...

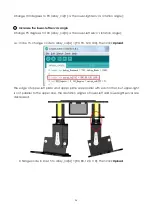
Page 29: ...wer left servo s rotation angle i e In line 15 change code to array_cal 4 90 90 120 100 Then click Upload The edge of upper left plate and upper plate are parallel with each other but upper right is not parallel to the upper one the deviation angles of lower left and lower right servos are decreased Change code in line 15 to array_cal 4 80 80 120 110 Then click Upload ...

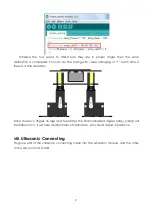
Page 30: ...time if there is a little deviation Since the servo angles on legs and feet differ the final calibrated angles array_cal 4 will be different too It will take multiple times of calibration you should adjust in patience viii Ultrasonic Connecting Plug one end of the ultrasonic connecting cable into the ultrasonic module and the other to the servo control board ...

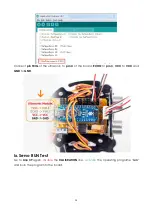
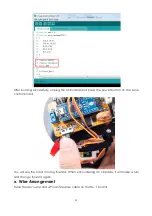
Page 31: ...IG of the ultrasonic to pin 4 of the board ECHO to pin 3 VCC to VCC and GND to GND ix Servo RUN Test Go to Line 39 again disable the CALIBRATION line Activate the operating programe run and burn the program to the board ...

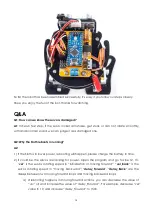
Page 32: ...nd press the power button on the servo control board You will see the robot moving forward When encountering an obstacle it will make a turn and then go forward again x Wire Arrangement Twine the servo wire and 4 Pin anti reverse cable on the No 1 board ...

Page 33: ...Sloth is in lower power rebooting will happen please charge the battery in time 2 It could be the servos are lacking for power Open the program and go to Line 12 13 vel is the servos rotating speed in initialization or moving forward vel_Back is the servos rotating speed in moving backward delay_Forward delay_Back are the delays between two moving forward loops and moving backward loops a If reboo...

Page 34: ...k to 8 and increase delay_Backward to 1500 You can adjust to a proper value as you want Then click Upload Q3 Sloth walks too slowly when it moves forward How to solve this A3 Sloth s default speed is middle speed the related sketch is vel mid delay_Forward mid 20 750 You can change the speed value as shown below to adjust the walking speed ...

Page 35: ... the value DO NOT adjust a high speed for walking backward to avoid possible falling down Q5 How to make the sloth more stable in walking A5 Cut to get two paper cushion for the robot feet and stick them on the Sloth soles to maintain enough friction for a stable walking Summary In this manual having learned the related components for building the robot kit you ve gone through the assembly of the ...

Page 36: ...uding but not limited to texts images and code in this manual are owned by the SunFounder Company You should only use it for personal study investigation enjoyment or other non commercial or nonprofit purposes under the related regulations and copyrights laws without infringing the legal rights of the author and relevant right holders For any individual or organization that uses these for commerci...

Reviews: