background image

100

Keysight E1460A 64-Channel Relay Multiplexer User  Guide

Relay Multiplexer Command Reference

SYSTem

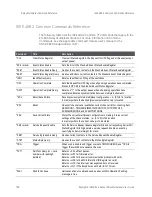
SYSTem:ERRor?

SYSTem:ERRor?

 returns the error numbers and corresponding error messages in 

the error queue of a switchbox. See Appendix C for a listing of switchbox error 
numbers and messages.

Comments

Error Numbers/Messages in the Error Queue:

 Each error generated by a switchbox stores 

an error number and corresponding error message in the error queue. The error 
message can be up to 255 characters long.

Clearing the Error Queue:

 An error number/message is removed from the queue each 

time the SYSTem:ERRor? command is sent. The errors are cleared first-in, 
first-out. When the queue is empty, each following SYSTem:ERRor? command 
r0, “No error”. To clear all error numbers/messages in the queue, 
execute the *CLS command.

Maximum Error Numbers/Messages in the Error Queue:

 The queue holds a maximum of 30 

error numbers/messages for each switchbox. If the queue overflows, the last 
error number/message in the queue is replaced by -350, “Too many errors”. The 
least recent error numbers/messages remain in the queue and the most recent 
are discarded.

*RST Condition:

 *RST does not clear the error queue.

Summary of Contents for E1460A

Page 1: ...Keysight E1460A Relay Multiplexer Module User Manual 75000 Series C ...

Page 2: ......

Page 3: ...W KEYSIGHT DISCLAIMS ALL WAR RANTIES EITHER EXPRESS OR IMPLIED WITH REGARD TO THIS MANUAL AND ANY INFORMATION CONTAINED HEREIN INCLUDING BUT NOT LIMITED TO THE IMPLIED WARRANTIES OF MER CHANTABILITY AND FITNESS FOR A PARTICULAR PURPOSE KEYSIGHT SHALL NOT BE LIABLE FOR ERRORS OR FOR INCIDENTAL OR CONSEQUENTIAL DAMAGES IN CONNECTION WITH THE FURNISHING USE OR PERFORMANCE OF THIS DOCUMENT OR OF ANY I...

Page 4: ...T perform proce dures involving cover or shield removal unless you are qualified to do so DO NOT operate damaged equipment Whenever it is possible that the safety protection features built into this prod uct have been impaired either through physical damage excessive moisture or any other reason REMOVE POWER and do not use the product until safe operation can be verified by service trained personn...

Page 5: ...lly understood and met A WARNING denotes a hazard It calls attention to an operating pro cedure or practice that if not cor rectly performed or adhered to could result in personal injury or death Do not proceed beyond a WARNING notice until the indi cated conditions are fully under stood and met Products display the following sym bols Warning risk of electric shock Refer to manual for addi tional ...

Page 6: ...vi ...

Page 7: ...Bus 25 Configuring Terminal Modules 26 Standard Terminal Module Description 26 Terminal Module Option A3E Description 27 Connecting User Inputs 29 Wiring Terminal Modules 30 Attaching Terminal Modules to the Multiplexer 32 Programming the Multiplexer 33 Checking SCPI Drivers 33 What are SCPI Device Drivers 33 Checking the SCPI Driver Revision 33 Downloading a New Driver 34 Multiplexer Addressing 3...

Page 8: ...us Multiplexer Functions 60 Using the Scan Complete Bit 60 Example Using the Scan Complete Bit 60 Using the Analog Bus 61 Example Connecting the Analog Bus 61 Saving and Recalling States 64 Detecting Error Conditions 65 Example Error Checking Using Interrupts 65 Synchronizing the Multiplexer 67 3 Relay Multiplexer Command Reference About This Chapter 69 Command Types 69 Common Commands Format 69 S...

Page 9: ...ROUTe FUNCtion 85 ROUTe FUNCtion 87 ROUTe OPEN 87 ROUTe OPEN 89 ROUTe SCAN 90 ROUTe SCAN MODE 91 ROUTe SCAN MODE 92 ROUTe SCAN PORT 92 ROUTe SCAN PORT 93 STATus 94 Subsystem Syntax 94 STATus OPERation CONDition 96 STATus OPERation ENABle 96 STATus OPERation ENABle 96 STATus OPERation EVENt 97 STATus PRESet 97 SYSTem 98 Subsystem Syntax 98 SYSTem CDEScription 98 SYSTem CPON 99 SYSTem CTYPe 99 SYSTe...

Page 10: ... the Command Module or Mainframe 113 Register Descriptions 114 The WRITE Registers 114 The READ Registers 114 Status Control Register 115 Writing to the Status Control Register 115 Reading the Status Control Register 115 ID and Device Type Registers 116 Relay Control Registers 116 Programming Examples 119 Example Opening Closing Multiplexer Channels 119 Example Using a Multimeter with a Multiplexe...

Page 11: ... mainframe using a command module such as an E1406A Command Module Multiplexer Components The E1460A 64 Channel Relay Multiplexer module consists of a relay switch card and a standard screw type terminal module The E1460A is also available with Option A3E that provides a crimp and insert terminal housing and connectors Various configurations can be set by programming closing certain switch card re...

Page 12: ...dules can be defined as a switchbox or as a scanning multimeter For a switchbox configuration all multiplexer channels within the instrument can be addressed using a single interface address For a scanning multimeter configuration both the multimeter and all multiplexer modules within the instrument can be addressed using a single interface address ...

Page 13: ...n Getting Started Channel Relay Switches The channel relay switches are separated into eight banks Each bank has eight switchable channels and a COM channel Each channel has a separate HI H and LO L line See Figure 1 1 for a block diagram Figure 2 1 E1460A Multiplexer Block Diagram ...

Page 14: ...l is opened it is internally disconnected Open channels are not terminated At power on or reset all channels are switched open non terminated for all banks only when using the SCPI or C SCPI driver At power off all relays remain in their present state Control Relays In addition to the channel switching relays the switch card contains seven control relays numbered 0990 to 0996 These relays switch t...

Page 15: ...terminal Only one channel can be switched closed at a time A maximum of 128 one wire channels can be switched SCAN goes through all channel relay lows Then control relay 0990 switches and SCAN goes through all channel relay highs Two wire Mode Switches both the HI and LO terminals of a channel in banks 0 through 7 to the HI COM and LO COM terminals A maximum of 64 two wire channels can be switched...

Page 16: ... addition the low terminal of the pair channel in banks 4 through 7 can be connected to the analog bus Guard terminal Banks are paired 0 4 1 5 2 6 and 3 7 A maximum of 32 three wire channels can be switched Four wire Mode Switches both the HI and LO terminals of a channel in banks 0 through 3 to the HI COM and LO COM terminals Also switches the HI and LO terminals of the pair channel in banks 4 th...

Page 17: ...nnect AC power from the mainframe and from other modules that may be connected to the multiplexer CHANNEL WIRING INSULATION All channels that have a common connection must be insulated so that the user is protected from electrical shock in the event that two or more channels are connected together This means wiring for all channels must be insulated as though each channel carries the voltage of th...

Page 18: ...x or scanning multimeter instrument The instrument logical address LADDR is set with the logical address switch located on the instrument The logical address switch LADDR factory setting for the E1460A is 112 Valid address values are from 1 to 255 See Figure 1 2 to set the logical address From Figure 1 2 note that the value of the logical address set is the sum of the values of the switches set to...

Page 19: ...e is installed in a C Size mainframe the interrupt priority jumper does not have to be moved This is because the VXIbus interrupt lines have the same priority and interrupt priority is established by installing modules in slots numerically closest to the command module Thus slot 1 has a higher priority than slot 2 slot 2 has a higher priority than slot 3 etc See Figure 1 4 to change the interrupt ...

Page 20: ...1 and 1 5 that connect COM lines of banks together to form dual 1x32 channel configurations These wire jumpers can be changed to reconfigure the switch card to various 8 channel or 16 channel configurations The interrupt priority jumper MUST be installed in position 1 when using the E1406 command module Level X interrupt priority should not be used under normal operating conditions Changing the pr...

Page 21: ... JM4 JM5 Used to connect the COM lines of bank pairs 4 5 and 6 7 JM10 JM11 Used to connect the COM lines of banks 0 and 1 JM12 JM13 Used to connect the COM lines of banks 2 and 3 JM14 JM15 Used to connect the COM lines of banks 4 and 5 JM16 JM17 Used to connect the COM lines of banks 6 and 7 It is only necessary to change the wire jumpers when reconfiguring the switch card for groups of eight or 1...

Page 22: ...fully lift the shield to expose the printed circuit board 2 Configure the wire jumpers as required using Table 1 2 If you install new jumpers use zero ohm resistors or No 22 AWG copper wire For example to configure banks 0 1 2 and 3 as 1x8 multiplexers and banks 4 5 6 and 7 as 1x16 multiplexers jumper positions are Jumpers JM14 15 16 17 and No Jumpers JM2 3 4 5 10 11 12 13 3 Replace the shield and...

Page 23: ...2 and JM3 are removed then banks 2 and 3 can no longer be connected to the analog bus terminals except through user wiring Table 1 2 Jumper Configurations Bank Number Jumper Configuration JM Number 0 Jumper 1 No Jumper Bank 0 Bank 1 Bank 2 Bank 3 1 2 3 4 5 10 11 12 13 14 15 16 17 1x32 1x32 1x32 1x32 0 0 0 0 0 0 1x16 1x16 1x16 1x16 1 1 0 0 0 0 1x8 1x8 1x8 1x8 1 1 1 1 1 1 1x8 1x8 1x16 1x16 1 1 1 1 0...

Page 24: ... the multiplexer in a mainframe Figure 2 6 Installing the Multiplexer in a VXIbus Mainframe Slide the multiplexer into any slot except slot 0 until the backplane connectors touch Tighten the top and bottom screws To remove the multiplexer from the mainframe to secure the multiplexer to the mainframe reverse the procedure Extraction Levers Set the extraction levers out 4 1 2 in the extraction lever...

Page 25: ...ple multiplexer modules and to the E1411B multimeter Use cable part number E1400 61605 to connect the analog bus to all the modules The analog bus can also be wired to the terminal module See Standard Terminal Module Description for more information Figure 2 7 Analog Bus Cable Connections Multiplexer Modules E1400 61605 Daisy Chain Cables Command Module or VXI Controller Multimeter Module ...

Page 26: ...he standard screw type terminal module connectors and associated bank numbers channel numbers and line designations Use the following guidelines for wiring connections Be sure that wires make good connections on screw terminals Maximum terminal wire size is No 16 AWG When wiring all 64 channels a smaller gauge wire 20 22 AWG is recommended Wire ends should be stripped 6mm 0 25 in and tinned to pre...

Page 27: ...y 50 each Insulation Rating 105oC max Voltage 300 V Shielded Twisted Pair and Contacts A crimp and insert contact is crimped onto each conductor at one end of a shielded twisted pair cable The other end is not terminated Order 91511A Length 2 meters Wire Gauge 24 AWG Outside Diameter 0 1 inches Quantity 25 each Insulation Rating 250oC max Voltage 600 V Jumper Wire and Contacts A crimp and insert c...

Page 28: ...1519A is required for removing contacts from the crimp and insert connector These products are not included with Option A3E or with the terminal option accessories listed earlier Extra Crimp and Insert Connectors The crimp and insert connector is normally supplied with Option A3E Contact Keysight if additional connectors are needed Order 91484B Table 1 3 Option A3E Terminal Module Accessories cont...

Page 29: ...arted Connecting User Inputs Figure 1 10 shows the front panel of the E1460A and the multiplexer s connector pin out which mates to the terminal module Actual user inputs are connected to the terminal module See Wiring Terminal Modules for connection information Figure 2 10E1460A Multiplexer Pin Out ...

Page 30: ...o Wire Terminal Modules Continued on next page Install Connectors Crimp and Insert 4 Tighten screw Insert wire into terminal Screw Type Make Connections Remove Clear Cover 3 1 VW1 Flammability Use wire Rating Size 16 26 AWG 0 2 5mm Tab and Release B Press Tab Forward A Release Screws Route Wiring 5 secure wires Tighten wraps to Use wire Size 22 26 wire exit panels Remove 1 of the 3 Remove and Reta...

Page 31: ...continued Terminal Module onto the Multiplexer tabs onto the fixture A Hook in the top cover Push in the Extraction Levers to Lock the Replace Clear cover Levers Extraction Replace Wiring Panel Install on Multiplexer 8 for wire exit holes in panels Cut required 6 Keep wiring panel exit possible hole as small as 9 7 tighten screws B Press down and ...

Page 32: ...e multiplexer levers and push both levers out simultaneously use a small screwdriver to release the two extraction To remove the terminal module from the multiplexer Push in the extraction levers to lock the terminal module the terminal module to the Apply gentle pressure to attach Align the terminal module connectors to the multiplexer connectors onto the multiplexer 4 multiplexer extraction leve...

Page 33: ...ion on drivers see the Keysight web site http www Keysight com find inst_drivers What are SCPI Device Drivers Keysight register based modules are supported by Standard Commands for Programmable Instruments SCPI drivers These drivers reside in E1406A Command Module non volatile memory If you add a new register based module to an existing VXI system and plan to program the module using SCPI the firm...

Page 34: ...03 or later In the example response above the currently installed drivers are VOLTMTR E1326A A 06 00 ROM SWITCH SWITCHBOX A 07 00 ROM In this example you must download a new SWITCH or VOLTMTR driver depending upon which driver you chose in Step 1 Downloading a New Driver To download a new driver choose your operating system and interface from the following list and follow the related instructions ...

Page 35: ...d and are not sent to the instrument For example the ROUTe command is an implied command and is shown here as ROUTe CLOS 123 Thus to execute these commands you can just enter CLOS 123 See Chapter 3 for more information about SCPI commands and how to send them Multiplexer Card Numbers The multiplexer card number identifies the module within a switchbox or scanning multimeter configuration The card ...

Page 36: ...ssive logical address is card number 02 etc See Figure 1 15 for card numbers and logical addresses of a typical multiple module scanning multimeter configuration Figure 2 14 Card Numbers in a Multiple Module Switchbox order is not required but is recommended Note Physical placement of the Module in the Logical Address Multiple Module Switchbox Card Numbers Command Module Logical Address 114 Multip...

Page 37: ...ored One wire mode only ss0hbc for a single channel ss0hbc ss0hbc for multiple channels ss0hbc ss0hbc for sequential channels ss0hbc ss0hbc ss0hbc ss0hbc for groups of sequential channels or any combination of the above Two wire three wire or four wire modes and control relays where b 099 Figure 2 15Card Numbers in a Multiple module Scanning Multimeter HP E1411B Multimeter 128 64 32 16 8 4 2 1 Log...

Page 38: ...d four wire modes Only valid banks can be accessed in a channel list Closing opening or querying banks 4 to 7 when operating in three wire and four wire modes will generate an error Channel Number The channel number identifies what channel will be switched to its COM terminal Channel numbers are 0 to 7 Only valid channels can be accessed in a channel list When switching the control relays the chan...

Page 39: ...chbox The program next queries the channel closure state A returned 1 shows that the command to close the channel has been sent to the switchbox A returned 0 shows that the command to close the channel has not been sent to the switchbox BASIC is used as the program language The computer interfaces to the mainframe using GPIB with interface select code 7 primary address 09 and secondary address 14 ...

Page 40: ...40 Keysight E1460A 64 Channel Relay Multiplexer User Guide Getting Started Programming the Multiplexer ...

Page 41: ...ncluding Multiplexer Commands States page 41 Switching Channels page 44 Scanning Channels page 51 Miscellaneous Multiplexer Functions page 60 Multiplexer Commands States This section summarizes Relay Multiplexer module commands queries and reset states Table 2 1 shows multiplexer commands used in this chapter See Chapter 3 for additional information about the commands ...

Page 42: ...OUTe CLOSe channel_list Queries the state of the closed channels in the channel_list ROUTe FUNCtion card_number function Sets the operating mode to one wire two wire three wire or four wire ROUTe OPEN channel_list Opens the channels in the channel_list ROUTe SCAN channel_list Defines the channels to be scanned Channels specified in the channel_list are closed one at a time ROUTe SCAN PORT Closes b...

Page 43: ...ting Mode Selected STAT OPER EVEN Status Operation Event OPEN Channel Open SYST CDES number Module Description INIT CONT Scanning State SYST CTYP number Module Type OUTP ECLTrgn ECL Trigger Output State SYST ERR System Error OUTP EXT External Trigger Output State TRIG SLOP Trigger Slope OUTP TTLTrgn TTL Trigger Output State TRIG SOUR Trigger Source SCAN MODE Scanning Mode Selected Table 2 3 Multip...

Page 44: ... for additional information Querying Open Closed Channels The CLOS channel_list and OPEN channel_list commands determine if the channel in the channel_list is open or closed respectively The query command does not determine if in the event of a hardware failure the channel remains open closed See ROUTe OPEN and ROUTe CLOSe for additional information Switching Control Relays The control relays 0990...

Page 45: ...nels Two Wire Example Switching Channels Three Wire Example Switching Channels Four Wire Example Switching Channels One Wire This example illustrates one wire mode operation For the example the HI terminal is used Bank 2 channel 1 is closed connecting the HI terminal to the one wire HI COM terminal Figure 2 1 shows how the multiplexer is configured For one wire operation the control relays are set...

Page 46: ...ES 0992 0993 will close when SCAN PORT ABUS is selected during a scan see Scanning Channels 0994 0995 0996 remain in their present state with the following exceptions 0994 is closed in RES mode If card_number WIRE2X64 2x64 configuration 0994 is closed in the RES and NONE modes In the FRES mode 0994 and 0995 are opened 0996 closes and connects COM to LO for voltage measurements with the MEASure or ...

Page 47: ... to bank 0 COM terminals If the Status Register switch is set to the two wire operating mode the FUNC 1 WIRE2 command is not required The WIRE2X64 command can be used rather than closing control relay 0995 to configure the card to a single 64 channel multiplexer Available only with E1406A Switchbox rev A 06 00 or later Figure 2 17 Example Switching Channels Two Wire H L COM L H CH0 BANK 0 SWITCH C...

Page 48: ... opened when not SCAN PORT ABUS see Scanning Channels 0994 0995 are set open when SCAN channel_list is executed To connect the HI and LO terminals of bank 0 channel 0 and the LO terminal of bank 4 channel 0 to their COM terminals execute FUNC 1 WIRE3 Configures the multiplexer card 01 for three wire operation CLOS 100 Connects the HI and LO terminals of bank 0 channel 0 to the bank 0 COM terminals...

Page 49: ...re set open when SCAN channel_list is executed 0992 0993 will close when SCAN PORT ABUS is selected during a scan They are opened otherwise see Scanning Channels 0994 0995 0996 are set open when SCAN channel_list is executed To connect the HI and LO terminals of bank 0 channel 0 and the HI and LO terminals of bank 4 channel 0 to their COM terminals execute FUNC 1 WIRE4 Configures the multiplexer c...

Page 50: ...operating mode the FUNC 1 WIRE4 command is not required In four wire mode banks are paired 0 4 1 5 2 6 and 3 7 Upper bank pair 4 7 channels cannot be switched or queried while in this mode Figure 2 19Example Four Wire Mode Channel Switching H L COM BANK 0 SWITCH CARD TERMINAL MODULE L H 1 IN 2 IN 1 OUT 2 OUT 4 IN 4 OUT BANK 4 COM 3 IN 3 OUT CH0 CH0 H L L H ...

Page 51: ...are available Scanning Channels Comments Scanning Channels Sequence The TRIGger SOURce command specifies the source to advance the scan The OUTPut command can be used to enable the E1406A Command Module Trig Out port TTL Trigger bus lines 0 7 or ECL Trigger bus lines 0 1 Figure 2 5 illustrates scanning Figure 2 20 Scanning Channels Sequence ARM COUN number TRIG SOUR BUS HOLD EXT MM TTLT ECLT OUTP ...

Page 52: ... see the ROUTe SCAN PORT command for more information Two Wire Ohms Measurements When making two wire ohms scanning measurements using multimeters with SOURCE SENSE leads use SCAN MODE RES When making two wire ohms scanning measurements using multimeters with HI LO leads use SCAN MODE VOLT See the ROUTe SCAN MODE command for more information Scanning Channels Examples Some example programs follow ...

Page 53: ...903 CONF RES AUTO MAX Configures the multimeter to measure resistance using autorange at the least accurate resolution the largest value 40 OUTPUT 70903 TRIG SOUR TTLT0 Multimeter to perform measurement when trigger received on TTL Trigger bus line 0 50 OUTPUT 70903 OUTP TTLT1 STAT 1 Multimeter to cause trigger on TTL trigger bus line 1 when measurement complete 60 OUTPUT 70903 TRIG COUN 64 Multim...

Page 54: ... 7 160 OUTPUT 70914 OPC Multiplexer operations complete 170 ENTER 70914 Opc Enters a 1 when complete 180 OUTPUT 70903 READ Places multimeter in wait for trigger state Will send measurement results to output buffer when triggered 190 OUTPUT 70914 INIT Closes bank 0 channel 0 and enables the scan Causes a trigger output on TTL Trigger bus line 0 that initiates the multimeter to make a measurement 20...

Page 55: ...Rdgs 1 64 40 CLEAR Dvm 50 CLEAR Mux 60 OUTPUT Dvm RST CLS 70 OUTPUT Mux RST CLS 80 OUTPUT Dvm FUNC RES 90 OUTPUT Dvm TRIG SOUR TTLT0 100 OUTPUT Dvm TRIG COUN 64 110 OUTPUT Dvm OUTP TTLT1 STAT ON 120 OUTPUT Dvm OPC 130 ENTER Dvm Cp 140 OUTPUT Dvm SYST ERR 150 ENTER Dvm A 160 PRINT A 170 OUTPUT Mux FUNC 1 WIRE1 180 OUTPUT Mux OUTP TTLT0 STAT 1 190 OUTPUT Mux TRIG SOUR TTLT1 200 OUTPUT Mux SCAN MODE ...

Page 56: ...Ext Trig port This trigger signals the multimeter to make the measurement The E1406A Trig Out port is connected to the 3457A multimeter Voltmeter Complete port This trigger causes the multiplexer to advance the scan Figure 2 7 shows how to connect the command module and multiplexer module to the 3457A multimeter This example uses GPIB select code 7 primary address 09 and secondary address 14 for t...

Page 57: ...output from E1406A Trig Out port which initiates the external multimeter to make a measurement When the measurement is complete the multimeter s VM Complete port sends a trigger to the multiplexer to advance the scan 80 Wait 1 Wait 1 second 90 FOR Channels 1 to 16 Start counting loop 16 channels 100 ENTER 722 Results Enter measurement result 110 NEXT Channels Increment count and repeat measurement...

Page 58: ...e control relay 0995 to access upper 4 banks 40 OUTPUT 70903 MEAS VOLT DC 100 177 Configure the scanning multimeter to measure voltage on bank 0 channels 0 to 2 50 ENTER 70903 Rdgs Enter measurement result 60 FOR I 1 TO 64 Start counting loop 3 channels 70 PRINT Rdgs I Display measurement result 80 NEXT I Increment the count and repeat measurement process for a total of 3 measurements 90 END Termi...

Page 59: ...al The remaining channels are open 1 k on channel 00 HI 1 5 k on channel 00 LO 1 2 k on channel 01 HI 1 8 k on channel 01 LO A typical result returns HEWLETT PACKARD E1411B 0 A 04 02 in response to the IDN command Also If E1460A terminal module jumper 10 is cut and jumpers 11 12 and 13 are in place ROUT FUNC will return WIRE1 is displayed The four channels with resistors connected return the nomin...

Page 60: ... command to assert a GPIB Service Request you can interrupt the computer when the scan complete bit is set after the scanning cycle completes This allows the controller to do other operations while the scanning cycle is in progress Example Using the Scan Complete Bit This example monitors bit 7 in the Status Byte Register to determine when the scanning cycle completes The example uses GPIB select ...

Page 61: ...he FUNCtion command is executed all analog bus control relays are opened If an analog bus connection is required you must close the appropriate control relay Once switched the relay remains closed unless specifically opened OPEN command power up or RST Control relay numbers and functions follow 0992 Connects lower 32 channels banks 0 to 3 to the analog bus H1 terminals 0993 Connects upper 32 chann...

Page 62: ...onfiguration The multimeter when correctly programmed automatically closes the appropriate control relays 0990 0996 For more information see the E1326B E1411B User s Manual The cable test example that follows can be expanded to test cables with more than 4 conductors Continuity is checked by closing additional channel relays to test the odd numbered wires on the first loop pass and the even number...

Page 63: ...es 40 50 reset multiplexer and switch banks 0 3 to analog bus Lines 60 180 measure continuity of cable The first loop pass measures wires 1 and 3 and the second loop pass measures wires 2 and 4 Lines 190 420 measure insulation short circuit of cable The first loop pass measures wires 1 to 3 2 to 3 2 to 4 1 to 4 and 1 to 2 The second loop pass measures wires 3 to 1 4 to 1 4 to 2 3 to 2 and 3 to 4 F...

Page 64: ...LOS 10990 270 OUTPUT 70903 READ 280 ENTER 70903 D I 290 OUTPUT 70914 CLOS 10991 300 OUTPUT 70903 READ 310 ENTER 70903 E I 320 OUTPUT 70914 OPEN 10990 330 OUTPUT 70903 READ 340 ENTER 70903 F I 350 OUTPUT 70914 OPEN 121 122 360 K I 120 370 OUTPUT 70914 CLOS K 380 OUTPUT 70903 READ 390 ENTER 70903 G I 400 OUTPUT 70914 OPEN 10990 10991 410 OUTPUT 70914 OPEN J 420 NEXT I 430 PRINT Continuity Wire 1 2 3...

Page 65: ...re are errors at every step of the switching process This is called polling and is illustrated in the following example 10DIM Err_num 256 20OUTPUT 70914 CLOS 101 30OUTPUT 70914 SYST ERR 40ENTER 70914 Err_num 50IF VAL Err_num 0 THEN 60 PRINT Error Err_num 70 STOP 80END IF 90 program continues Example Error Checking Using Interrupts The second approach to error checking involves the use of interrupt...

Page 66: ...pt from the multiplexer 30 OUTPUT 70914 SRE 32 Unmask the event status bit in the multiplexer s Status Register 40 OUTPUT 70914 ESE 64 Unmask the error conditions in multiplexer Standard Event Status Register 50 Program multiplexer for desired application 60 70 80 END 90 SUB Errmsg Error Message subprogram 100 DIM Message 256 120 CLEAR 70914 When an error occurs clear the multiplexer to regain con...

Page 67: ...program verifies that the switching is complete before the multimeter begins a measurement The example uses GPIB select code 7 primary address 09 and secondary address 03 for the multimeter and GPIB select code 7 primary address 09 and secondary address 14 for the multiplexer 10 OUTPUT 70914 CLOS 101 OPC Close bank 1 channel 1 and request confirmation that the channel is closed 20 ENTER 70914 Opc_...

Page 68: ...68 Keysight E1460A 64 Channel Relay Multiplexer User Guide Using the Relay Multiplexer Miscellaneous Multiplexer Functions ...

Page 69: ...EE 488 2 Common commands and SCPI commands Common Commands Format The IEEE 488 2 standard defines the Common commands that perform functions like reset self test status byte query etc Common commands are four or five characters in length always begin with an asterisk and may include one or more parameters The command keyword is separated from the first parameter by a space character Some examples ...

Page 70: ...dability you may send the entire command The instrument will accept either the abbreviated form or the entire command For example if the command syntax shows DIAGnostic DIAG and DIAGNOSTIC are both acceptable forms Other forms of DIAGnostic such as DIAGN or DIAGNOS will generate an error You may use upper or lowercase letters Therefore DIAGNOSTIC diagnostic and DiAgNoStIc are all acceptable Implie...

Page 71: ...elects from a finite number of values These parameters use mnemonics to represent each valid setting An example is TRIGger SOURce source where source can be BUS EXTernal HOLD IMMediate ECLTrgn or TTLTrgn Numeric Numeric parameters are commonly used decimal representations of numbers including optional signs decimal points and scientific notation for example 123 123E2 123 1 23E2 123 1 23E 2 1 23000...

Page 72: ...SAV 1 Linking Multiple SCPI commands Use both a semicolon and a colon between the commands such as CLOS 101 CLOS 101 SCPI also allows several commands within the same subsystem to be linked with a semicolon and colon such as ROUT CLOS 101 ROUT CLOS 101 SCPI Commands Reference This section describes the Standard Commands for Programmable Instruments SCPI for the Relay Multiplexer module Commands ar...

Page 73: ...Scan Enabled Via Interface When a scan is enabled via an interface an interface clear command CLEAR 7 can be used to stop the scan When the scan is enabled via the interface and TRIG SOUR BUS or HOLD is set you can use ABORt to stop the scan Restarting a Scan Use the INITiate command to restart the scan Related Commands ARM INITiate CONTinuous ROUTe SCAN TRIGger Example Stopping a Scan with ABORt ...

Page 74: ...inuous OFF 0 is set MIN sets 1 cycle and MAX sets 32 767 cycles Parameters Comments Number of Scans Use only numeric values between 1 and 32767 MIN or MAX for the number of scanning cycles Related Commands ABORt INITiate IMMediate RST Condition ARM COUNt 1 Example Setting Ten Scanning Cycles This example sets a multiplexer module for 10 scans of channels 0 through 7 in bank 1 in a single module sw...

Page 75: ...not specified With MIN or MAX as a parameter MIN returns 1 and MAX returns 32 767 Parameters Comments Related Commands INITiate IMMediate Example Query Number of Scans This example sets a multiplexer module for 10 scanning cycles and queries the number of scan cycles set The ARM COUN command returns 10 ARM COUN 10 Set 10 scans per INIT command ARM COUN Query number of scans Name Type Range of Valu...

Page 76: ... SOURce command advances the scan through the channel list A trigger at the end of the channel list closes the first channel in the channel list and the scan cycle repeats Non Continuous Scanning Operation Non continuous scanning is enabled with the INITiate CONTinuous OFF or INITiate CONTinuous 0 command Sending the INITiate IMMediate command closes the first channel in the channel list Each trig...

Page 77: ...T returns 1 INIT CONT ON Enable continuous scanning INIT CONT Query continuous scanning state INITiate IMMediate INITiate IMMediate starts the scanning process and closes the first channel in the channel list Successive triggers from the source specified by the TRIGger SOURce command advance the scan through the channel list Comments Starting the Scanning Cycle The INITiate IMMediate command start...

Page 78: ... a channel is closed during a scan This is also used to disable a selected ECL Trigger bus line n specifies the ECL Trigger bus line 0 or 1 and mode enables ON or 1 or disables OFF or 0 the specified ECLTrg bus line Parameters Comments Enabling ECL Trigger Bus When enabled a pulse is output from the selected ECL Trigger bus line 0 or 1 after each channel is closed during a scan If disabled a pulse...

Page 79: ... state of the specified ECL Trigger bus line The command returns 1 if the specified bus line is enabled or 0 if the specified bus line is disabled Example Query ECL Trigger Bus Enable State This example enables ECL Trigger bus line 0 and queries the enable state The OUTPut ECLTrgn command returns 1 since the port is enabled OUTP ECLT0 STAT 1 Enable ECL Trigger bus line 0 OUTP ECLT0 Query bus enabl...

Page 80: ...STATe RST Condition OUTPut EXTernal STATe OFF disabled Example Enabling Trig Out Port OUTP EXT 1 Enable Trig Out port to output pulse after each scanned channel is closed OUTPut EXTernal STATe OUTPut EXTernal STATe queries the present state of the Trig Out port The command returns 1 if the port is enabled or 0 if disabled Example Query Trig Out Port Enable State This example enables the Trig Out p...

Page 81: ...r EXTernal can be enabled at one time Enabling a different output source will automatically disable the active output For example if TTLTrg1 is the active output and TTLTrg4 is enabled TTLTrg1 will become disabled and TTLTrg4 will be the active output Related Commands ROUTe SCAN TRIGger SOURce OUTPut TTLTrgn STATe RST Condition OUTPut TTLTrgn STATe OFF disabled Example Enabling TTL Trigger Bus Lin...

Page 82: ...cified by channel_list Channel_list has the form ss0hbc where ss card number 01 99 0h one wire mode only high low switching 00 or 01 b bank number 0 7 and c channel number 0 7 Parameters Comments One Wire Mode WIRE1 When closing a channel in one wire mode the HI or LO line must be selected using channel_list 01 selects HI and 00 selects LO If one wire mode is selected and a four digit channel numb...

Page 83: ...mpt is made to close the upper bank pair 4 7 channels an error will be generated Closing Channels To close a single channel use ROUT CLOS ssbc or ss0hbc multiple channels use ROUT CLOS ssbc ssbc or ss0hbc ss0hbc sequential channels use ROUT CLOS ssbc ssbc or ss0hbc ss0hbc groups of sequential channels use ROUT CLOS ssbc ssbc ssbc ssbc or ss0hbc ss0hbc ss0hbc ss0hbc or any combination of the above ...

Page 84: ... bank 6 of card 2 ROUTe CLOSe ROUTe CLOSe channel_list returns the current state of the channel s queried Channel_list has the form ssbc or ss0hbc see ROUTe CLOSe for definition The command returns 1 if channel s are closed or returns 0 if channel s are open Comments Query is Software Readback The ROUTe CLOSe command returns the current software state of the channel s specified It does not account...

Page 85: ...is set to the command must be sent AFTER the card is powered up One Wire Mode WIRE1 Switches either the HI or LO terminal of a channel in banks 0 through 7 to the one wire HI COM or one wire LO COM terminal When closing a channel in one wire mode the HI or LO line must be selected using channel_list Only one of the 128 one wire channels can be switched at a time Two Wire Mode WIRE2 Switches both t...

Page 86: ...a channel in bank 0 3 to that bank s HI COM and LO COM terminals Also switches the HI and LO terminal of the channel in pair bank 4 7 to that bank s HI and LO COM terminals When closing a channel in four wire mode only the lower bank 0 3 is specified and the upper bank pair 4 7 will automatically close A maximum of 32 four wire channels can be switched Selecting an upper bank 4 7 channel causes an...

Page 87: ...nnel_list Channel_list has the form ss0hbc where ss card number 00 99 0h one wire mode only high low switching 00 or 01 b bank number 0 7 and c channel number 0 7 Parameters Comments One Wire Mode WIRE1 When opening a channel in one wire mode the HI or LO line must be selected using channel_list 01 selects HI and 00 selects LO If one wire mode is selected and a four digit channel number is used th...

Page 88: ...ened to perform special functions for example isolating channels from the analog bus Channels must be changed after the multiplexer has been configured using the ROUTe FUNCtion command Open 0990 to select the HI terminal for one wire switching 0991 to connect Cable Test terminal to the one wire LO COM terminal 0992 to disconnect lower 32 channels banks 0 to 3 from the analog bus 0993 to disconnect...

Page 89: ...ck The ROUTe OPEN command returns the current software state of the channel s specified It does not account for relay hardware failures A maximum of 128 channels at a time can be queried for a multiple module switchbox Three Four Wire Modes WIRE3 WIRE4 When configured for three or four wire modes the upper bank pair 4 7 channels cannot be queried If an attempt is made to query the upper bank pair ...

Page 90: ... Scanning Channels To scan a single channel use ROUT SCAN ssbc or ss0hbc multiple channels use ROUT SCAN ssbc ssbc or ss0hbc ss0hbc sequential channels use ROUT SCAN ssbc ssbc or ss0hbc ss0hbc groups of sequential channels use ROUT SCAN ssbc ssbc ssbc ssbc or ss0hbc ss0hbc ss0hbc ss0hbc or any combination of the above Scanning Operation When a valid channel list is defined INITiate IMMediate begin...

Page 91: ...ode When selected channel_list is setup for volts measurements VOLT mode is also used when making two wire ohms measurements using two wire multimeters RES Mode When selected channel_list is setup for two wire ohms measurements Control relay 0994 is closed when SCAN PORT ABUS is selected When selected the multimeter SENSE SOURCE leads are used to make the measurement When using the HI LO leads on ...

Page 92: ...can mode is in the none volts two wire ohms or four wire ohms measurement mode respectively Example Query the Scanning Mode This example selects the four wire ohms measurement mode FRES on card 1 of a single module switchbox then queries the measurement state Because four wire ohms mode is selected the query command returns FRES SCAN MODE FRES Select four wire ohms scanning mode SCAN MODE Query th...

Page 93: ...e four wire ohms measurement mode FRES on card 1 of a single module switchbox and then enables the analog bus connection Control relays 0992 0993 close and 0990 0991 0994 0995 open FUNC 1 WIRE4 Set mode to four wire TRIG SOUR EXT Select external trigger source SCAN MODE FRES Select the four wire ohms mode SCAN PORT ABUS Select the analog bus port SCAN 130 137 Scan channels 0 7 in bank 3 paired wit...

Page 94: ...spectively can be queried with the STB command Use the ESE command to query the unmask value for the Standard Event Status Register the bits you want logically OR d into the summary bit The registers are queried using decimal weighted bit values The decimal equivalents for bits 0 through 15 are included in Figure 3 1 A numeric value of 256 executed in a STAT OPER ENABle number command allows only ...

Page 95: ...ster 32768 16384 8192 4096 2048 1024 512 256 128 64 32 16 8 4 2 1 128 64 32 16 8 4 2 1 2 128 4 8 16 32 1 RQS ESB MAV 1 7 6 3 5 4 2 0 unmask examples ESE 61 unmasks standard event register bits 0 2 3 4 and 5 ESE 128 only unmasks bit 7 SRE 128 unmasks the OPR bit operation in the status byte register This is effective only if the STAT OPER ENAB 256 command is executed STAT QUES ENAB 256 unmasks the ...

Page 96: ... Register bit 7 For multiplexer modules when bit 8 in the Operation Status Register is set to 1 and that bit is enabled by the STATus OPERation ENABle command bit 7 in the Status Register is set to 1 Parameters Comments Setting Bit 7 of the Status Register STATus OPERation ENABle 256 sets bit 7 of the Status Register to 1 after bit 8 of the Operation Status Register is set to 1 Related Commands RO...

Page 97: ...256 if bit 8 of the Operation Status Register is set to 1 The command returns 0 if bit 8 of the Operation Status Register is set to 0 Event Register Cleared Reading the Event Register with the STATus OPERation EVENt command clears it Aborting a scan Aborting a scan will leave bit 8 set to 0 Related Commands ROUTe SCAN Example Reading the Operation Status Register After a Scanning Cycle STAT OPER R...

Page 98: ...n The SYSTem CDEScription command returns the following E1460A descriptions depending on mode currently configured One Wire Mode 128 Channel S E Relay Mux Two Wire Mode Dual 32 Channel 2 Wire Relay Mux Two Wire 64 Mode 64 Channel 2 Wire Relay Mux Three Wire Mode 32 Channel 3 Wire Relay Mux Four Wire Mode 32 Channel 4 Wire Relay Mux Example Reading the Description of a Card 1 Module This example se...

Page 99: ...Ction command will not be affected by execution of the SYSTem CPON number or RST commands Example Setting Card 1 Module to its Power on State SYST CPON 1 Set card 1 to its power on state SYSTem CTYPe SYSTem CTYPe number returns the module type of a selected module in a switchbox Parameters Comments 64 Channel Multiplexer Module Model Number The SYSTem CTYPe number command returns HEWLETT PACKARD E...

Page 100: ...racters long Clearing the Error Queue An error number message is removed from the queue each time the SYSTem ERRor command is sent The errors are cleared first in first out When the queue is empty each following SYSTem ERRor command returns 0 No error To clear all error numbers messages in the queue execute the CLS command Maximum Error Numbers Messages in the Error Queue The queue holds a maximum...

Page 101: ...ate IMMediate command All must be executed unless defaults are used before TRIGger IMMediate will execute BUS or HOLD Source If selected the TRIGger SOURce BUS or TRIGger SOURce HOLD commands remain in effect after triggering a switchbox with the TRIGger IMMediate command Related Commands INITiate ROUTe SCAN Example Advancing Scan Using TRIGger Command This example uses the TRIGger command to adva...

Page 102: ...mand Not Supported Attempting to change the TRIGger SLOPe to anything other than NEG will generate an error TRIGger SLOPe TRIGger SLOPe is used to query the polarity of the output trigger For the E1460A this query always returns NEG Example Query Trigger Slope TRIG SLOP Always returns NEG TRIGger SOURce TRIGger SOURce source specifies the trigger source to advance the channel list during scanning ...

Page 103: ...SOURce TTLTrgn or ECLTrgn selected only one switchbox at a time can use the trigger bus selected on the E1406A Command Module bus The trigger input is assigned to the first switchbox that requested the trigger source with a TRIGger SOURce TTLTrgn or ECLTrgn command Only one of the ten available trigger bus lines ECL0 to 1 or TTL0 to 7 can be specified at one time Assigning EXTernal I TTLTrg I ECLT...

Page 104: ...t external triggering SCAN 100 107 Scan channels 0 to 7 in bank 0 INIT Begin scan close bank 0 channel 0 trigger externally Advance scan to next channel Example Scanning Using Bus Triggers This example uses bus triggering TRIG SOUR BUS to scan bank 0 channels 0 through 7 of a single module switchbox The trigger source to advance the scan is the TRG command as set with TRIGger SOURce BUS When INIT ...

Page 105: ... for the switchbox Command returns BUS ECLT EXT HOLD IMM or TTLT for sources BUS ECLTrgn EXTernal HOLD IMMediate or TTLTrgn respectively Example Querying the Trigger Source This example sets external triggering and queries the trigger source Since external triggering is set TRIG SOUR returns EXT TRIG SOUR EXT Set external trigger source TRIG SOUR Query trigger source ...

Page 106: ...ously stored multiplexer configuration n 0 to 9 is location in memory where the desired previously stored set up is located RST Reset Opens all channels and invalidates current channel list for scanning Sets ARM COUN 1 TRIG SOUR IMM INIT CONT OFF OUTP STAT OFF SCAN MODE NONE and SCAN PORT NONE SAV Save Current State Stores the current multiplexer configuration in memory Stores current settings of ...

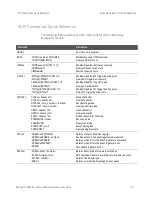
Page 107: ...les TTL Trigger bus line pulse Query TTL Trigger bus line state ROUTe CLOSe channel_list CLOSe channel_list FUNCtion card_number function FUNCtion card_number OPEN channel_list OPEN channel_list SCAN channel_list SCAN MODE mode SCAN MODE SCAN PORT port SCAN PORT Close channel s Query channel s Set operating mode Query operating mode Open channel s Query channel s Define channels for scanning Set s...

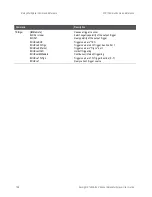
Page 108: ...l SOURce HOLD SOURce IMMediate SOURce TTLTrgn SOURce Causes a trigger to occur Select negative polarity of the output trigger Query polarity of the output trigger Trigger source is TRG Trigger source is ECL Trigger bus line 0 or 1 Trigger source is Trig In port Hold off triggering Continuous internal triggering Trigger source is TTL Trigger bus line 0 7 Query current trigger source Command Descrip...

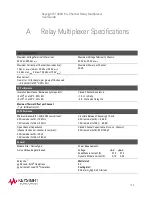
Page 109: ...Closed Channel Resistance 1 5 initially 3 5 at end of relay life Maximum Thermal Offset per Channel 7 V differential H L AC Performance Minimum Bandwidth 3dB 50 W source load 2 Wire mode 4x16 10 MHz 1 Wire mode 1x128 3 MHz Crosstalk Between Channels 10 kHz 2 Wire mode 4x16 90 dB 1 Wire mode 1x128 60 dB Open Channel Capacitance channel to channel channel to common 2 Wire mode 4x16 30 pF 1 Wire mode...

Page 110: ...exer User Guide Relay Multiplexer Specifications Terminals Screw type maximum wire size 16AWG Operating Temperature 0 55 C Operating Humidity 65 RH 0 40 C Net Weight kg 1 6 1 Relays are subject to normal wear out based on the number of operations ...

Page 111: ...an embedded controller Also if slot 0 the resource manager and the computer GPIB interface are provided by other devices a C Size system can be downsized by removing the command module Register addresses for register based devices are located in the upper 25 of VXI A16 address space Every VXI device up to 256 devices is allocated a 32 word 64 byte block of addresses With twelve registers the E1460...

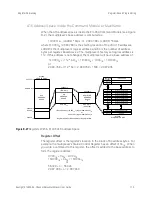
Page 112: ...ltiplexer will have a base address of C00016 112 64 16 C00016 1C0016 DC0016 or 49 152 112 64 49 152 7168 56 320 Figure B 26Registers Within A16 Address Space Outside the Command Module Register Address Base address Register Offset Base Address COOO OOOO 16 SPACE ADDRESS COOO 16 FFFF 16 A16 49 152 C000 SPACE ADDRESS REGISTER 16 16 FFFF ID Register A16 REGISTER MAP E1460A or 49 152 Logical Address 6...

Page 113: ...ample the multiplexer s Status Control Register has an offset of 0416 When you write a command to this register the offset is added to the base address to form the register address DC0016 0416 DC0416 1FDC0016 0416 1FDC0416 or 56 320 4 56 324 2 087 936 4 2 087 940 Figure B 27Registers Within E1406 A16 Address Space Logical Address 64 2 080 768 Logical Address 64 Register Address Base address Regist...

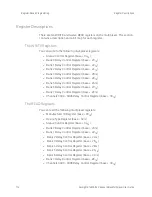
Page 114: ...lay Control Register base 2816 Bank 5 Relay Control Register base 2A16 Bank 6 Relay Control Register base 2C16 Bank 7 Relay Control Register base 2E16 Channels 0990 0996 Relay Control Register base 3016 The READ Registers You can read the following multiplexer registers Manufacturer ID Register base 0016 Device Type Register base 0216 Status Control Register base 0416 Bank 0 Relay Control Register...

Page 115: ...rrupt generated after a channel has been closed can be disabled Bit 6 of this register is used to inform the user of the interrupt status For example if the Status Register base 0416 returns D3BF the multiplexer module is not busy bit 7 set the interrupt is enabled bit 6 0 and the configuration is four wire bits 10 13 set In addition if a terminal module card is connected to the relay switch card ...

Page 116: ...sult in the lowest numbered channel being closed For example to connect both upper and lower banks to the analog bus write a 1 to bits 2 and 3 of the base 3016 to close bank 0990 relays 2 and 3 All other bits must be set to 0 To reset the multiplexer all relays open you must write a 0 to each bit in the Relay Control Registers Reading the Relay Control Registers always returns FFFF16 Register maps...

Page 117: ... 15 14 13 12 11 10 9 8 7 6 5 4 3 2 1 0 Write Undefined CH 7 CH 6 CH 5 CH 4 CH 3 CH 2 CH 1 CH 0 Read Always Returns FFFF16 Write a 1 to close channel to COM Bank 3 Relay Control Register base 2616 15 14 13 12 11 10 9 8 7 6 5 4 3 2 1 0 Write Undefined CH 7 CH 6 CH 5 CH 4 CH 3 CH 2 CH 1 CH 0 Read Always Returns FFFF16 Write a 1 to close channel to COM Bank 4 Relay Control Register base 2816 15 14 13 ...

Page 118: ... 13 12 11 10 9 8 7 6 5 4 3 2 1 0 Write Undefined CH 7 CH 6 CH 5 CH 4 CH 3 CH 2 CH 1 CH 0 Read Always Returns FFFF16 Write a 1 to close channel to COM Bank 7 Relay Control Register base 2E16 15 14 13 12 11 10 9 8 7 6 5 4 3 2 1 0 Write Undefined CH 7 CH 6 CH 5 CH 4 CH 3 CH 2 CH 1 CH 0 Read Always Returns FFFF16 Write a 1 to close channel to COM Channels 0990 0996 Relay Control Register base 3016 15 ...

Page 119: ...anguage on a PC connected via GPIB to the E1406A Command Module DIAG POKE and DIAG PEEK are the E1406A commands for direct register access Example Opening Closing Multiplexer Channels The flowchart in Figure B 3 shows one way to close or open a multiplexer channel and determine when it has finished closing or opening The address of the multiplexer s Status Register is base 0416 The address of the ...

Page 120: ...sing or opening This C program example closes and then opened Channel 5 on bank 2 register address 36 To initialize the E1460A write zeros to all Relay Control bits include stdio h include chpib h include cfunc h define LOG_ADDR 112L define BASE_ADDR long 0x1FC000 64 LOG_ADDR Figure B 28Closing Opening a Multiplexer Channel START STOP 0 1 0 1 Check Multiplexer Status Register Bit 7 Busy Close Mult...

Page 121: ... 2 13 10 send_data 1 16 send_data 2 1 send_data 0 BASE_ADDR reg_addr IOEOI 7L 0 IOEOL 7L 0 IOOUTPUTS 70900L DIAG POKE 10 IOEOI 7L 1 IOEOL 7L state 0 IOOUTPUTA 70900L send_data 3 send_data 0 BASE_ADDR 4 IOEOI 7L 0 IOEOL 7L 0 IOUTPUTS 70900L DIAG PEEK 11 IOEOI 7L 1 IOEOL 7L state 2 IOOUTPUTA 70900L send_data 2 while bit_number 0 IOENTER 70900L read bit_number long read 6 1 return 0 ...

Page 122: ... base 0416 Multimeter Status Register base 0416 Multimeter Command Register base 0816 Figure B 29Program Timing Between Multiplexer and Multimeter START STOP 0 1 0 1 Check Multiplexer Status Register Bit 7 Busy Close Multiplexer Channel Busy Bit 7 Status Register Multiplexer Check Check Status Register Bit 5 MM Comp 1 0 Wait for Measurement s to Complete Have all channels been measured B B Retriev...

Page 123: ...l can also be advanced by monitoring bit 4 Data Ready However before measuring the next channel readings from the previous channel must be read from the buffer in order to clear the bit Example Reading ID Device Type and Status Registers This C programming example reads the Module ID Device Type and Status Registers from the module include stdio h include chpib h include cfunc h define LOG_ADDR 11...

Page 124: ...lude stdio h include chpib h include cfunc h define LOG_ADDR 112L define BASE_ADDR long 0x1FC000 64 LOG_ADDR main int reg_addr 36 long bit_number float send_data 3 read char state 2 13 10 send_data 0 BASE_ADDR reg_addr send_data 1 16 send_data 2 pow 2 5 IOEOI 7L 0 IOEOL 7L 0 IOOUTPUTS 70900L DIAG POKE 10 IOEOI 7L 1 IOEOL 7L state 0 IOOUTPUTA 70900L send_data 3 send_data 0 BASE_ADDR 4 IOEOI 7L 0 IO...

Page 125: ...er programming using an E1499A V 382 embedded computer running HP UX and using the SICL interface library Program to scan E1460A 68A 69A channels with a V 382 include stdio h include fcntl h include stdlib h include sicl h include time h define E1460A vxi 112 Logical Address of device define BUSY 0x80 typedef unsigned short word typedef struct device_registers word id_reg word devtype_reg word sta...

Page 126: ...bank0_reg 0x000 while dev_ptr statcntl_reg BUSY 0 dev_ptr bank1_reg 0x000 while dev_ptr statcntl_reg BUSY 0 dev_ptr bank2_reg 0x000 while dev_ptr statcntl_reg BUSY 0 dev_ptr bank3_reg 0x000 while dev_ptr statcntl_reg BUSY 0 dev_ptr bank4_reg 0x000 while dev_ptr statcntl_reg BUSY 0 dev_ptr bank5_reg 0x000 while dev_ptr statcntl_reg BUSY 0 dev_ptr bank6_reg 0x000 while dev_ptr statcntl_reg BUSY 0 de...

Page 127: ...Keysight E1460A 64 Channel Relay Multiplexer User Guide 127 Programming Examples Register Based Programming printf Scanned bank 0 channel d n i rly 2 rly printf Done n exit 0 ...

Page 128: ...128 Keysight E1460A 64 Channel Relay Multiplexer User Guide Register Based Programming Programming Examples ...

Page 129: ...gger Source Already Allocated Assigning an external trigger source to a switchbox when the trigger source has already been assigned to another switchbox 2000 Invalid Card Number Addressing a module card in a switchbox that is not part of the switchbox 2001 Invalid Channel Number Attempting to address a channel of a module in a switchbox that is not supported by the module for example 2006 Command ...

Page 130: ...130 Keysight E1460A 64 Channel Relay Multiplexer User Guide Relay Multiplexer Error Messages ...

Page 131: ......

Page 132: ...This information is subject to change without notice Keysight Technologies 1990 2019 Printed in Malaysia Edition 7 October 2019 E1460 90006 E1460 90006 www keysight com ...

Reviews: