background image

Contents

vi


3

Installing the Simulator and C Source Debugger With HP-UX

3-1

. . . . . . . . . . . . . . . . . . . . . . . 

Lists the hardware and software you need to install the simulator and C source debugger; pro-
vides installation instructions for HP systems running HP-UX

t

.

3.1

What You Need

3-2

. . . . . . . . . . . . . . . . . . . . . . . . . . . . . . . . . . . . . . . . . . . . . . . . . . . . . . . . . . . . 

Hardware checklist

3-2

. . . . . . . . . . . . . . . . . . . . . . . . . . . . . . . . . . . . . . . . . . . . . . . . . . . . . . . . . 

Software checklist

3-3

. . . . . . . . . . . . . . . . . . . . . . . . . . . . . . . . . . . . . . . . . . . . . . . . . . . . . . . . . . 

3.2

Step 1: Installing the Simulator and Debugger Software

3-4

. . . . . . . . . . . . . . . . . . . . . . . . . . 

Mounting the CD-ROM

3-4

. . . . . . . . . . . . . . . . . . . . . . . . . . . . . . . . . . . . . . . . . . . . . . . . . . . . . . 

Copying the files and setting up the simulator

3-4

. . . . . . . . . . . . . . . . . . . . . . . . . . . . . . . . . . 

Unmounting the CD-ROM

3-5

. . . . . . . . . . . . . . . . . . . . . . . . . . . . . . . . . . . . . . . . . . . . . . . . . . . 

3.3

Step 2: Setting Up the Debugger Environment

3-6

. . . . . . . . . . . . . . . . . . . . . . . . . . . . . . . . . . 

Reinitializing your shell

3-7

. . . . . . . . . . . . . . . . . . . . . . . . . . . . . . . . . . . . . . . . . . . . . . . . . . . . . . 

3.4

Step 3: Verifying the Installation

3-8

. . . . . . . . . . . . . . . . . . . . . . . . . . . . . . . . . . . . . . . . . . . . . . 

3.5

Using the Debugger With the X Window System

3-9

. . . . . . . . . . . . . . . . . . . . . . . . . . . . . . . . 

Using the keyboard’s special keys

3-9

. . . . . . . . . . . . . . . . . . . . . . . . . . . . . . . . . . . . . . . . . . . . 

Changing the debugger font

3-10

. . . . . . . . . . . . . . . . . . . . . . . . . . . . . . . . . . . . . . . . . . . . . . . . . 

Color mappings on monochrome screens

3-10

. . . . . . . . . . . . . . . . . . . . . . . . . . . . . . . . . . . . . 

Summary of Contents for SCOUTTRAINER25

Page 1: ...TMS320C2xx Simulator Getting Started Guide 1996 Microprocessor Development Systems ...

Page 2: ...Printed in U S A April 1996 D412015 9741 revision SPRU176 ...

Page 3: ...TMS320C2xx Simulator Getting Started Guide SPRU176 April 1996 Printed on Recycled Paper ...

Page 4: ...NED INTENDED AUTHORIZED OR WARRANTED TO BE SUITABLE FOR USE IN LIFE SUPPORT APPLICATIONS DEVICES OR SYSTEMS OR OTHER CRITICAL APPLICATIONS Inclusion of TI products in such applications is understood to be fully at the risk of the customer Use of TI products in such applications requires the written approval of an appropriate TI officer Questions concerning potential risk applications should be dir...

Page 5: ...ered trademarks of Microsoft Corp OpenWindows Solaris and SunOS are trademarks of Sun Microsystems Inc PC and PC DOS is a trademark of International Business Machines Corp SPARC is a trademark of SPARC International Inc SPARCstation is licensed exclusively to Sun Microsystems Inc X Window System is a trademark of the Massachusetts Institute of Technology ...

Page 6: ...vi ...

Page 7: ...ing the Debugger With Windows 1 9 2 Installing the Simulator and C Source Debugger With SunOS 2 1 Lists the hardware and software you need to install the simulator and C source debugger pro vides installation instructions for SPARCstations running SunOSt or Solarist 2 1 What You Need 2 2 Hardware checklist 2 2 Software checklist 2 3 2 2 Step 1 Installing the Simulator and Debugger Software 2 4 Mou...

Page 8: ...2 Software checklist 3 3 3 2 Step 1 Installing the Simulator and Debugger Software 3 4 Mounting the CD ROM 3 4 Copying the files and setting up the simulator 3 4 Unmounting the CD ROM 3 5 3 3 Step 2 Setting Up the Debugger Environment 3 6 Reinitializing your shell 3 7 3 4 Step 3 Verifying the Installation 3 8 3 5 Using the Debugger With the X Window System 3 9 Using the keyboard s special keys 3 9...

Page 9: ...PCtsystems running MS DOS or PC DOS You can also use the debugger with Windows When you complete the installa tion turn to the TMS320C2xx C Source Debugger User s Guide Topic Page 1 1 What You Need 1 2 1 2 Step 1 Installing the Simulator and Debugger Software 1 4 1 3 Step 2 Setting Up the Debugger Environment 1 5 1 4 Step 3 Verifying the Installation 1 8 1 5 Using the Debugger With Windows 1 9 Cha...

Page 10: ... monitor color recommended Optional hardware A Microsoft compatible mouse An EGA or VGA compatible graphics display card and a large mon itor The debugger has several options that allow you to change the overall size of the debugger display If you have an EGA or VGA compatible graphics card you can take advantage of the larg er screen sizes The larger screen sizes are most effective when used with...

Page 11: ...ll memory is invalid initially sim203 cmd and sim209 cmd are batch files containing commands that configure a memory map of C203 and C209 devices respec tively init clr is a general purpose screen configuration file If init clr isn t present when you invoke the debugger the debugger uses the default screen configuration init 25 init 43 and init 50 have been provided for basic 80 x 25 80 x 43 and 8...

Page 12: ...kup copy of each product disk s 2 On your hard disk create a directory named sim2xx This directory will contain the C2xx software MD C sim2xx 3 Insert the product disk s into drive A Copy the contents of the disk s COPY A C sim2xx V The DOS version of the debugger is named sim2xx exe and the Windows version of the debugger is named sim2xxw exe Throughout this docu ment the debugger is referred to ...

Page 13: ...me that you invoke the debugger invoke the debugger options Indicates the port address and other options for more information see the TMS320C2xx C Source Debugger User s Guide p port address Identifies the emulator port on your PC 378 default port address for the XDS510PP LPT1 on most PCs to verify the address of the printer port where you connected the XDS510PP see your PC documentation 240 defau...

Page 14: ... following format to set the D_SRC environment variable SET D_SRC pathname1 pathname2 4 To specify the emulator port address and other options use the following format to define the D_OPTIONS environment variable SET D_OPTIONS p port_address options 5 To add the emulator reset command to the file type EMURST 6 Save the file as initdb bat and then exit the text editor 7 Before you start Windows and...

Page 15: ... source files that you want to debug use the following format to set the D_SRC environment variable SET D_SRC pathname1 pathname2 4 To specify the emulator port address and other options use the following format to define the D_OPTIONS environment variable SET D_OPTIONS p port_address options 5 To add the emulator reset command to the file type EMURST 6 Save the file and then exit the text editor ...

Page 16: ...4 bf00 SPM 0 0035 be47 SETC SXM 0036 bf80 LACC ffffh 0038 b801 ADD 1 0039 e388 BCND 003dh EQ 003b 7a89 CALL 0041h AR1 003d 7a89 CALL main AR1 003f 7a89 CALL abort AR1 0041 7802 ADRK 2 0042 bf80 LACC ffffh 0044 8b88 MAR AR0 0045 a6a0 TBLR 0046 b801 ADD 1 0000 0000 0000 0000 0000 0000 0000 0000 0007 0000 0000 0000 0000 0000 0000 0000 000e 0000 0000 0000 0000 0000 0000 0000 0015 0000 0000 0000 0000 0...

Page 17: ...s bigger than the debugger requires the extra space is not used If the resized display is smaller than required the display is clipped Note that when the display is clipped it can t be scrolled You may want to create an icon to make it easier to invoke the debugger from within the Windows environment Refer to your Windows manual for details You should run Windows in either the standard mode or the...

Page 18: ...1 10 ...

Page 19: ...bugger on a SPARCstation running SunOSt or Solarist When you complete the installation turn to the TMS320C2xx C Source Debugger User s Guide Topic Page 2 1 What You Need 2 2 2 2 Step 1 Installing the Simulator and Debugger Software 2 4 2 3 Step 2 Setting Up the Debugger Environment 2 6 2 4 Step 3 Verifying the Installation 2 8 2 5 Using the Debugger With the X Window System 2 9 Chapter 2 ...

Page 20: ...ms in the following hardware and software checklists Hardware checklist Host A SPARCstation or a system that is100 compatible with a SPARCstation 2 class or higher Display Monochrome or color monitor color recommended Disk space 2M bytes of disk space Required hardware CD ROM drive Optional hardware Mouse ...

Page 21: ...MS320C2xx C Source Debugger User s Guide If a memory map batch file isn t present when you invoke the debugger all memory is invalid initially sim203 cmd and sim209 cmd are batch files containing commands that configure a memory map for C203 and C209 devices respec tively init clr is a general purpose screen configuration file If init clr isn t present when you invoke the debugger the debugger use...

Page 22: ...r operating system version If you have SunOS 4 1 x load the CD ROM into the drive and enter the following from a command shell mount rt hsfs dev sr0 cdrom exit cd cdrom sparc If you have SunOS 5 0 or 5 1 load the CD ROM into the drive and enter the following from a command shell mount rF hsfs dev sr0 cdrom exit cd cdrom cdrom0 sparc If you have SunOS 5 2 or higher J If your CD ROM drive is already...

Page 23: ...nter mkdir your_pathname sim2xx 2 Copy the files from the CD ROM to your hard disk system cp r your_pathname sim2xx Unmounting the CD ROM Note Root Privileges If you are running SunOS 4 1 x 5 0 or 5 1 you must have root privileges to unmount the CD ROM If you don t get help from your system administrator You must unmount the CD ROM after copying the files If you have SunOS 4 1 x 5 0 or 5 1 enter t...

Page 24: ... DISPLAY machinename Options that you want to use every time that you invoke the debugger setenv D_OPTIONS object filename options time that you invoke the debugger object filename Names the file that you want to load every time that you invoke the debugger options Initialization options for more information see the TMS320C2xx C Source Debugger User s Guide b Selects a screen size of 80 characters...

Page 25: ...n bin user fred sim2xx setenv D_DIR user fred sim2xx setenv D_SRC user fred C2xxsource setenv DISPLAY barney 0 setenv D_OPTIONS b enurst set path statement Environment variables Reset the emulator Reinitializing your shell When you modify your shell configuration file you must ensure that the changes are made to your current session For example if you are using a C shell use this command to reread...

Page 26: ...SPM 0 0035 be47 SETC SXM 0036 bf80 LACC ffffh 0038 b801 ADD 1 0039 e388 BCND 003dh EQ 003b 7a89 CALL 0041h AR1 003d 7a89 CALL main AR1 003f 7a89 CALL abort AR1 0041 7802 ADRK 2 0042 bf80 LACC ffffh 0044 8b88 MAR AR0 0045 a6a0 TBLR 0046 b801 ADD 1 0000 0000 0000 0000 0000 0000 0000 0000 0007 0000 0000 0000 0000 0000 0000 0000 000e 0000 0000 0000 0000 0000 0000 0000 0015 0000 0000 0000 0000 0000 000...

Page 27: ... debugger uses are shown in the following table with their corresponding keysym A keysym is a label that interprets a keystroke it allows you to modify the action of a key on the keyboard Key Keysym F1 to F10 F1 to F10 PAGE UP Prior PAGE DOWN Next HOME Home END End INSERT Insert Right Left Up Down Use the X utility xev to check the keysyms that are associated with your key board If you need to cha...

Page 28: ...o Courier add the following line to the Xdefaults file sim2xx font courier For more information about using xrdb to change the font refer to your X Window System documentation Color mappings on monochrome screens Although a color monitor is recommended the following table shows the color mappings for monochrome screens Color Appearance on Monochrome Screen black black blue black green white cyan w...

Page 29: ...on an HP9000 series 700tPA RISCtsystem running HP UX When you complete the installation turn to the TMS320C2xx C Source Debugger User s Guide Topic Page 3 1 What You Need 3 2 3 2 Step 1 Installing the Simulator and Debugger Software 3 4 3 3 Step 2 Setting Up the Debugger Environment 3 6 3 4 Step 3 Verifying the Installation 3 8 3 5 Using the Debugger With the X Window System 3 9 Chapter 3 ...

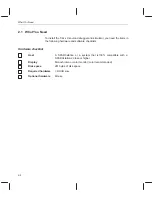
Page 30: ...nd simulator you need the items in the following hardware and software checklists Hardware checklist Host An HP9000 series 700 PA RISC system Display Monochrome or color color recommended Disk space 2M bytes of disk space Required hardware CD ROM drive Optional hardware Mouse ...

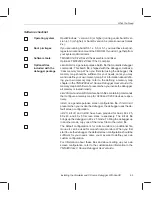
Page 31: ...t when you invoke the debugger all memory is invalid initially sim203 cmd and sim209 cmd are batch files containing commands that configure a memory map of C203 and C209 devices respec tively init clr is a general purpose screen configuration file If init clr isn t present when you invoke the debugger the debugger uses the de fault screen configuration init 25 init 43 and init 50 have been provide...

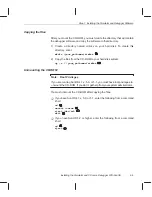
Page 32: ... SAM system administration manager To use the UNIX mount command follow these steps 1 To mount the CD ROM enter mount rt cdfs dev dsk your_cdrom_device cdrom exit 2 Make the hp700 directory on the CD ROM the current directory For example if the CD ROM is mounted at cdrom enter cd cdrom hp700 To use SAM to mount the CD ROM see System Administration Tasks the HP documentation about SAM for instructi...

Page 33: ...he Simulator and C Source Debugger With HP UX Unmounting the CD ROM Note Root Privileges You must have root privileges to unmount the CD ROM If you don t get help from your system administrator You must unmount the CD ROM after copying the files Enter cd umount cdrom exit ...

Page 34: ... DISPLAY machinename Options that you want to use every time that you invoke the debugger setenv D_OPTIONS object filename options time that you invoke the debugger object filename Names the file that you want to load every time that you invoke the debugger options Initialization options for more information see the TMS320C2xx C Source Debugger User s Guide b Selects a screen size of 80 characters...

Page 35: ...n bin user fred sim2xx setenv D_DIR user fred sim2xx setenv D_SRC user fred C2xxsource setenv DISPLAY barney 0 setenv D_OPTIONS b enurst set path statement Environment variables Reset the emulator Reinitializing your shell When you modify your shell configuration file you must ensure that the changes are made to your current session For example if you are using a C shell use this command to reread...

Page 36: ...SPM 0 0035 be47 SETC SXM 0036 bf80 LACC ffffh 0038 b801 ADD 1 0039 e388 BCND 003dh EQ 003b 7a89 CALL 0041h AR1 003d 7a89 CALL main AR1 003f 7a89 CALL abort AR1 0041 7802 ADRK 2 0042 bf80 LACC ffffh 0044 8b88 MAR AR0 0045 a6a0 TBLR 0046 b801 ADD 1 0000 0000 0000 0000 0000 0000 0000 0000 0007 0000 0000 0000 0000 0000 0000 0000 000e 0000 0000 0000 0000 0000 0000 0000 0015 0000 0000 0000 0000 0000 000...

Page 37: ... the following table with their corresponding keysym A keysym is a label that interprets a keystroke it allows you to modify the action of a key on the keyboard Key Keysym F1 to F10 F1 to F10 PAGE UP Prior PAGE DOWN Next HOME Home END End INSERT Insert Right Left Up Down Use the X utility xev to check the keysyms that are associated with your key board If you need to change the keysym definitions ...

Page 38: ...er to Courier add the following line to the Xdefaults file sim2xx font courier For more information about using xrdb to change the font refer to your X Window System documentation Color mappings on monochrome screens Although a color monitor is recommended the following table shows the color mappings for monochrome screens Color Appearance on Monochrome Screen black black blue black green white cy...

Page 39: ...3 PC systems 1 3 SPARC systems 2 3 sim2xx cmd HP systems 3 3 PC systems 1 3 SPARC systems 2 3 batch files continued siminit cmd HP systems 3 3 PC systems 1 3 SPARC systems 2 3 bb debugger option HP systems 3 6 PC systems 1 5 SPARC systems 2 6 C CD ROM mounting HP systems 3 4 SPARC systems 2 4 requirements HP systems 3 2 SPARC systems 2 2 retrieving files from HP systems 3 4 SPARC systems 2 5 unmou...

Page 40: ... X Window System HP systems 3 9 to 3 10 SPARC systems 2 9 to 2 10 default memory map HP systems 3 3 PC systems 1 3 SPARC systems 2 3 default continued screen configuration file HP systems 3 3 PC systems 1 3 SPARC systems 2 3 directories auxiliary files HP systems 3 6 PC systems 1 5 SPARC systems 2 6 debugger software HP systems 3 4 3 6 PC systems 1 4 1 5 SPARC systems 2 5 2 6 identifying additiona...

Page 41: ...alization batch files HP systems 3 3 PC systems 1 3 SPARC systems 2 3 insert key HP systems 3 9 SPARC systems 2 9 installation debugger HP systems 3 4 PC systems 1 4 SPARC systems 2 4 simulator HP systems 3 4 PC systems 1 4 SPARC systems 2 4 verifying HP systems 3 8 PC systems 1 8 SPARC systems 2 8 K keyboard mapping HP systems 3 9 SPARC systems 2 9 keysym label HP systems 3 9 SPARC systems 2 9 L ...

Page 42: ...ing files from CD ROM HP systems 3 4 SPARC systems 2 5 root privileges HP systems 3 3 SPARC systems 2 3 S s debugger option HP systems 3 6 PC systems 1 5 SPARC systems 2 6 screen configurations HP systems 3 3 PC systems 1 3 SPARC systems 2 3 setpath statement HP systems 3 6 SPARC systems 2 6 sim2xx command options HP systems 3 6 PC systems 1 5 SPARC systems 2 6 directory HP systems 3 4 3 6 PC syst...

Page 43: ...ARC systems 2 9 xmodmap HP systems 3 9 SPARC systems 2 9 xrdb HP systems 3 10 SPARC systems 2 10 V v debugger option HP systems 3 6 PC systems 1 5 SPARC systems 2 6 verifying the installation HP systems 3 8 PC systems 1 8 SPARC systems 2 8 W Windows 1 9 X x debugger option HP systems 3 6 PC systems 1 5 SPARC systems 2 6 X Window System HP systems 3 9 to 3 10 SPARC systems 2 9 to 2 10 Xdefaults fil...

Page 44: ...Index 6 ...

Reviews: