2
SKILL
LEVEL
Ringo Educational Guide Rev04.1 ~ Plum Geek
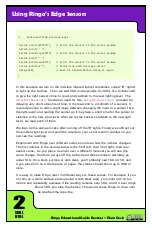
In this example, we’ve made a change to the
MoveWithOptions()
function. You
may notice that instead of going direction
0
, we instead have plugged another
function into this spot -
GetHeading()
. Lets talk about this for second.
Lets say we put a
0
instead of
GetHeading()
. You may want to try this and see
what happens on your own. When we put a
0
in this function, Ringo is going
to try and drive to the heading of
0
referenced from the last time you called
either
HardwareBegin()
or
ZeroNavigation()
. Putting a
0
in here the first time
through the loop causes him to drive straight as expected. But after we rotate
him 90 degrees, he is no longer headed in the
0
degree direction. If we call
MoveWithOptions()
a second time after the rotation, and we put a
0
for direction,
Ringo will make a left turn as he starts to drive because he is trying to return to
the
0
degree direction.
An easy way to avoid this, is to always place
GetHeading()
in place of the zero.
The
GetHeading()
function reads Ringo’s current heading and automatically
passes this current heading to the
MoveWithOptions()
function each time it is
called. By passing
GetHeading()
for the direction, Ringo will always travel in a
straight line each time the function is called, no matter how much you rotate him.
You could do other cool things like passing “
GetHeading()+15
” which would cause
Ringo to make a 15 degree clockwise turn during each movement.
These are the basics to get you started. We will continue to fill out this guide with
additional examples and greater explanation as we move forward. Cheers!!
void loop(){
//direction, speed, distance, runtime, skidtime, edge, wiggle
MoveWithOptions
(
GetHeading()
,
220
,
300
,
2000
,
100, 0, 10
);
// go forward 300 mm at present heading
delay(500);
// wait 1/2 second
RotateAccurate
(
90
,
2000
); // rotate 90 degrees clockwise
delay(500);
// wait 1/2 second
}
Using Ringo’s Navigation


