background image


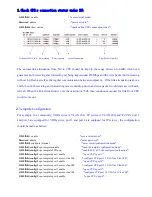
4. Revise one NC’s working frequency, change the default 1000MHz TO 1100MHz. 


GD.LINK>

 enable                                    /                       

  /*access initial mode*/ 

Password

: admin                                                                 

/*enter password*/ 

GD.LINK# 

configure terminal                                      .     

/*access global configuration mode*/ 

GD.LINK(config)# 

service stop   

/*stop NC service, access head-end configuration mode available only after NC stop */ 

GD.LINK(config)#

 headend                                               

/*access head-end configuration mode*/ 

GD.LINK(config-headend)# 

frequency 1100                     

/*revise the working frequency as 1100MHz*/ 

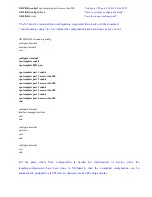
GD.LINK(config-headend)# 

exit                                         

/*back to the previous operation mode*/   

GD.LINK(config)# 

service start


  /*start NC service*/ 

GD.LINK(config-if)#

 end              /                                       

/*back to privilege configuration mode*/ 

GD.LINK#

 write                                                                     

/*save the configuration*/ 

GD.LINK# 

show running-config              /                           

  /*check the finished program*/ 

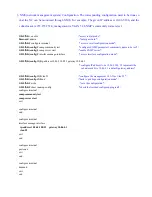
configure terminal 

exit 


configure terminal 

end 


configure terminal 

interface manage-interface 

exit 

end 


configure terminal 

port coax 

exit 

end 


configure terminal 

headend 

frequency 1100 

exit 

end 


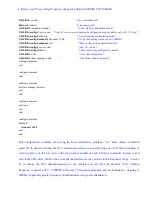
This  configuration  is  mainly  for  solving  the  basic  interference  problems.  Use  “show  online”  command 

under NC to observe whether the NC’s attenuation value is in a normal range or not. If the forwarding or 

receiving  rate is  on the low side, or the error packet  number in  each refresh is  constantly increased,  and 

even leads CPEs often off-line, then it means the interference may existed in this frequency range. You can 

try  to  change  the  NC’s  default  frequency  to  see  whether  you  can  solve  the  problem.  NC’s  working 

frequency  is  between  950  ~1500MHz  with  total  23  frequency  channels,  and  each  channel’  s  stepping  is 

25MHz. Apparently greater frequency modification occurs greater attenuation.     

Summary of Contents for XL-MB103SW

Page 1: ...XL MB103SW MoCA Ethernet bridge User s Guide ...

Page 2: ...xample in a community VOD service is VLAN 100 IP service is VLAN 200 and if CPE s port 1 and port 3 are equipped for VOD service port 2 and port 4 are equipped for IP service the configuration should be made as bellow GD LINK enable access initial mode Password admin enter password GD LINK configure terminal enter overall configuration mode GD LINK config cpe template enable open the template conf...

Page 3: ...te enable cpe template 8021q on cpe template port 1 enable cpe template port 1 access vlan 100 cpe template port 2 enable cpe template port 2 access vlan 200 cpe template port 3 enable cpe template port 3 access vlan 100 cpe template port 4 enable cpe template port 4 access vlan 200 end configure terminal interface manage interface exit end configure terminal port coax exit end configure terminal ...

Page 4: ...D LINK config interface manage interface access interface configuration mode GD LINK config if ip address 10 86 5 100 22 gateway 10 86 4 1 configure IP address to be 10 86 5 100 22 represents the subnet mask bits 10 86 4 1 is default gateway address GD LINK config if vlan 52 configure the management VLAN as Vlan 52 GD LINK config if end back to privilege configuration mode GD LINK write save the c...

Page 5: ... finished program configure terminal exit configure terminal end configure terminal interface manage interface exit end configure terminal port coax exit end configure terminal headend frequency 1100 exit end This configuration is mainly for solving the basic interference problems Use show online command under NC to observe whether the NC s attenuation value is in a normal range or not If the forw...

Page 6: ...r 1 cpe port 1 enable Enable to set up CPE port 1 GD LINK config user 1 cpe port 1 access vlan xx Set up VLAN of CPE port 1 GD LINK config user 1 end Exit to privilege mode GD LINK show run Check configuration GD LINK write Save Configuration 6 Change login password GD LINK enable Access privilege mode Password admin Enter password admin GD LINK con t Access overall configuration mode GD LINK conf...

Page 7: ...CPE MAC Add Forwarding rate Receiving Rate Actual Attenuation Error Packet Number ...

Reviews: