background image

Weather Station P03/3-RS485 • Version: 11.10.2011 • Subject to technical alterations. Errors excepted. 

5

Transfer protocol 

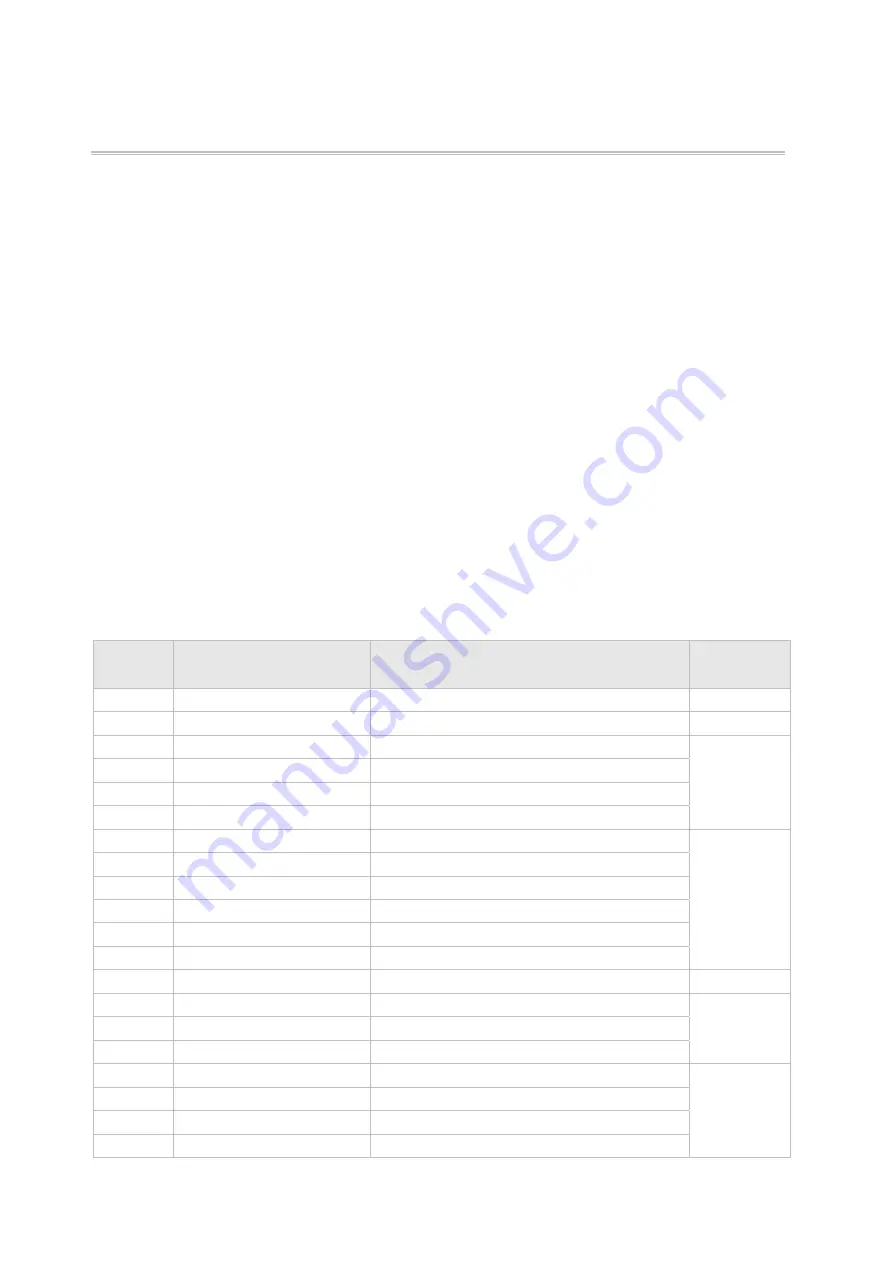
All characters and/or digits are based on the ASCII standard, i.e. every reading 

processed internally as an integer or float value will always be broken down into and 

transferred in its individual ASCII format characters. They must then be reassembled in 

the reverse process by the receiver. 

Transfer rate:  

19200 Baud   

Data bits: 


Stop bit: 


Parity:  


none 


The checksum is calculated along by the receiver by adding all received bytes up until 

byte 35 and then compared with the checksum transferred from the P03. 


Units:   

Temperatures in degrees Celsius 


Sun intensity in kilolux 

  Daylight 

in 

Lux 


Wind in metres per second 


The DCF signal can be easily interfered with. It is possible for no radio clock reception to 

exist for extended periods. Therefore, only use the output time for synchronization of 

another clock working in parallel in the system. For this, the second 0 should be used.  


Byte 

No. 

Char 

Meaning 


Weather data start 


OT: Sign 

Outdoor temperature sign •  / +  


OT: 1st digit 

Outdoor temperature 1st digit (tens) 

in °C 

OT: 2nd digit 

Outdoor temperature 2nd digit (ones) 

OT: Point 

Outdoor temperature point 

OT: 3rd digit 

Outdoor temperature 3rd digit (tenth) 

SuS: 1st digit 

Sun South 1st digit (tens) 

1-99 klx 

SuS: 2nd digit 

Sun South 2nd digit (ones) 

SuW: 1st digit 

Sun West 1st digit (tens)  

10 

SuW: 2nd digit 

Sun West 2nd digit (ones) 

11 

SuE: 1st digit 

Sun East 1st digit (tens) 

12 

SuE: 2nd digit 

Sun East 2nd digit (ones) 

13 

Twilight 

Twilight: J = Yes; N = No 

< 10 lx 

14 

Daylight 0-999Lx 

Daylight (1st digit hundreds) 

0-999 lx 

15 

Daylight 0-999Lx 

Daylight (2nd digit tens) 

16 

Daylight 0-999Lx 

Daylight (3rd digit ones) 

17 

Wind: 1st digit 

Wind 1st digit (tens) 

in m/s 

18 

Wind: 2nd digit 

Wind 2nd digit (ones) 

19 

Wind: Point 

Wind Point 

20 

Wind: 3rd digit 

Wind 3rd digit (tenth) 

Summary of Contents for P03/3-RS485

Page 1: ...terface Technical data and notes for installation Elsner Elektronik GmbH Control and Automation Engineering Herdweg 7 D 75391 Gechingen Germany Phone 49 0 70 56 93 97 0 Fax 49 0 70 56 93 97 20 info elsner elektronik de www elsner elektronik de ...

Page 2: ...them incorrectly will destroy the interface components Functions Brightness measurement with three separate sensors for east south and west Recognition of twilight dawn with special filters Wind speed measurement by means of a nonwearing electronic sensor No damage from storm or hail as with mechanical anemometers Temperature measurement Heated precipitation sensor 1 2 watts No false reports as a ...

Page 3: ...5 at 0 15 m s at an angle of attack of 45 pole mounting Measurement range brightness 0 99 000 lux Resolution 1 lux at 0 120 lux 2 lux at 121 1 046 lux 63 lux at 1 047 52 363 lux 423 lux at 52 364 99 000 lux Accuracy 35 The following standards were referenced with regard to evaluating electromagnetic compatibility of the product EN 60730 1 2000 11 A11 2002 The product has been tested by an accredit...

Page 4: ...011 Subject to technical alterations Errors excepted 4 PCB layout Fig 1 1 Socket for connecting cables to rain sensor in housing cover 2 Socket for connection 1 24 V DC 2 GND A Data B Data 3 DCF77 reception control LED 4 DCF77 antenna set screw ...

Page 5: ...st for extended periods Therefore only use the output time for synchronization of another clock working in parallel in the system For this the second 0 should be used Byte No Char Meaning 1 W Weather data start 2 OT Sign Outdoor temperature sign 3 OT 1st digit Outdoor temperature 1st digit tens in C 4 OT 2nd digit Outdoor temperature 2nd digit ones 5 OT Point Outdoor temperature point 6 OT 3rd dig...

Page 6: ...digit thousands 37 Checksum 2nd digit Checksum 2nd digit hundreds 38 Checksum 3rd digit Checksum 3rd digit tens 39 Checksum 4th digit Checksum 4th digit ones 40 End End 0x03 Installation and first use The weather station may only be installed tested put into operation and troubleshot by a person qualified to do so When connecting the weather station do not connect any live wires switch off the mai...

Page 7: ...snowing The weather station must not be shaded by anything such as building structures or trees There must be at least 60 cm of free space underneath the weather station to allow it to measure the wind correctly and to prevent it from being snowed in when it snows Please ensure that the extended awning does not cast shade on the unit and that this is not protected from the wind Temperature measure...

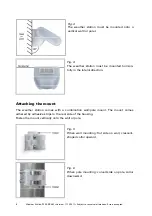
Page 8: ... must be mounted horizon tally in the lateral direction Attaching the mount The weather station comes with a combination wall pole mount The mount comes adhered by adhesive strips to the rear side of the housing Fasten the mount vertically onto the wall or pole Fig 5 When wall mounting flat side on wall crescent shaped collar upward Fig 6 When pole mounting curved side on pole collar downward ...

Page 9: ... 9 Fig 7 An additional optional accessory available from Elsner Elektronik is an articulated arm for flexible wall pole or beam mounting of the weather station View of rear side and drill hole plan Fig 8 a Dimensions of rear side of housing with bracket Subject to change for technical enhancement ...

Page 10: ... right along the bottom edge see Fig 9 Remove the weather station cover Proceed carefully so as not to pull off the wire connecting the PCB in the bottom part with the rain sensor in the cover wire with push connector Push the connection cable through the rubber seal on the bottom of the weather station and push the power and bus cables onto their designated terminals The connection is by typical ...

Page 11: ...must snap in on the left and right with a definite click Fig 10 Make sure the cover and bottom part are properly snapped together This picture is looking at the closed weather station from underneath Fig 11 Push the housing from above into the fastened mount The bumps on the mount must snap into the rails in the housing To remove it the weather station can be simply pulled upwards out of the mount...

Page 12: ...lying the power before the wind measurement will be output Maintenance The weather station must be checked for dirt on a regular twice yearly basis and cleaned if necessary A dirty weather station can lead to strange results such as the wind sensor failing to work the station constantly announcing rain or failure to detect sunlight ...

Reviews: