27
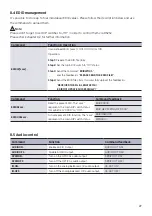
8.4 EDID management
It’s possible to store up to four individueal EDID values. Please follow the description below and use
the commands to upload them.
Note:
Please don‘t forget to set DIP switches to „1111“ in order to control them via RS232.
Please check
chapter 6.3
for further information.
Command
Function & Operation
EDIDW[xxxx].
User-defined EDID. [xxxx] = 1011, 1100, 1101 or 1110.
Operation:
Step 1:
Prepare the EDID file (.bin).
Step 2:
Set the 4-pin DIP switch to “1111” status.
Step 3:
Send the command “
EDIDW1101.
”,
and the feedback is “
PLEASE SEND THE EDID FILE!
”.
Step 4:
Send the
EDID file (.bin). If successfully upload, the feedback is:
“
RECEIVED THE FILE, LENGTH=134!
EDID1101 UPDATE SUCCESSFULLY!
”
Command
Function
Command feedback
EDIDRxxxx.
Read the preset EDID. The “xxxx”
represents the 4-pin DIP switch status.
It maybe from “0000” to “1110”.
EDIDR0000.
EDID HEX STRING OF '0000':
EDIDUSExxxx.
Activate preset EDID function. The “xxxx”
represents the 4-pin DIP switch status.
EDIDUSE0000.
DIP0000!
8.5 Audio control
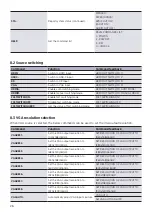
Command
Function
Command feedback
AUDIOON.
Enable AUDIO Output
AUDIO OUT ON!
AUDIOOFF.
Disable AUDIO Output
AUDIO OUT OFF!
SPDIFON.
Turn on the OPTICAL audio output.
SPDIF OUT ON!
SPDIFOFF.
Turn off the OPTICAL audio output.
SPDIF OUT OFF!
IISON.
Turn on the analog balanced L/R audio output.
IIS OUT ON!
IISOFF.
Turn off the analog balanced L/R audio output.
IIS OUT OFF!

