www.rovingnetworks.com
Version 1.0r 9/21/2012
69
RN -W IFLYCR -U M
Post Sensor Data Automatically
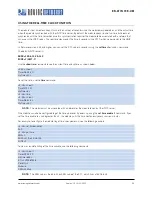
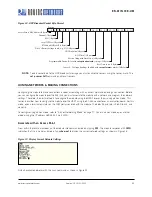
The module can send the value of the GPIO and sensor pins to the web server automatically. The data arrives as 18 bytes
of ASCII hex data in the format <
2 bytes GPIO
><
channel 0 thru 7 sensor data
>.
NOTE:
The analog-to-digital convertor is 14 bits on a 400 mV signal, which translates to about 24 microvolts
(0x61A80 in hex). When you use the
show q
command in command mode, the module displays the raw
readings. However, for HTTP web posting and UDP broadcast packets, the module shifts the reading by 4
bits (which is a divide by 16) resulting in a 16-bit number. Therefore, if you want the actual voltage
sampled, you must take the 16-bit number and shift it left by 4 bits to get the number of microvolts. If you the
value in millivolts (and do not need high accuracy), right shift by another 6 bits, which is the same as dividing
by about 1K.
Example: Post Sensor Data to Web Server
set ip proto 18
// Turn on HTTP mode = 0x10 and TCP mode = 0x2
set dns name www.webserver.com
// Set the web server name
set ip host 0
// Turn on DNS
set ip remote 80
// Set the web server port, 80 is standard
set com remote GET$/userprog.php?DATA=
// Sample server application
set q sensor 0xff
// The module samples all 8 sensor channels
set sys auto 30
// Connect every 30 seconds
set option format 7
// Send the header plus the sampled binary data
// converted to ASCII format
The resulting string sent to the server is:
GET /userprog.php?DATA=0F3000001111222233334444555566667777\n\n
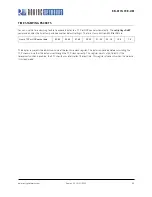
The data format for this example is:
2 Bytes
GPIO
Channel 0
Channel 1
Channel 2
Channel 3
Channel 4
Channel 5
Channel 6
Channel 7
0F30
0000
1111
2222
3333
4444
5555
6666
7777
HTML Client Example: Posting Sensor Data Automatically
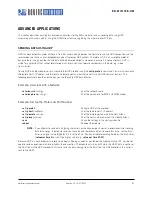
In this example, the module connects to the web server at www.rovingnetworks.com/server.php?value= and posts the
sensor data to the web server every 60 seconds. You set the network connections as described previously, and set
additional parameters.
set ip proto 18
// Turn on HTTP mode = 0x10 and TCP mode = 0x2set
dns name www.rovingnetworks.com
// Set the web server name
set ip host 0
// Turn on DNS
set ip remote 80
// Set the web server port, 80 is standard
set com remote GET$/server3.php?value=
// Set up the server application string
set sys auto 10
// Automatically connect every 10 seconds
set option format 7
// Send the header and sampled binary data converted
// to ASCII
set q sensor 0xFF
// Set the sensor mask to sample all channels
save
// Save the configuration to the config file
reboot
// Reboot so that the settings take effect


