background image


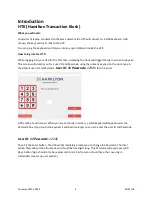
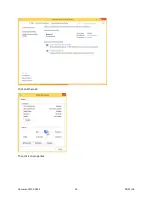
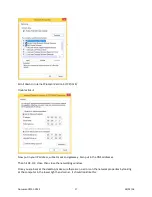
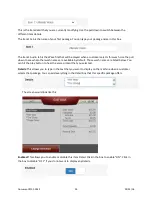
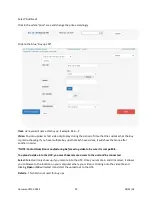
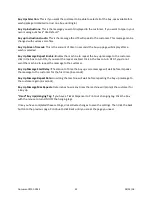
Scroll down to Internet Protocol Version 4 (TCP/IPv4) 

Double click it. 


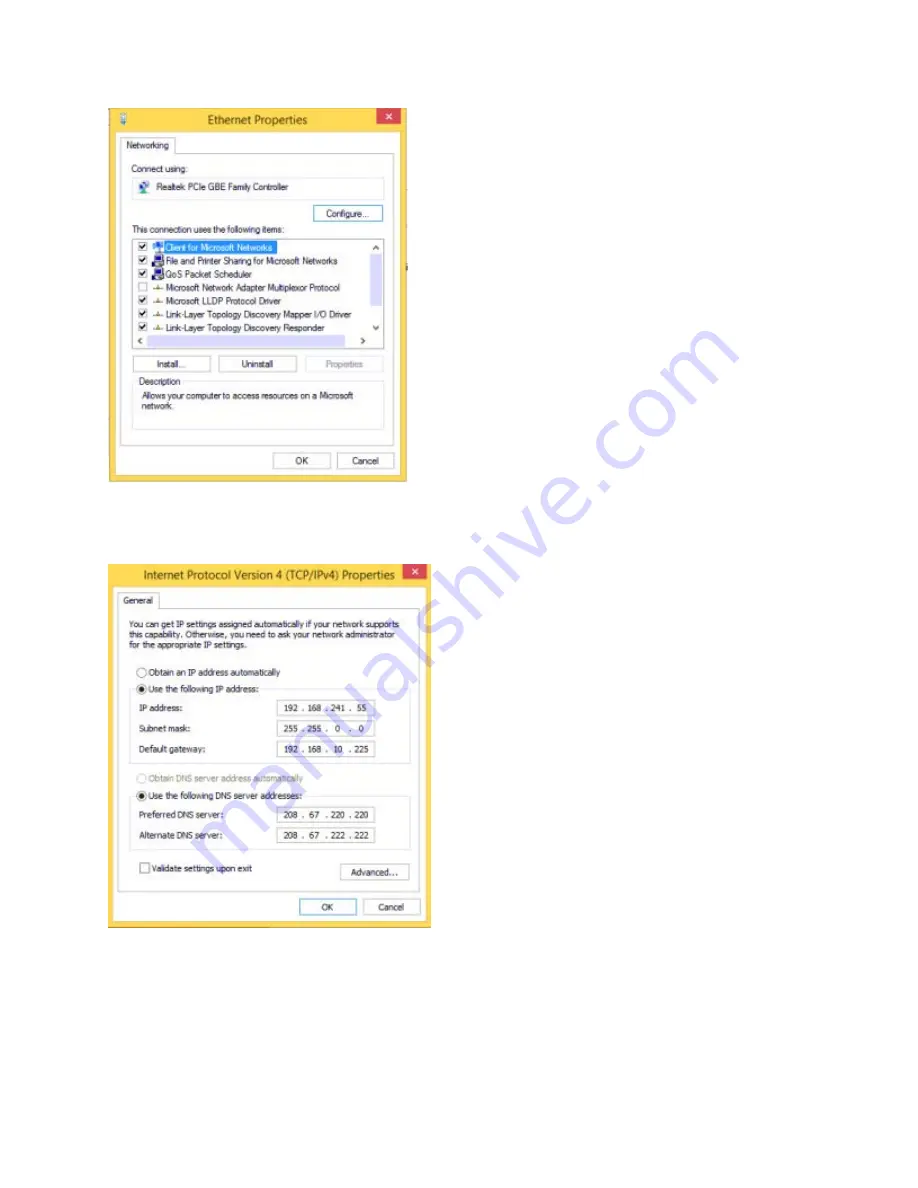
Now put in your IP address, subnet mask and gateway.  Also put in the DNS addresses. 

Then hit OK, OK, close, then close the networking window. 

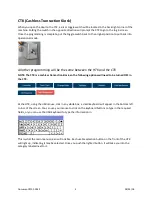
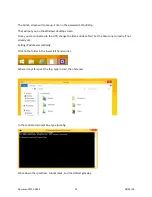
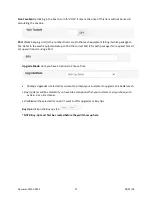
Once you are back at the desktop, make sure there are no errors on the network properties by looking 

at the computer in the lower right hand corner.  It should look like this: 

Document #101-0243

17

02/01/18

Summary of Contents for CTK

Page 1: ...HTK CTK PROGRAMMING MANUAL Document 101 0243 1 02 01 18 ...

Page 2: ... 28 Buy Up Items 31 Configure Buttons 33 Events 37 Welcome Messages 40 Proceed Prompts 42 Tokenotes 45 Token Coins 48 Code Coupons 50 Code Coupon Receipts 54 RFID Basic Settings 56 Change Rule 57 Queue Mode 59 Vend 61 Matrix 63 Custom Single Relay 64 Ethernet Vending 66 Checkout Screen 67 Misc Messages 69 Barcode 71 HTK 73 DAN AUX 75 SMTP 77 FTP Updates 79 Document 101 0243 2 02 01 18 ...

Page 3: ...97 Gate 99 Validator 101 Hoppers 103 Receipt Printer 105 Coin Mechanism 113 Programming IDX Coin Mech 115 Canadian Coin Programming 116 Australia Coin Mech Programming 117 Bill Dispenser 118 POS 122 Card Reader 123 Hamilton ExpressPass RFID System 125 Cash Management 127 LIMITED WARRANTY AGREEMENT OF HAMILTON MANUFACTURING CORP 133 Document 101 0243 3 02 01 18 ...

Page 4: ...ypad on the door type in the default user ID and Passcode User ID 00 Passcode 12345 then hit enter HTK s with a touch screen When you are at the log in screen a small keypad will appear under the Passcode box If you touch the keypad it will become larger so you can enter the user ID and Passcode User ID 00 Passcode 12345 Then hit the enter button The HTK will immediately prompt you to change the P...

Page 5: ...e CTK is a cashless transaction kiosk so the following options will need to be turned OFF in the CTK At the HTK using the USB mouse click in any white box a small keyboard will appear in the bottom left corner of the screen You can use your mouse to click on the keyboard buttons to type in the required fields or you can use the USB keyboard to type the information in This is what the main menu scr...

Page 6: ...tton will allow you to clear an error that may have occurred and reset the HTK The blue Operational Mode button will take you back to the operational screen viewed by customers The white banner at the top of the screen will let you know where you are at in the programming It will add categories and page numbers as you enter into them Once you enter into a category you will notice a red Back button...

Page 7: ...first four steps Step 1 Set up Region this should have been set at the factory Step 2 Set up network LAN Step3 Create a user and rights Step 4 Enable remote access After these four steps are complete you can now go inside and remote into the HTK from your computer or laptop to complete the setup NOTE You cannot log in remotely using the admin credentials Document 101 0243 7 02 01 18 ...

Page 8: ...e white Version box displays the name and version of the payment application for credit card acceptance along with the credit version The application version is the current version on the HTK software The orange Clear Error button will allow you to clear an error that may have occurred and reset the HTK The white logoff button will take you back to the operational screen viewed by customers Docume...

Page 9: ...rs as you enter into them Once you enter into a category you will notice an orange Back button This button will take you back to the previous page If you keep selecting the back button you will eventually end up back at the main menu screen where you would be able to choose the blue Operational Mode button Document 101 0243 9 02 01 18 ...

Page 10: ...p the rest of the equipment Due to this after changing the region you will be required to reconfigure your Hoppers Validator and Bill Dispenser These settings cannot be changed from this screen see Lan Settings section of this manual NOTE This is normally set at the factory if the location of the machine is known If the correct region is already set DO NOT CHANGE THE SETTINGS If a new controller o...

Page 11: ...le alternative on the operational menu of the HTK display Voice Selecting Male or Female for the voice option will change how the HTK speaks the menu prompts Default Language The language you select for this box will be the primary language visually and vocally when a customer pulls up to the HTK Choosing one of the alternate languages from the above section will allow that language to be offered ...

Page 12: ...ngs Turn the top lock so the login screen comes up Enter in user ID 00 password is 12345 At this screen hit the Service Mode button At this screen hit the Service Mode Reboot button Document 101 0243 12 02 01 18 ...

Page 13: ... program to make changes Then this screen will come up On this screen the customer will have to swipe up on the screen if it s a touchscreen or just click on it if they have a mouse hooked up Document 101 0243 13 02 01 18 ...

Page 14: ...nge the time and date first Set the time zone correctly if not already set Setting IP addresses statically Click on the folder in the lower left hand corner Where it says this pc at the top type in cmd then hit enter In the command prompt box type ipconfig Write down the ip address subnet mask and the default gateway Document 101 0243 14 02 01 18 ...

Page 15: ...1 50 or whatever ip you want to check If there is a response in ms that address is being used try another Once you know what ip to use right click on the computer in the lower right hand corner This will come up Left click on Open Network and Sharing Center That will bring up this screen Document 101 0243 15 02 01 18 ...

Page 16: ...Click on Ethernet Then click on properties Document 101 0243 16 02 01 18 ...

Page 17: ... mask and gateway Also put in the DNS addresses Then hit OK OK close then close the networking window Once you are back at the desktop make sure there are no errors on the network properties by looking at the computer in the lower right hand corner It should look like this Document 101 0243 17 02 01 18 ...

Page 18: ...llow there something is not right Re check your settings Once the IP addresses are set right click on the icon that says Exit Service Mode Then hit yes on this screen Then type in a Y for yes here Document 101 0243 18 02 01 18 ...

Page 19: ...Then hit enter The HTK will reboot and load the wash program You will see the initialization screen next Then it will go to the wash selection screen Document 101 0243 19 02 01 18 ...

Page 20: ...n Icon It is in the upper left hand corner under the Recycle Bin Double click it If they don t have the Logmein Icon you can start a session by opening Internet Explorer The type in www logmein123 com in the address bar This will allow the Hamilton technician to gain control of the HTK to better assist Document 101 0243 20 02 01 18 ...

Page 21: ...ct Select ADD User Enable User click in the box to enable the user it will switch to ON or OFF If at any point you want to disable the user simply click in the box to change it to OFF and select activate changes Document 101 0243 21 02 01 18 ...

Page 22: ...ress or text message email address where the verification code will be sent in order to remote access the HTK Also if the user will receive notification from the HTK Rights click on the tab at the top marked Rights Simply click in the box to turn on the rights the user is entitled to Once you have completed these settings click save and then activate changes to save the settings Then click the bac...

Page 23: ...Item Prices Select Select Select Select The screen should look like this Document 101 0243 23 02 01 18 ...

Page 24: ...s up to 8 separate packages You may use as many or as few as you wish Once you have completed these settings click Save and activate changes to save the settings Then click the back button to the previous page Continue to click Back until you are at the page you need Document 101 0243 24 02 01 18 ...

Page 25: ...Item Details Select Select Select Select The screen should look like this Document 101 0243 25 02 01 18 ...

Page 26: ...are available by default Those wash names are listed below You can hit the play button to hear the voice prompt that you selected Details This allows you to type in the text that you want to display on the machine when a customer selects that package You can add everything in the detail box that this specific package offers The screen would look like this Enabled This allows you to enable or disab...

Page 27: ...quired Not all set ups will require using a SKU Upgrade Mode Here you have 3 options to choose from Package Upgrades is selected if you want to prompt your customer to upgrade to a better wash Buy Up Items will be selected if you have Ala cart options that your customer can purchase such as Rain X or a tire cleaner Disabled will be selected if you don t want to offer upgrades or Buy Ups Buy Ups cl...

Page 28: ...Item Buy Ups Select Select Select Select The screen should look like this Document 101 0243 28 02 01 18 ...

Page 29: ... one after another in order NOTE Contact Hamilton manufacturing before using video to be sure it is compatible To upload a video into the HTK you must have remote access to the unit and be connected Select Select will only show up if you remote into the HTK Once you remote in and click select it allows you to browse to the location on your computer where your video is Clicking onto the video file ...

Page 30: ...wash manufacture for these settings This would also be used with the Hamilton Hosted Solutions Upgrade Mode Buy Up Items allows the option of providing services after the initial wash package has been selected Package Upgrades allows the option to give customers that have a free or automatic wash service RFID and Codes to upgrade their package for additional money if they wish If you choose to use...

Page 31: ...Buy Up Items Select Select Select Select The screen should look like this Document 101 0243 31 02 01 18 ...

Page 32: ...ant the repeat enabled Click in the box to turn OFF if you do not want the machine to repeat the message to the customer Buy Up Message Start Delay The amount of time the buy up voice message will wait before it speaks the message to the customer for the first time in seconds Buy Up Message Repeat Rate How long the machine will wait before repeating the buy up message to the customer again in seco...

Page 33: ...ashes during an event that you have setup in the Events section Use the pull down arrow to change the Event you are modifying Single function click in the box to turn OFF ON the Single Function if you only sell one wash Then click Save and Activate changes This is what the screen will look like Document 101 0243 33 02 01 18 ...

Page 34: ...ok like When the single button is OFF it will allow you to use up to 8 packages The buttons tab seen below allows you to select the position of the washes that you setup in Item Details Using the pull down arrow next to the wash name select the wash you want to show up and in what position on the screen Button 1 will be positioned on the screen of the machine in the upper left hand corner Document...

Page 35: ...This is how it will display to the customer Another example would be 2 packages on each side of the screen Document 101 0243 35 02 01 18 ...

Page 36: ...ll not be able to push refund to get money back The Hold Cash Credits button will determine if the machine will hold on to a cash credit that is not used For example if cash is inserted into the HTK and no package is selected and hold cash credit is turned ON if they drive away the credit will stay on the screen until it is used or the HTK is rebooted If the Hold Cash Credits button is turned OFF ...

Page 37: ...k like this This is the default base screen for the Events menu From this screen you have the ability to instantly put the HTK out of service with a custom Closed message This can be done by filling the boxes similar to the picture above turning ON the Close button then Save and then Activate Changes When you wish to bring the machine back into service click in the box to turn OFF Save then Activa...

Page 38: ...r situations where you wish to run the special for a predetermined amount of time sometime in the future For example an upcoming holiday week Daily event types are for specials that you want to run every day but only between specific hours of the day This is where you would find something like an Early Bird special every morning or if you wanted to set specific closed times where the equipment wou...

Page 39: ...ike this Close This is an option that would allow you to make an event to close down the HTK for the duration of the event By default the option will show Use Base Value which means that it will stay open and continue to use the existing pricing Selecting Yes will instead put the HTK out of service and will keep it out of service until the event is over or you go back to Use Base Value Closed Head...

Page 40: ...settings click activate changes to save the settings Then click the back button to the previous page Continue to click Back until you are at the page you need Welcome Messages Select Select Select The screen should look like this Welcome Delay this is delay in seconds on which the voice will start to talk when a customer pulls up to the HTK Click to the Message 1 tab Document 101 0243 40 02 01 18 ...

Page 41: ...ur computer to find your custom prompts NOTE The browse button can only be seen when you remote into the HTK Message 1 Video Is a video that the HTK will play for the customer This can be added with customer video files Hamilton Manufacturing does not supply these videos Videos should be a wmv or mp4 file 320x240 and less than 20MB They can be played on the following screens Welcome Prompts Screen...

Page 42: ...e back button to the previous page Continue to click Back until you are at the page you need Proceed Prompts Select Select Select Select The screen should look like this Proceed Prompt This is the message seen after a customer makes a wash selection and is waiting to Document 101 0243 42 02 01 18 ...

Page 43: ...Buy Up Items Cycles through videos while waiting for buy up choices Click on the select button You can then browse your computer to find your custom prompts NOTE Contact Hamilton Manufacturing before using video to be sure it is compatible Non Stacking wait prompt video This is a video that the HTK will play for the customer It can be added with custom video files Hamilton Manufacturing does not s...

Page 44: ... prompts click on the Browse button You can then browse your computer to find your custom prompts Click on the Timeout tab Proceed Timeout This is the time in seconds that the HTK will display the proceed message Once you have completed these settings click activate changes to save the settings Then click the back button to the previous page Continue to click Back until you are at the page you nee...

Page 45: ...Tokenotes Select Select Select Select Select The screen should look like this Click Add New Document 101 0243 45 02 01 18 ...

Page 46: ...e If the Tokenote is only good for one specific wash package leave the default value at 0 Description This is a text field for entering a description of the Tokenote discount Exclusive Use When checked this Tokenote cannot be used with other token credits Use Count This is the number of times that value Tokenote can be used in a single transaction Example Tokenote is a 1 off use count equals 1 wou...

Page 47: ...ake that Tokenote good for only one package If you want to make the Tokenote good for one package put the value of the Tokenote under that package and then leave 0 00 amount under the remaining packages One Tokenote with a different value for each package Tokenote good for one package only Once you have completed these settings click activate changes to save the settings Then click the back button...

Page 48: ...should look like this Select Add New Token coin 1 Value Is the value of the token Mode Single Credit Allows only a single token to be deposited per transaction Multiple Credit Allows multiple tokens to be deposited per transaction Document 101 0243 48 02 01 18 ...

Page 49: ...peat this step for each Token that will be accepted Once you have completed these settings click activate changes to save the settings Then click the back button to the previous page Continue to click Back until you are at the page you need Document 101 0243 49 02 01 18 ...

Page 50: ...Code Coupons Select Select Select Select Select Select The screen should look like this Click Add New Document 101 0243 50 02 01 18 ...

Page 51: ...asterisk Leaving the box OFF the numbers will be visible on the display when entering the code Coupon Code click the blue number Coupon Key This is where you will enter the code number you want to use When you enter a code the pound sign must be added to the beginning This tells the HTK that this is a code coupon and not a code from a POS system When your customer enters this code they must also e...

Page 52: ...l display all of the codes that are programmed in the machine Enable Turning ON will enable the code to be used at the machine If the box id OFF the code will be disabled Default Value This is the value of the discount for this code coupon for all packages If the Code Coupon is only good for one specific wash package leave the default value at 0 00 Example 1 00 would be a 1 00 discount off any was...

Page 53: ...to be used you must uncheck the enable box If you will never use this code again it is suggested that you delete the code coupon all together Once you have completed these settings click activate changes to save the settings Then click the back button to the previous page Continue to click Back until you are at the page you need Document 101 0243 53 02 01 18 ...

Page 54: ...ect Select Select Select Select Select The screen should look like this Coupon Barcode Std This is for the type of barcode that will be printed on your receipt Code39 Code128 Coda bar ITF QR Code Document 101 0243 54 02 01 18 ...

Page 55: ...printed on a receipt will follow the same rules as a normal code coupon It will always be good until it has been disabled or deleted Printed When a QR Code is selected what is typed in this box will print on the receipt under the QR Code example 2 00 off on your next visit Coded This gives you the option to add text within the barcode itself Example Go to Hamiltonmfg com Now if your customer has a...

Page 56: ...lable for the package those buy up items will be offered to the customer for additional money If they don t wish to purchase the optional buy up item s then they press DONE If there are no buy up items available it will automatically vend the wash package associated with the RFID tag number If neither are on when the RFID tag is read a credit will appear This will allow the customer to choose whic...

Page 57: ... settings Then click the back button to the previous page Continue to click Back until you are at the page you need Change Rule Select Select Select Select The screen should look like this Click on Add new Rule to start a new rule The click Edit Document 101 0243 57 02 01 18 ...

Page 58: ...t before any other change Priority If you have more than one change rule you can choose which rule has the most priority Using the pull down select which priority 1 being the highest priority 9 being the lowest Valid for Item This lets you select if this is for a specific package Using the pull down you can then select which package you want this priority used for If you leave the selection at non...

Page 59: ...sed package In scenarios that would use this function the receipt is generally then shown to an attendant that would provide the customer with whatever service they just purchased In most scenarios you will leave this OFF Cycle Signal Operation This menu contains the options for how the HTK looks for a cycle signal Required This tells the HTK we should be looking for a cycle signal Not Required Th...

Page 60: ...nal This will change what kind of signal the HTK is expecting or looking for Active When the equipment is sending the HTK constant voltage it would be in service If it takes that voltage away that would put the HTK out of service Passive When the equipment is sending the HTK no voltage it would be in service If it starts sending voltage it would go out of service Drive off Timer This option is gen...

Page 61: ...lect Select The screen should look like this NOTE If you need more than eight relays you will need to purchase a second wash interface pan and harness this will expand the available relays to sixteen Document 101 0243 61 02 01 18 ...

Page 62: ...d to control a gate up signal or a door up signal without interfering with the wash package vending When always use isolated vend is not checked the relay can be used as a 9th vend relay Isolated Duration This is the length of time that the HTK turns on the isolated vend relay The length of time this relay should be held depends on the requirements of the receiving equipment that you are connectin...

Page 63: ...on a keypad The length of time these relays should be held depends on the requirements of the receiving equipment It should be the same amount of time a person would take to press and hold the button Refer to the your equipment manual before programming these settings Always use Isolated Vend When checked will fire this relay with every item vended The isolated vend relay has a separate common fro...

Page 64: ...itches 1 2 and 3 should all be set to the ON position The wash interface pan 2 switch 1 should be ON Custom single relay Vend This is designed so the HTK can fire one relay from either of the wash interfaces expanding the relays available to sixteen Click the Vend Pattern tab To assign a package or buy up to a specific wash interface pan and relay use the drop down box to the right of the Item or ...

Page 65: ... have completed these settings click activate changes to save the settings Then click the back button to the previous page Continue to click Back until you are at the page you need Document 101 0243 65 02 01 18 ...

Page 66: ...ct Select Select The screen should look like this Ethernet Vend Enable This allows you to send package vending information via Ethernet if the receiving equipment is capable Turn ON to enable the ether vend Document 101 0243 66 02 01 18 ...

Page 67: ... IP address assigned to the tunnel controller or receiving equipment Port This is the listening port of the tunnel controller or receiving equipment Once you have completed these settings click activate changes to save the settings Then click the back button to the previous page Continue to click Back until you are at the page you need Checkout Screen Select Select Select Select Select The screen ...

Page 68: ...rk at the top to customize this field See below In this example we set the machine to wait 2 seconds before prompting the customer to deposit money The machine will wait for 10 seconds before prompting the customer a second time After another 10 seconds the machine will prompt the customer the 3rd time The machine will not prompt the customer again after the 3rd time Turn ON the Deposit Message re...

Page 69: ... Misc Messages Select Select Select Select Select The screen should look like this Application Title This is the name of the HTK that will display on the upper left wash select screen Select Item Prompt This is the message displayed in the banner at the top of the wash screen To customize this message turn OFF Use Default and you can type in your own message Document 101 0243 69 02 01 18 ...

Page 70: ...o the customer This message is for your records only Once you have completed these settings click activate changes to save the settings Then click the back button to the previous page Continue to click Back until you are at the page you need Document 101 0243 70 02 01 18 ...

Page 71: ...s used to interface with certain manufacturers of equipment Specifically it is used in situations where the HTK is expected to print off a barcode on the receipt that is to be scanned or entered into a different manufacturer s equipment to provide a certain service Document 101 0243 71 02 01 18 ...

Page 72: ... enables that code to also print as a barcode Vend Barcode Std Selects which standard format is used to create the barcode Vend BC Term ID Chars Determines how many digits of the HTK Terminal ID will be used in the vend barcode Cannot be more than 4 Vend BC Other Field Makes the subtitle and barcode either a randomly generated number or match the Transaction ID Vend BC Other Chars Changes how many...

Page 73: ...1 Terminal Name a name given specific to the HTK example HTK lane 1 This will help to determine which lane you are remote accessing In the example above the terminal name is Customer SERVICE Serial Number this is the serial number of the HTK Once a number other than zero 0 has been entered this field cannot be edited This must be filled in when communicating to Payment Express Document 101 0243 73...

Page 74: ...is signal leave it set to Passive Out of Service Delay Here you can determine in seconds how long before the HTK goes out of service when we get an inhibit signal from the car wash on the wash in service input Once you have completed these settings click activate changes to save the settings Then click the back button to the previous page Continue to click Back until you are at the page you need D...

Page 75: ... connection on This should be set to 8050 unless instructed by Hamilton to change Listen SSL should be off unless instructed by Hamilton Retry Interval The time in minutes the HTK waits before trying to send a record again Common setting is 10 minutes Click save Click on the Listeners tab Document 101 0243 75 02 01 18 ...

Page 76: ...e cash management tab Enable Cash Management is the ability to add the starting amount of cash in the HTK As the HTK accepts money and dispenses money it will add and subtract from the proper categories Such as the Bill Validator Bill cassettes hoppers and coin mechanism Cash Status Frequency Offers 3 options Per Transaction if chosen will send each transaction to the external listener each time a...

Page 77: ...k save then activate changes to save the settings Then click the back button to the previous page Continue to click Back until you are at the page you need NOTE for Sonny s Autopilot set up please contact Hamilton customer service SMTP Select Select Select Select The screen should look like this Document 101 0243 77 02 01 18 ...

Page 78: ...ls before allowing access Username Will be the email address you use to send out email Example example gmail com Password Is the password that was setup with the email you created Email from Is the email address that will show up on the email being sent from the HTK Typically this is the same as Username Test Recipient allows you to test the settings you put in by sending out a test email Enter in...

Page 79: ...FTP Updates Select Select Select Select The screen should look like this Note THIS SHOULD NOT BE CHANGED UNLESS INSTRUCTED BY HAMILTON MANUFACTURING Document 101 0243 79 02 01 18 ...

Page 80: ...cepted Value Card Using the pull down select which value cards you will be accepting if any Currently the HTK can accept Hamilton P2P cards Wash Card World Gift cards or Auto Pilot cards Accepted Tracks Using the pull down select which tracks are needed on the card United States will use track 1 and track 2 Canada will use only track 2 Australia will use both track 1 and track 2 Click on the Surch...

Page 81: ...card whatever is typed in this box will appear on the screen before the value card balance Gift Card Balance Postfix When using a value card whatever is typed in this box will appear on the screen after the value card balance Item Based Balance Prefix When using an item based card such as the Auto Pilot Wash Book whatever is typed in this box will appear on the screen before the card balance Item ...

Page 82: ... Express is for EMV card processing using SCR200E reader Moneris is for the Verifone EMV reader in Canada eMatters is for legacy card processing in Australia Eway is for legacy card processing in Australia NOTE when selecting Payment Express see the Hardware Card Reader section to obtain the card reader serial number Document 101 0243 82 02 01 18 ...

Page 83: ...nformation will be entered A payment gateway is a secure connection from the bank to your storefront allowing your customers to make credit card purchases that directly deposit into your bank account Hamilton Manufacturing uses E Xact Transactions Ltd as the payment Gateway for the United States and Canada An account with E Xact Transactions Ltd must be set up in order to do high speed credit card...

Page 84: ...xactly as it was provided capital letters dashes etc Password The password is generally randomly assorted letters and numbers When entering the password just like the User ID it is important to pay attention to capital and lower case characters Once you have completed these settings click activate changes to save the settings Then click the back button to the previous page Continue to click Back u...

Page 85: ...to you by P2P Points to Partners Inc You must first set up an account with P2P Phone 888 488 7642 www pointstopartners com Document 101 0243 90 4 2016 P2P IP Address This is auto filled by the factory and should not be changed unless instructed by a Hamilton customer service representative Document 101 0243 85 02 01 18 ...

Page 86: ...D This is auto filled by the factory and should not be changed unless instructed by a Hamilton customer service representative Credit Routing ID This is auto filled by the factory and should not be changed unless instructed by a Hamilton customer service representative Once you have completed these settings click activate changes to save the settings Then click the back button to the previous page...

Page 87: ...s you will enter from Wash Card Wash Card Port This is the port you will put in from Wash Card NOTE All information for this section should be provided by Wash Card Systems Once you have completed these settings click activate changes to save the settings Then click the back button to the previous page Continue to click Back until you are at the page you need Document 101 0243 87 02 01 18 ...

Page 88: ...Select The screen should look like this URL The service URL for World Gift is http wgchost com W3 Service asmx Merchant Number This number is referencing the customer s account and will be provided by World Gift Document 101 0243 88 02 01 18 ...

Page 89: ...by World Gift Password This information will be provided by World Gift Once you have completed these settings click activate changes to save the settings Then click the back button to the previous page Continue to click Back until you are at the page you need Auto Pilot Cards Select Select Select Select Select The screen should look like this Document 101 0243 89 02 01 18 ...

Page 90: ...10 31 Host Port This will always be 8052 Encryption Key Is going to be 12345678 Encryption Salt Is Hamilton Invalid Choice Text Is not used at this time Invalid Choice Text Audio Is not used at this time Invalid Choice Action Is not used at this time Document 101 0243 90 02 01 18 ...

Page 91: ...tness This is the percentage of brightness used to light the display The higher the percentage the brighter the display will be 100 is the brightest Logo Allows for adding a logo image to certain custom themes URL The url of an image to use for the logo Document 101 0243 91 02 01 18 ...

Page 92: ...una Green Ocean Blue Lava Red Bubbles 4 Bubbles 8 Hexagon 4 Hexagon 8 Hexagon 7 Block 4 and special edition seasonal releases You can also choose the color of the button NOTE Graphic buttons are only available with a touch screen display Custom graphics are also available Contact Hamilton Sales Department Volume This is the percentage of sound played when the voice prompts are activated the higher...

Page 93: ...ntage the brighter the screen saver will be Screensaver Timeout This is the amount of time in minutes the HTK must be idle before the screen saver will activate Screen Saver Video You have the ability to add a video to play when the screen saver initiates Click the Misc tab Use 2 Factor in Subnet By turning this ON it will now require the 2 factor authentication to remote into the HTK from within ...

Page 94: ... the proximity sensor is covered the HTK will automatically change back to the wash menu screen Hide indicators There are two black dots in the bottom middle of the display pay screen These indicators are so you can see the cycle signal change of state without having to open the HTK If the black dot on the right side turns white that means the HTK is receiving the cycle signal from the equipment i...

Page 95: ...Alerts Select Select Select Select The screen should look like this Document 101 0243 95 02 01 18 ...

Page 96: ...will send an email if that particular error comes up Send SMS SMS stands for Short Message Service or text message If this is turned ON and the error occurs the machine will send a text message Send on Clear The machine can send a message if one of these errors is cleared Once you have completed these settings click activate changes to save the settings Then click the back button to the previous p...

Page 97: ...s that are entered in this area Enable Alarm Relay turning this feature ON OFF will enable disable the alarm relay If there is an external security system at the location that is connected to the HTK this option chooses whether or not it will send a message to the system if the alarm is tripped Shock Sensor Normal State By default the shock sensor that is installed by Hamilton is in an Open state ...

Page 98: ...receipt the lowest number will display that tax first Example City tax and State tax Tax Rate This is the percentage rate being charged per transaction 100 being the maximum Compound If turned ON causes this tax to be calculated on the sale amount including the previous tax Once you have completed these settings click then click activate changes to save the settings Then click the back button to t...

Page 99: ...Gate Select Select Select Select Select The screen should look like this Document 101 0243 99 02 01 18 ...

Page 100: ...re it will timeout when it does not get a signal from the gate safety loop When the car passes over the safety loop it will send the HTK a 24V signal cycle signal Once the HTK receives that 24V signal the HTK will then send the wash package to the Car Wash If the HTK does not receive the 24V signal in the amount of time entered it will then go to Sorry Equipment is out of service NOTE This is a re...

Page 101: ...ore new setting is active Validator Type Using the pull down you ll want to select the validator type you are using Usually this is done in the factory so will you only need to change this if you change Validator types or if you have to program the machine from factory defaults Your choices are Document 101 0243 101 02 01 18 ...

Page 102: ...you can choose none if this is a cashless machine Once you have selected the correct validator you can choose what bills you want to accept Turn ON the bills you want to accept and leave OFF for bills you do not want to accept Once you have completed these settings click activate changes to save the settings Then click the back button to the previous page Continue to click Back until you are at th...

Page 103: ...to the hopper NOTE Coin types may differ depending on the Region selected NOTE Hopper and coin types are usually set at the factory There are 2 coin hoppers in the HTK Typically the left one is hopper 1 and the right is hopper 2 You can verify how they are setup by checking the dip switches on the hopper See dip switch configuration below Document 101 0243 103 02 01 18 ...

Page 104: ...now which coin type goes in which hopper It should show you what coins to put into it EX Quarter Dollar Token Once you have completed these settings click activate changes to save the settings Then click the back button to the previous page Continue to click Back until you are at the page you need Document 101 0243 104 02 01 18 ...

Page 105: ... this dropdown to select whether or not the HTK will give a receipt for cash transactions There are 3 choices Always will print a receipt automatically when the transaction completes Never disables the printer for cash transaction Ask will prompt the customer to push a button if they want a receipt Card Receipts You can use this dropdown to select whether or not the HTK will give a receipt for cre...

Page 106: ... top of the receipt You can only add an image to use for this feature while remotely accessing the HTK Using the Browse button you can point to where on your computer the picture is that you would like to upload Once the image is selected click OK and you should be able to choose it for the header image Receipt Headers By default the HTK starts off with several header lines that are ready to be ed...

Page 107: ...e Once you have completed these settings click activate changes to save the settings Then click the back button to the previous page Continue to click Back until you are at the page you need How to load printer paper 1 locate the blue knob on the left side of the printer 2 Push the blue knob all the in 3 Pull the blue knob out slowly until you hear feel two clicks Document 101 0243 107 02 01 18 ...

Page 108: ...e rods as shown 6 insert a clean edge of the paper into chute below the bottom guide rod The printer will automatically pull the paper in and print out a test page If printer paper comes out with nothing printed on it you have the paper roll on upside down Document 101 0243 108 02 01 18 ...

Page 109: ...How to Remove the paper from the printer 1 locate the blue knob on the left side of the printer 2 Push the blue knob all the way in 3 Pull paper out of the printer Document 101 0243 109 02 01 18 ...

Page 110: ... of the printer 2 Push the blue knob all the way in 3 Pull paper out of the printer 4 locate the thumb screw on the right side of the bracket 5 Remove the thumb screw pull the top portion of the bracket toward you allowing the bracket to lay back Document 101 0243 110 02 01 18 ...

Page 111: ...6 Locate the two plastic tabs and gently pull outward allowing the printer head to hinge open 7 Clean out any and all paper Document 101 0243 111 02 01 18 ...

Page 112: ...8 Turn the blue gear located on the right side of the printer This will allow the rollers in the printer to rotate to be sure you have removed any and all paper jams Document 101 0243 112 02 01 18 ...

Page 113: ...ains three separate lines for programming Line 1 refers to positions 1 and 2 on the IDX coin mech line 2 refers to positions 3 4 on the IDX coin mech and line 3 refers to positions 5 6 on the IDX coin mech Each line recognizes 1 pulse or 2 pulses from the IDX Click Add New Document 101 0243 113 02 01 18 ...

Page 114: ... pull down arrow select the coin type then select the line and finally the pulse Click on save To add another coin click add New Here is an example Click save the activate changes Document 101 0243 114 02 01 18 ...

Page 115: ... of the coin by depositing them into the acceptor as usual It is best to use 6 different coins since there are typically slight variations from coin to coin 6 After the 6 th sample coin is deposited the LED will flash red green a few times to indicate the LEARN procedure is complete and the coin parameters are stored in memory 7 Slide the front cover open again and turn the rotary switch back to p...

Page 116: ...al back to position 0 New Style Looney Position 2 on the IDX push the button one time for 1 pulse Run 6 coin samples Turn the dial back to position 0 Old Style Tooney Position 3 on the IDX push the button one time for 1 pulse Run 6 coin samples Turn the dial back to position 0 New style Tooney Position 4 on the IDX push the button one time for 1 pulse Run 6 coin samples Turn the dial back to posit...

Page 117: ...ted to not modify the default programming in the HTK software under Coin Mechanism This way if categories are ENABLED in the Microcoin the coins will credit properly Refer to the default Coin Mechanism programming in the HTK software within this document Here is the default programming in the Micrcoin acceptor Note Category 10 is left DISABLED and not programmed as the 50 cent coin is too large in...

Page 118: ...l differ between regions NOTE If you wish to dispense a Tokenote they must first be set up in order to see it as an option here See the Tokenote section of this manual Once you have completed these settings click activate changes to save the settings Then click the back button to the previous page Continue to click Back until you are at the page you need The bill box cassette itself will determine...

Page 119: ... A or B When the cassette is inserted into the bill dispenser the dispenser will sense the magnets to determine whether it is cassette A or cassette B NOTE All spare bill box cassettes ordered from Hamilton will come set as cassette A How to load the bill cassettes Locate the green button on the front of the cassette push the button to open Document 101 0243 119 02 01 18 ...

Page 120: ...A sticker inside will also show how to load the cassette Lift the green flipper and pressure plate as the notes will be placed under them Document 101 0243 120 02 01 18 ...

Page 121: ...otes have been inserted replace the flipper and pressure plate back to their original position They will lay on top of the notes Close the lid and insert the cassette into the bill dispenser Document 101 0243 121 02 01 18 ...

Page 122: ... 6 digit Hamilton code system generating a 6 digit code HCS Tunnel Pass Hamilton Tunnel Pass system POS 4000 Unitec POS 4000 Unit Number When multiple HTK s are being used the POS system will identify them by their unit numbers You will increase the unit number by one per HTK Once you have completed these settings click activate changes to save the settings Then click the back button to the previo...

Page 123: ...he screen will look like when an EMV type card reader is in use Card Reader Type this will auto fill and is not changeable at this screen SCR Serial Number this will auto fill when it communicates with the card reader SCR Firmware Version this will auto fill to the current version the card reader is running Document 101 0243 123 02 01 18 ...

Page 124: ... antenna is not connected Host Message Received this shows the date and time the HTK last received a message from the Payment Express host Depending on configuration this may be Never Test SCR Clicking this button allows you to test if the card reader can read a magstripe card a chip card or a contactless card Test Gift Card Clicking this button allows you to test if the SCR has been profiled to a...

Page 125: ... during installation of the RFID equipment and is rarely changed It s important to make note of the readers IP address for two reasons First you need to enter that address here in the HTK configuration so it knows which reader to communicate with And also you will need to know that address in case it s ever necessary to log into the reader to make changes to its configuration settings for example ...

Page 126: ...kiosk The minimum value recommended for proper operation is 4000 milliseconds 4 seconds Blocklist Timeout After a tag has been processed and has left the field for the Out of Field duration the tag is put into a blocking list to prevent that tag from being recognized again This setting determines how long a tag will remain in the blocking list before it can be read again Reset Reader In the event ...

Page 127: ... will also calculate how many bills or coins were accepted You will have to enable cash management before it will display on the configuration screen Select Select Select Select Turn ON the enable cash management Once you have completed these settings click save and then activate changes to save the settings Then click the back button to the previous page Continue to click Back until you are at th...

Page 128: ...Click back until you get to the Main Configuration screen Select The screen should look like this Document 101 0243 128 02 01 18 ...

Page 129: ...ou a receipt The receipt will show how much cash was received by breaking it down into each denomination count Then the balance in The bill acceptor category is now reset to zero Repeat these steps for the coin acceptor Select Document 101 0243 129 02 01 18 ...

Page 130: ...lls are remaining in the cassette Add Using the key pad on the front of the HTK type in how many bills you are adding to the cassette You will enter the quantity of bills not the dollar amount The software will calculate the dollar amount for you After you add the quantity and select done the HTK will print you a receipt Repeat these steps for cassette B Document 101 0243 130 02 01 18 ...

Page 131: ...e keypad on the front of the HTK type in how many coins will be added to the hopper You will enter the quantity of coins not the dollar amount The software will calculate the dollar amount for you After you add the quantity and select done the HTK will print you a receipt Repeat these steps for hopper 2 Document 101 0243 131 02 01 18 ...

Page 132: ...Document 101 0243 132 02 01 18 ...

Page 133: ... 2 The Seller shall not be liable for any expense incurred by Purchaser incidental to the repair or replacement of equipment and Purchaser shall assume full responsibility for any freight or shipping charges 3 The coverage of this warranty shall not extend to expendable parts 4 Purchaser shall have a warranty registration card on file with Seller prior to any claim in order for warranty protection...

Page 134: ...ircumstances 8 No person or entity other than a factory trained representative or Hamilton Manufacturing Corp has performed or attempted to perform the subject repair or service 9 Using equipment which has been serviced or repaired for anything other than its intended or designed use such as downloading software applications not certified by Seller will void the Limited Warranty Agreement This inc...

Page 135: ...1026 Hamilton Dr Holland OH 43528 P 419 867 4858 P 888 723 4858 F 419 867 4850 hamiltonmfg com Document 101 0243 135 02 01 18 ...

Reviews: