7. Example sketches
These examples demonstrate how to program an Arduino-controlled Zumo to perform more complex
and interesting tasks. The source files for the examples are included in the download for the
[https://www.pololu.com/docs/0J57/6]
. Once the library is installed, the examples
can be accessed in the Arduino environment under
File > Examples > ZumoShield
.
7.a. RC Zumo
By connecting an RC receiver and running this example sketch, you can turn your Zumo into a radio-
controlled vehicle. With the
[https://www.pololu.com/docs/0J57/6]
installed,
the sketch file can be opened in Arduino by selecting
File > Examples > ZumoShield > RCControl
.
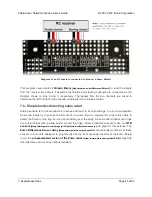
A Zumo robot with an RC receiver
attached to make a radio-controlled
vehicle.
An easy way to connect the receiver to the Zumo Shield is to solder two 1×3
[https://www.pololu.com/product/965]
to the locations shown in the diagram below, then plug in a pair
of standard
[https://www.pololu.com/category/112/servo-cables]
between the receiver and the
Zumo Shield. (If your receiver has a separate power source, you should only connect the signal and
ground wires between it and the Zumo.)
Pololu Zumo Shield for Arduino User’s Guide
© 2001–2019 Pololu Corporation
7. Example sketches
Page 44 of 52


