WATTrouter Mx - user manual
How to fit and setup the device
Page 66 from 82
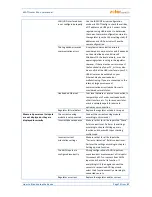
<IP>...</IP><!-- controller IP address-->
<MSK>...</MSK><!-- controller subnet mask-->
<DR>...</DR><!-- default gateway IP address-->
<MAC>...</MAC><!-- controller MAC address-->
<HTTP>80</HTTP><!-- HTTP port-->
<UDP>80</UDP><!-- UDP port-->
<CWD>7200.0</CWD><!-- CombiWATT delay in s-->
<CWL>0.02</CWL><!-- CombiWATT production limit in kW-->
<CWR>0</CWR><!-- energy counter reset (0=at sunrise to 1=fixed time)-->
<CWT>6:00</CWT><!-- fixed time for energy counter reset-->
<LA>50</LA><!--
latitude in °
-->
<LO>15</LO><!--
longitude in °
-->
<STC>0</STC><!-- synchronize date and time with the client (0=inactive,
1=active)-->
<STS>0</STS><!-- synchronize date and time with time server (0=inactive,
1=active)-->
<DST>1</DST><!-- use summer time (0=inactive, 1=active)-->
<TZ>13</TZ><!-- time zone (0=GMT-12 through 25=GMT+14)-->
<TSIP>...</TSIP><!-- time server IP address-->
<DT>0</DT><!-- digital sensor type (0=DS18S20, 1=DS18B20)-->
<DFT>1</DFT><!-- default tab (0=Input settings to 4=Statistics)-->
</conf>
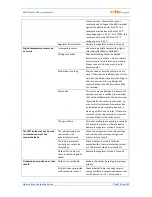
3.
POST /conf.xml
By sending this HTTP request you will save the configuration in the controller. This configuration has the
same format as the GET /conf.xml command, but you must (can) also send additional data. Append the
configuration to the POST /conf.xml command and skip 1 empty line, so the request will look like this:
POST /conf.xml
<!--Request headers-->
<!--one empty line-->
<conf>
<!--the following shows configuration data structure as in the GET
/conf.xml request-->
<DaC>1.1.2012</DaC><!-- date (client)-->
<TiC>0:00:00</TiC><!-- time (client)-->
<UN>admin</UN><!-- username for authorization, mandatory item-->
<UP>1234</UP><!-- password for authorization, mandatory item-->
<UNn>home</UNn><!-- new username, only when change is required-->
<UPn>abcd</UPn><!-- new password, only when change is required-->
<RST>1</RST><!-- reset controller, only if required-->
</conf>
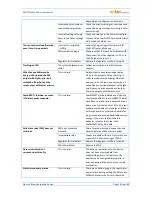
The controller will reply with the following:
<!--Response headers-->
<!--one empty line-->
<conf>
<accept>0</accept><!-- error code: 0-ok, 1-incorrect configuration, 2-
incorrect login (access) data, 3-incorrect new login data, 4-wrong XML file
format-->
</conf>
4.
POST /test.xml
By sending this HTTP request you activate or deactivate test mode for given output(s). Append the data to
the POST /test.xml command and skip 1 empty line, so the request will look like this:
POST /test.xml


