4.1.2 MacOS - Sierra
• Copy the JM3 Robot Tool to a folder and run the program “robottool.app”.
• Click on the “Add Robot” icon - enter the name (freely selectable), the hostname and the USB port you
are using and go to the next step.
• Select the robot type, e.g. “Marvin”. The available USB port name can be looked up in the system
configuration - the USB port is usually “/dev/tty.usbmodem1421”. Just type in the correct USB port
e.g. “/dev/tty.usbmodem1421”. As interface type, select “UART” with a baud rate “0” (default).
• Click OK
• Click on “Add File” to select the hex-file with the new program. The search simply goes over the path
with “SelectFile”. Select the hex-file you want to load into the micro controller. As a further step select
the type, e.g. “Marvin”.
• Click OK.
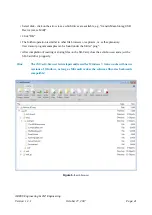
• Select the robot and the program in the listed links.
• Click “Upload program” (at the top of the toolbar)
• Click “Save” (at the top of the toolbar), if you want to save the created robots and programs.
Hint:
The JM3 Robot-Tool is developed for and tested on MacOS Sierra - newer versions
will work as long as Apple will maintain the backward compatibility of the libraies!
4.1.3 Windows 7
• Copy the JM3 Robot Tool to a folder and run the file “robottool.exe”.
• Click on the “Add Robot” icon - enter the name (freely selectable), the hostname and the USB port you
are going to use.
• Select the robot type e.g. “Marvin”. The correct COM Port can be checked in the Device Manager -
often this is “COM3”. Just type in the correct COM port e.g. “COM3”. As interface select “UART”
and the baud rate should be set to “0” (default).
• Click OK
• Click on “Add File” to select the hex-file with the new program. The search simply goes over the path
with “SelectFile”. Select the hex-file you want to load into the micro controller. As a further step select
the type, e.g. “Marvin”.
• Click OK.
AREXX Engineering & JM³ Engineering
Version: 1.3.1
October 27, 2017
Page: 33


