background image

Chapter 6

HANDY FUNCTIONS

Summary of Contents for PD-9810

Page 1: ...PD 9810 PROGRAMMER ENGLISH ...

Page 2: ......

Page 3: ...al carefully before using the machine Operation of this industrial sewing machine is usually carried out in front of moving parts such as the needle and the needle thread take up These parts may cause personal injuries Please follow the operational and safety instructions by the experts instructors and use this machine correctly ...

Page 4: ... described below Program reading from and writing to the machine and files Parameter setting for the program Cycle program setting Comparison of machine data and file data with the program that is set with this product Program copying NOTE Refer to the instruction manual for the machine for how to operate the machine ...

Page 5: ...PROGRAM CHANGE PROCEDURE Parameter Changing of the Program No 5 E 14 Chapter 4 PARAMETER Parameter Table E 18 When the programmer is connected to the machine with the taper tack specifications E 18 When the programmer is connected to the machine with the straight bar tack specifications E 21 Parameter Selection E 24 Selection with the SHORT CUT key E 24 Selection with the key E 24 Selection with t...

Page 6: ...3 Initializing all of the program E 43 Initializing one of any programs E 43 Initializing all of the program in the environment setting area and work area E 44 Environment Setting E 45 Language used E 45 Setting numbers of the program to read and write E 46 Enable disable for auto read write E 46 Display non display of the check message E 47 PROM version display E 48 Comparing the Program E 49 Com...

Page 7: ...Chapter 1 INTRODUCTION ...

Page 8: ...r 2 P key The key is used to start and end the programmer 3 Start lamp The lamp is ON while the programmer is activated 4 MENU key The menu screen is displayed with this key 5 ESC key The key is used to return to the previous screen or to cancel settings 6 key Numericals for the parameter and program No are increased by 1 7 key Numericals for the parameter and program No are decreased by 1 8 ENTER...

Page 9: ...h pitch in straight section No of eyelet stitches key Pressing this key will show the setting screen for the number of eyelet stitches Cutting space key Pressing this key will show the setting screen for the cutting space Knife X position compensation key Pressing this key will show the setting screen for the compensation of knife X positions Knife Y position compensation key Pressing this key wil...

Page 10: ...am 5 File read icon Program reading is performed from the data storage area of the programmer 6 File write icon Program writing is performed to the data storage area of the programmer 7 Initialization icon All of the programs loaded in the programmer are reset to the factory settings 8 Environment setting icon Setting is performed as for languages and mode that are displayed on the programmer 9 Pr...

Page 11: ...tch 6 patterns are available as illustrated below 3 Sewing speed This will display the sewing speed parameter No 00 set to the chosen program number 4 Stitch pitch This will display the stitch pitch parameter No 05 of the sewing pattern set to the chosen program number 5 Button hole length This will display the button hole length parameter No 02 of the sewing pattern set to the chosen program numb...

Page 12: ... for the selected parameter is displayed 2 Parameter No A parameter number can be changed when this indication is selected with key and key is pressed Let the desired parameter No displayed and press the ENTER key Then the setting screen for the desired parameter is displayed 3 Up cursor icon When this icon is displayed more information is available than what is displayed Press key to display the ...

Page 13: ...rite page E 29 Cycle program page E 40 File read page E 30 File write page E 31 Initialization page E 43 Environment setting page E 45 Program comparison page E 49 Program copy page E 51 Program No selection screen page E 5 when auto read write setting is ON Parameter Nos page E 6 W0012Q W0034Q W0032Q ...

Page 14: ...E 8 PD 9810 Chapter 1 INTRODUCTION ...

Page 15: ...Chapter 2 PREPARATION ...

Page 16: ...ON Connecting the Programmer to the Machine CAUTION Be sure to confirm the power to the machine is not set to ON before connecting to the machine 1 Connect the programmer to the connector on the left side of the operation panel 2376Q ...

Page 17: ...CAUTION When you set the power to OFF be sure to confirm data is not in communication nor receiving If set to OFF while in data communication and receiving the data is likely to be disrupted 1 Press the P key of the programmer The buzzer starts to sound and the display on the screen disappears This operation is operable on any screen except for the time when data is in communication The machine re...

Page 18: ...g the Programmer in Store 1 Set the power of the machine to OFF 2 Press the P key to end the programmer 3 Detach the programmer from the machine 4 Put the programmer in store by winding the cord on the back of the programmer 1405Q 2377Q 1407Q ...

Page 19: ...Chapter 3 EXAMPLE OF THE PROGRAM CHANGE PROCEDURE ...

Page 20: ...9 taper tack angle from 0 to 1 At first read program No 05 from the machine 1 Set program No of the machine to 05 and press the P key The program No 5 is automatically read Then proceed to step 6 When the auto read write setting is OFF continue to perform step 2 through step 5 At the time of shipping the auto read write setting is set to be ON 2 Press the MENU key to display the menu screen 3 Sele...

Page 21: ...vious one Operations from 8 to 9 are for changing the numerals of parameter 02 button hole length from 30 to 28 8 Select parameter 02 button hole length by either one of three methods described below A Press the Button hole length key B Move the cursor to the icon of parameter 02 with the key and press the ENTER key C Move the cursor to NO with the key and select No 02 with the key Then press the ...

Page 22: ...one Operations from 12 to 15 are for writing the changed data to the machine 12 When the auto read write setting is ON press P key to end the programmer Then the parameter for the program No which is under edition is automatically written to the machine With above operational steps finished parameter change and program writing have been completed When the auto read write setting is OFF press the M...

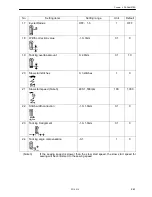
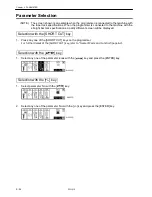
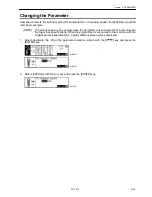
Page 23: ...Chapter 4 PARAMETER ...

Page 24: ...are available as to the machine and a part of parameters vary with the specifications of the connected machines When the programmer is connected to the machine with the taper tack specifications No Setting items Setting range Unit Default 00 Sewing speed 1 000 2 200rpm 100 1 800 01 Eyelet pattern 1 6 1 2 02 Button hole length Note 1 00 5 50mm 01 5 38mm 02 L1 14 18mm L2 18 22mm L3 22 26mm L4 26 30m...

Page 25: ...4 20 stitches 1 9 07 Cutting space 0 3 0 5mm 0 1 0 0 08 Knife X position compensation 0 5 0 5mm 0 1 0 0 09 Knife Y position compensation 0 7 0 7mm 0 1 0 0 10 Start tying stitches 0 2 stitches 1 0 11 End tying stitches 0 2 stitches 1 0 12 X alignment 1 6 1 0 13 Y alignment 1 6 1 0 14 θ1 alignment 3 3 1 0 ...

Page 26: ...5 1 OFF 19 Taper tack angle 5 5 1 0 20 Slow start stitches 0 3 stitches 1 0 21 Slow start speed Note 3 400 1 500rpm 100 1 000 22 Stitch width correction 1 0 1 0mm 0 1 0 Note 2 Eyelet speed will be decided according to the speed which is set to the parameter 00 sewing speed Note 3 If the sewing speed is slower than the slow start speed the slow start speed for sewing will be conformed to the sewing...

Page 27: ...ength Note 1 12 L1 14 18mm L2 18 22mm L3 22 26mm L4 26 30mm L5 28 32mm L6 32 36mm L7 36 40mm 1 12 L1 16mm L2 20mm L3 24mm L4 28mm L5 30mm L6 34mm L7 38mm 03 Tacking length 2 0 6 0mm Up to 3 0mm on one side 0 1 4 0 04 Tacking stitches 5 18 stitches 1 7 05 Stitch pitch 0 5 2 0mm 0 1 1 0 06 No of eyelet stitches 4 20 stitches 1 9 07 Cutting space 0 3 0 5mm 0 1 0 0 Note 1 Setting ranges and defaults o...

Page 28: ...pensation 0 7 0 7mm 0 1 0 0 10 Start tying stitches 0 2 stitches 1 0 11 End tying stitches 0 2 stitches 1 0 12 X alignment 1 6 1 0 13 Y alignment 1 6 1 0 14 θ1 alignment 3 3 1 0 15 θ2 alignment 3 3 1 0 16 Eyelet machine speed Note 2 600 0rpm 100 0 Note 2 Eyelet speed will be decided according to the speed which is set to the parameter 00 sewing speed ...

Page 29: ...p amount 0 2 0mm 0 1 1 0 20 Slow start stitches 0 3 stitches 1 0 21 Slow start speed Note 3 400 1 500rpm 100 1 000 22 Stitch width correction 1 0 1 0mm 0 1 0 23 Tacking X alignment 1 0 1 0mm 0 1 0 24 Tacking angle compensation 3 1 1 0 Note 3 If the sewing speed is slower than the slow start speed the slow start speed for sewing will be conformed to the sewing speed ...

Page 30: ...rtly different screen will be displayed Selection with the SHORT CUT key 1 Press any one of the SHORT CUT keys on the programmer For further details of the SHORT CUT key refer to Name of Parts and Function page E 2 Selection with the key 1 Select any one of the parameter icons with the key and press the ENTER key Selection with the key 1 Select parameter No with the key 2 Select any one of the par...

Page 31: ...example when the programmer is connected to the machine with the taper tack specifications When the programmer is connected to the machine with the straight bar tack specifications a partly different screen will be displayed 1 Select parameter No 00 on the parameter selection screen with the key and press the ENTER key 2 Select 2000rpm with the key and press the ENTER key W0113Q W0112Q W0054Q ...

Page 32: ...E 26 PD 9810 Chapter 4 PARAMETER ...

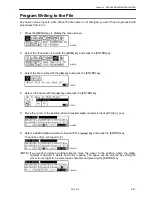
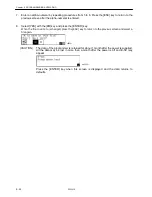
Page 33: ...Chapter 5 PROGRAM READING AND WRITING ...

Page 34: ...NTER key When the auto read write setting is set to ON the screen below does not appear For further details refer to Auto Read Write Setting page E 34 3 Press the ENTER key after confirming the program No The data is read from the machine 4 Press the ENTER key The screen below appears NOTE The screen shown is an example when the programmer is connected to the machine with the taper tack specificat...

Page 35: ...1 Press the MENU key to display the menu screen 2 Select the Machine write icon with the key and press the ENTER key 3 Press the ENTER key after confirming the program No The buzzer starts to sound and the writing is to end 4 Press the P key to end the programmer 1584Q W0014Q W0012Q ...

Page 36: ...u screen 2 Select the File read icon with the key and press the ENTER key 3 Select the file to read with the key and press the ENTER key 4 Select YES with the key and press the ENTER key When you change the file to read press the ESC key to return to the previous screen and select the file again 1589Q 1588Q W0015Q W0012Q ...

Page 37: ...ENTER key 4 Select a file name with the key and press the ENTER key 5 Move the cursor to the position where a desired alpha numeral is input with the key 6 Select a desired alpha numeral to input with the key and press the ENTER key The position of 3 is changed to 7 NOTE If you want to delete an alpha numeral move the cursor to the position where the alpha numeral is desired to delete and enter a ...

Page 38: ...e key and press the ENTER key When the file to write to is changed press the ESC key to return to the previous screen and select a file again CAUTION The data of the programmer is retained for about 1 month after the power is supplied All the data may be lost in more than a month after the power is off and E 59 may appear Press the ENTER key when this screen is displayed and the data returns to de...

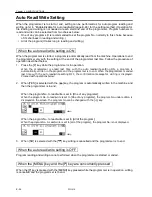
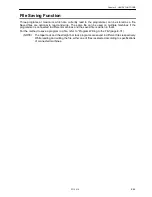
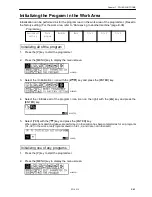
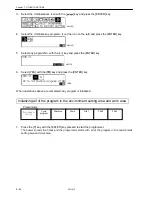
Page 39: ...Chapter 6 HANDY FUNCTIONS ...

Page 40: ...rite setting ON a program is automatically written in the program and the programmer is to end When the programmer is ended last time with the auto read write setting OFF the confirmation message for writing is displayed Proceed with operations below 2 When YES is selected with the key the program is automatically written in the machine and then the programmer is to end When the program No to read...

Page 41: ...sed on multiple machines if the programmer is connected to different machines and the saved file is written in them For the method to save a program in a file refer to Program Writing to the File page E 31 NOTE The taper tack and the straight bar tack programs are saved in different files respectively While reading and writing the file either one of files is selected according to specifications of...

Page 42: ...Chapter 6 HANDY FUNCTIONS E 36 PD 9810 ...

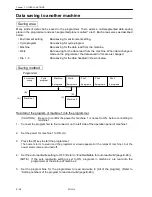
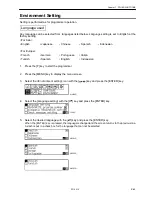
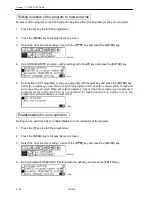
Page 43: ...Chapter 7 OTHER FUNCTIONS ...

Page 44: ...e sure to confirm the power for machine 1 is not set to ON before connecting to machine 1 1 Connect the programmer to the connector on the left side of the operation panel of machine 1 2 Set the power for machine 1 to ON A 3 Press the P key to start the programmer The buzzer starts to sound and the programmer screen appears All the lamps of machine 1 but the power source lamp are turned off 4 Set ...

Page 45: ...Press the P key on the programmer to end the programmer and set the power of machine 1 to OFF 8 Disconnect the programmer from the connector on the left side of the operation panel of machine 1 Proceed to write the data in the programmer to machine 2 CAUTION Be sure to confirm the power for machine 2 is not set to ON before connecting to machine 2 9 Connect the programmer to the connector on the l...

Page 46: ...le program with the key and press the ENTER key 5 Select any one of the program No 01 09 with the key 6 Select 05 with the key and change to 01 with the key Change the knife setting below from 0FF to ON with the same operation 7 Select below C4 with the key and change to 05 with the key Change the knife setting below from ON to OFF with the same operation If the knife setting is kept to be ON and ...

Page 47: ...C1 to in order to clear all of the setting and press the ENTER key 9 Press ESC key when the setting is completed and the screen will return to the selection screen for cycle programs 10 Press the ESC key to return to the menu screen after the setting is completed 11 Select the Machine write icon with the key and press the ENTER key The cycle program is written into the machine concurrently with pr...

Page 48: ...ss than those set on the machine C1 C3 are set to the cycle program of the machine C3 is displayed on the program No window of the machine C1 and C2 are set to the cycle program of the programmer When writing is performed to the machine with these conditions above the display in the program No indication box of the machine is changed as illustrated below Display in the program No indication box NO...

Page 49: ...he Initialization icon with the key and press the ENTER key 4 Select the Initialize all of the program icon icon on the right with the key and press the ENTER key 5 Select YES with the key and press the ENTER key When operations described above are performed initialization has been completed as for all programs 01 09 in the work area Programs saved in file 1 2 and 3 are not initialized Initializin...

Page 50: ...h the key and press the ENTER key When operations above are completed any program is initialized Initializing all of the program in the environment setting area and work area Programmer 1 Press the P key with the ENTER key pressed to start the programmer The buzzer sounds five times and the programmer starts with all of the program in the environment setting area and work area Cycle program Machin...

Page 51: ...Turkish Spanish English Indonesian 1 Press the P key to start the programmer 2 Press the MENU key to display the menu screen 3 Select the Environment setting icon with the key and press the ENTER key 4 Select the Language setting with the key and press the ENTER key 5 Select the desired language with the key and press the ENTER key When the ENTER key is pressed the language is changed and the scre...

Page 52: ...elect All programs to read and write all of the program and so does Any one program to read and write one of any program When set to All programs it takes long time to read and write because 9 programs are all read and written by one operation for reading and writing Setting to Any one program is recommended as a normal setting Enable disable for auto read write Setting can be performed as for ena...

Page 53: ... ON Screen for Check message OFF NOTE When the check message is set to OFF the file name change function Refer to Program Writing to the File page E 31 becomes inoperable 1 Press the P key to start the programmer 2 Press the MENU key to display the menu screen 3 Select the Environment setting icon with the key and press the ENTER key 4 Select Check message setting with the key and press the ENTER ...

Page 54: ...t setting icon with the key and press the ENTER key 4 Select PROM version information with the key and press the ENTER key The PROM version is displayed The upper line is for the programmer and the lower for the machine Indicating the PROM version Numerals like 01 are suffixed to the alphabetical character if the PROM is specially generated Ex PG J A01 MN G01 Indicating PROM specifications For Asi...

Page 55: ...ine 1 Press the P key to start the programmer 2 Press the MENU key to display the menu screen 3 Select the Program comparison icon with the key and press the ENTER key 4 Select the far left key with the key and press the ENTER key 1 When the program is changed the changed program No is displayed When the program No is selected with the key and the ENTER key is pressed the changed parameter is disp...

Page 56: ...3 Select the Program comparison icon with the key and press ENTER key 4 Select any one of the file icon the file to compare with the key and press the ENTER key 1 When the program is changed the changed program No is displayed When the program No is selected with the key and the ENTER key is pressed the changed parameter is displayed 2 If no change is made on the program No change is displayed W00...

Page 57: ...ENU key to display the menu screen 3 Select Program copy icon with the key and press the ENTER key 4 Select the program number of the source and the destination for the copy with the key and the key then press the ENTER key 5 Select Yes with the key and press the ENTER key The program will be copied to the destination and the screen will return to above 4 Pressing ESC key or MENU key will switch t...

Page 58: ...xchanged PROM of the machine should be changed to the identical version to the programmer If either one of PROMs is changed an error will occur because of inconsistency of the version 1 Shut off the power to the machine 2 Press the P key to end the programmer 3 Disconnect the machine from the programmer 4 Loosen and dismount 4 screws on the back of the programmer with a screwdriver and put the cov...

Page 59: ...is used to detach ply each side of PROM with care alternately and gradually If only one side is plied PROM may be damaged 6 Attach new PROM to the socket CAUTION Attach PROM by aligning the notch with the white circle on the printed circuit board PCB If attached in reverse way the programmer may become in trouble Align the notch of the programmer with white circle on the PCB 1372Q 1371Q 1370Q ...

Page 60: ...ogram in the environment setting area and work area CAUTION Be sure to initialize the program after you replace the PROM 9 Press the MENU key to display the menu screen 10 Select the Environment setting with the key and press the ENTER key 11 Select the PROM version information with the key and press the ENTER key 12 Confirm the version of PROM is upgraded the version is changed to the one of chan...

Page 61: ...C key and the ENTER key pressed to start the programmer The buzzer sounds six times intermittently and the programmer starts to operate with all of the program in the above areas initialized Settings are returned to those set at the factory Cycle program Machine File 1 File 2 File 3 Work Environment setting ...

Page 62: ...E 56 PD 9810 Chapter 7 OTHER FUNCTIONS ...

Page 63: ...Chapter 8 ERROR MESSAGE ...

Page 64: ...essage is as described below Data version unmatch error Press P key and after finished please adapt the data version of PROM Received data error When the received data is disrupted this error occurs Restart the programmer and receive the data again Communication error When communication fails this error occurs Restart the programmer and perform communication again Data lost error The error may occ...

Page 65: ...INSTRUCTION MANUAL 118 J98 SA0283 101 2002 12 F 1 BROTHER INDUSTRIES LTD 15 1 Naeshiro cho Mizuho ku Nagoya 467 8561 Japan Phone 81 52 824 2177 Printed in Japan ...

Reviews: