Advanced MIDI Programming
Desk Memory Organisation
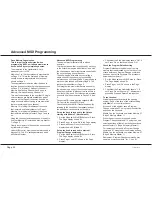
This is important to understand when
programming MIDI, as it allows memories to
be controlled by very simple keyboards.
The memories in the Lightmaster XL are
arranged from 1 to 120.
Memories 1 to 12 are permanently programmed
on Page ‘Ch’
. This is the first page of memory,
usually known to programmers and technical
people as Page 0.
These permanent memories allow the desk to
function as a conventional 2 preset desk because
on Page ‘Ch’, Memory 1 holds only Channel 1,
Memory 2 holds only Channel 2 and so on to
Memory 12 which holds only Channel 12.
This has the advantage to the user that 12 single
channel scenes are always available as part of
memory so that Page Overlay may be used on
single channels without having to use memories
that are recording only one channel.
Memory 13 is the logical address of the scene
that is stored on Memory Master 1 of Page 1,
Memory 14 is the logical address of the scene
that is stored in Memory Master 2 Page 1 and so
on.
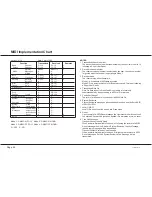
Using the cue sheet printed opposite, it is easy to
find that Memory 67 is stored on Memory Master
7 in Page 5.
Clearly any memory in the desk can be accessed
by its Memory Number.
Under MIDI control, memories are always used in
blocks of 12. The ‘No’ setting determines which
MIDI Note Number.
Advanced MIDI Programming
The easiest way to illustrate this is with an
example:
To program a show that is controlled by each key
in the octave that begins with Middle C and with
the channels and memories that are controlled by
the keys changing during the show.
The show begins with each key controlling a
single channel, then changing to controlling
simple scenes on Memory Page 3, progressing to
more complex scenes on Memory Page 6. The
last number uses Memory Page 8,
First program the memories that are needed for
the show using a copy of the cue sheet opposite.
Keep the memories in blocks of twelve as this is
how they will be used. For this example, program
scenes to fill all the memories in Pages 3, 6 and
8.
Connect a MIDI cable from the keyboard MIDI
OUT port to the desk MIDI IN port.
Check the keyboard MIDI Transmit channel (by
referring to the handbook if necessary) and set
the desk Receive channel to be the same.
Set up the desk to respond to the Octave
starting with Middle C (Note Value 60)
1 Set the Mode switch to MIDI Setup In / Slave.
The Page display shows ‘SL’
2 Press Page + to show ‘No’ in the Page display.
3 Press Add Step or Go until the Step No
display shows 60 (Middle C).
Set up the desk to respond to external
Program Change commands
1 Set the Mode switch to MIDI Setup In / Slave.
The Page display shows ‘SL’
2 Press Page + until ‘PC’ shows in the Page
display.
3 Check that the Step No display shows ‘ON’. If
not Press ‘Go’ so that it now shows ‘ON’.
Check the Program Default setting
Program Default sets the address of the first
memory that is addressed by the first key of the
octave before any Program Change command
has been sent by the keyboard. The procedure
below selects memory 1.
1 Set the Mode switch to MIDI Setup In / Slave.
The Page display shows ‘SL’
2 Press Page + until ‘Pd’ shows in the Page
display.
3 Check that the Step No display shows ‘1’. If
not Press ‘Go’ until it shows ‘1’. Alternatively
press Add Step and Delete Step together.
To run the show
Start playing the keyboard with the opening
number. Each of the keys of the octave starting
with Middle C will control a channel.
At the end of the number, send a Program
Change command ‘37’ using the Voice selection
buttons on the keyboard.
Middle C on the keyboard now drives Memory 37
(Page 3 Memory Master 1).
When the next change is required, send a
Program Change command ‘73’ using the Voice
selection buttons. Middle C on the keyboard now
drives Memory 73 (Page 6 Memory Master 1).
For the last number, send a Program Change
command ‘97’ using the Voice selection buttons.
Middle C on the keyboard now drives Memory 97
(Page 8 Memory Master 1)
Remember - Program Change commands may
need two or more numbers - for ‘1’, key ‘01’.
/p22/3
Advanced MIDI Programming
Page 22
7359500/p22/3
Summary of Contents for Lightmaster XL
Page 1: ...Lightmaster XL Manual...
Page 29: ......

