STREAM User Manual
27
2.
Set the SSID, password, and encoder type for Client Mode. Once you have confirmed these are set by
retrieving the data, and then save the settings.
3.
Enable the Wi-Fi Client Mode Auto-run feature
4.
Disable the Wi-Fi Access Point Auto-run feature
5.
Save the settings
6.
Tell the client mode to connect (192.168.2.1/ api/wificlient/connect
7.
Check the 192.168.2.1/api/wificlient status field until it is connected and then retrieve the
/api/wificlient/ipaddress to use
8.
Stop the Access point connection (/api/wifiap/stop)
9.
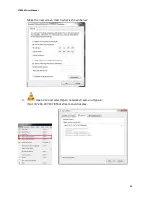
You must now change your computer to connect the Wi-Fi to the correct Client Wi-Fi.
Failures to set the Wi-Fi settings correctly may result in communication issues. If this happens, refer to the user
manual section on Resetting to Defaults using the button press (when camera is on, hold for 10-12 seconds until
red flashing LED appears, then release and briefly depress/release again.) The camera will then reboot and power
up but all settings will return to default settings.
An example command set may look like this:
1.
Ensure that your computer is connected to the camera’s Access Point (192.168.2.1)
2.
Scan for other Wi-Fi signals:
http://192.168.2.1/api/wificlient/scan
3.
Setup SSID :
http://
192.168.2.1/api/wificlient/ssid=
YOUR_NETWORK
4.
Setup password:
http://
192.168.2.1/api/wificlient/password=YOUR_PASSWORD
5.
Setup encoder type:
http://
192.168.2.1/api/wificlient/enctype=YOUR_WIFI_ENCODER_TYPE
6.
After each call returns success, validate that the new settings are in place by retrieving those pieces of
data from the camera (i.e. call http:// 192.168.2.1/api/wificlient/ssid and validate that the camera
returned = YOUR_NETWORK, etc.).
7.
Save Settings:
http://
192.168.2.1/api/system/settingssave
8.
Enable Auto Connect for the Client Mode:
http://
192.168.2.1/api/wificlient/autorun=1
9.
Disable Auto Connect on the Access Point: http:// 192.168.2.1/api/wifiap/autorun=0
10.
After each call returns success, validate that the new settings are in place by retrieving those pieces of
data from the camera (call http:// 192.168.2.1/api/wificlient/autorun and validate that the camera
returned the correct information).
11.
Save Settings:
http://
192.168.2.1/api/system/settingssave
12.
Connect: http:// 192.168.2.1/api/wificlient/connect
13.
Check Status until you see connected:
http://
192.168.2.1
/api/wificlient/status
14.
After connected to Client, extract Wi-Fi IP address:
http://
192.168.2.1
/api/wificlient/ipaddress
15.
Stop the Access Point: http:// 192.168.2.1/api/wifiap/stop
16.
You will no longer be able to communicate to the camera over 192.168.2.1 unless the settings return to
default or are set back via commands sent on the new Client Mode ipaddress.
17.
Change your computer Wi-Fi connection to connect as a Client to the same router/SSID that the camera is
on.
18.
Use the new Wi-Fi ip address in your browser to access the camera API:
http://<insert IP_ADDRESS
> (e.g.
http://10.0.1.35)
19.
To access the stream over Wi-Fi, use your viewer to connect to rtsp://ip address:8554/stream
Returning the camera to Access Point Mode from Client Mode:
Similar constraints exist for switching back to Access Point Mode, especially when the only communication is over
Wi-Fi (as in the battery version of the Stream).
1.
Ensure that your camera is connected to your host router.
2.
Enable Auto Connect for the Access Point Mode:
http:// 10.0.1.35/api/wifiap/autorun=1


