UM-0085-B09
DT80 Range User Manual
Page 158
RG
Sending Commands
Once the command window has been enabled, you will be able to type standard
DT80
commands into the lower
Send
pane. Controls will be familiar to
DeTransfer
users:
•
Entered text is not sent to the logger until you press Enter or click one of the "Send" buttons
•
Press Enter to send to the logger all text on the line on which the cursor is positioned.
•
Click
Send All
to send all text in the Send pane to the logger
•
Click
Send Selection
to send all text in the Send pane that you have highlighted.
•
Press Shift-Enter to insert a line break. Nothing will be sent to the logger. This is useful for entering a sequence
of commands or a multi-line job which you will later send all in one hit.
•
The Windows copy and paste mechanism may be used to paste text into the Send pane.
•
Click
Clear
to erase all text from the Send pane.
Note:
to
DeTransfer
users: The web interface command window does not interpret any "backslash" sequences. This means that to
send a "
\
" character to the logger you enter "
\
", not "
\\
".
Viewing Logger Output
Once the command window has been enabled, all output from the logger's command interface will be displayed in the
top
Receive
pane.
The Receive pane has a 32 kbyte memory buffer for storing received text. As text is received, it is added to the buffer.
Once the buffer becomes full, the oldest data is discarded.
The Receive pane normally displays the newest received data, but you can review data which has scrolled out of the
display are by using the scroll bars. However, if data is being returned quickly then this will be awkward because the
Receive pane will keep jumping back to display the newest data.
The
Pause
button is useful here – it temporarily stops screen display updates so you can scroll back through the receive
buffer. Note that incoming data will still be captured while the screen is paused. When you un-pause the display (by
clicking on the
Pause
button a second time) all captured text will be added to the receive buffer and displayed.
Other Features
Special Characters
The
Special Character Mode
control specifies how incoming control and non-printable characters are handled. When
this control is set to
Off
, all characters are written to the receive buffer "as is". When set to one of the other values, any
incoming characters with ASCII codes in the range 0-31 or 127-255 will be replaced by a text string identifying the
character. For example, if
Decimal
is selected then an incoming ESC character (ASCII 27) will be replaced with the
string
[27]
.
To send a special character, enter the special sequence
_char(
n
)
, where
n
is the required ASCII code (1-255) in the
Send window at the point you want the special character to be inserted. For example:
1$="abc_char(88)def"
will result in 1$ being set to
abcXdef
(character "X" has ASCII code 88)
Delays
It is sometimes useful to insert a delay between commands. This can be done using the special sequence
_wait(
n
)
,
where
n
is the number of seconds to wait. This command must be specified on a line by itself. For example, if you enter
the following in the Send pane:
HRESET
_wait(5)
DIR
and press
Send All
, then the web interface will send
HRESET
, pause for 5 seconds, then send
DIR
.
Macros
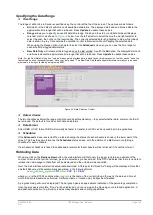
If the mouse cursor is moved over the status line area at the bottom of the screen then a set of six
macro
buttons will
appear, labelled, by default,
Macro 1
through
Macro 6
. These buttons allow you to save commonly used command
sequences and then send them with a single click.
To define a macro button, hold down the Ctrl key and click one of the buttons. A window will pop up, allowing you to set:
•
the label for the button
•
the commands to send (
_char
and
_wait
sequences may be included)
•
other options, such as whether you want to be prompted before the command is sent
Pressing
Save
will save the macro definitions to a file on the logger, from which they will be automatically retrieved when
you next connect to that logger.


