CHAPTER 13 S1C88 FAMILY DEBUGGER
S5U1C88000C MANUAL II
EPSON
157
WORKBENCH/DEV TOOLS/OLD ASSEMBLER
GUI utility
[Break | Breakpoint Setting] menu item
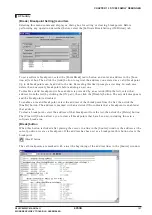
Selecting this menu command displays a dialog box for setting or clearing breakpoints. Before
performing any operation described below, select the [Software Break Setting (1MB Area)] tab.
To set a software breakpoint, select the [Point Break] radio button and enter an address in the [Loca-
tion at] text box. Then click the [Add] button to register the address you entered as a valid breakpoint.
Up to 64 breakpoints can be added to the list. Exceeding this limit prompts a warning. In such case,
delete the unnecessary breakpoints before adding a new one.
To disable a valid breakpoint (whose address is preceded by an asterisk (
∗
) in the list), select that
address from the list (by clicking the ON part), then click the [Disable] button. The asterisk disappears
and the breakpoint is disabled.
To enable an invalid breakpoint, select the address of that breakpoint from the list, then click the
[Enable] button. The address is marked with an asterisk (
∗
) to indicate that a breakpoint is enabled at
that address.
To clear a breakpoint, select the address of that breakpoint from the list, then click the [Delete] button.
The [Clear All] button allows you to clear all breakpoints that have been set, including those in a
software break area.
[Break] button
When this button is clicked after placing the cursor to a line in the [Source] window, the address at the
cursor position is set as a breakpoint. If the address has been set as a breakpoint, this button clears the
breakpoint.
[Break] button
The set breakpoints are marked with a
●
at the beginning of the address lines in the [Source] window.


