CHAPTER 13 S1C88 FAMILY DEBUGGER
166
EPSON
S5U1C88000C MANUAL II
WORKBENCH/DEV TOOLS/OLD ASSEMBLER
Notes
• Do not insert a space between "bd" and <channel>.
• The addresses must be specified within the range of the memory area available for each microcom-
puter model.
An error results if the limit is exceeded or the input one is not a hexadecimal number or a valid
symbol.
• Any attempt to clear a channel on which no break conditions are set results in an error being assumed.
• When a program or parameter file is loaded, the contents of all breaks set are cleared.
GUI utility
[Break | Breakpoint Setting] menu item
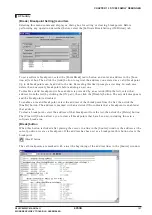
Selecting this menu command displays a dialog box for setting or clearing breakpoints. Before
performing any operation described below, select (click) the [Hardware Data Break Setting] tab.
Use the radio buttons to select the channel on which you want to set break conditions, then enter an
address in the [Location at] text box and data in the [Data Value for] text box (optional). Use the radio
buttons to select the desired read/write condition, then click the [Set] button to register what you've
entered as valid break conditions. Setting a new condition on a channel for which conditions are
already set overwrites the existing conditions.
To disable valid break conditions on a channel (preceded by an asterisk (
∗
) in the list), select that
channel from the list (by clicking the ON part), then click the [Disable] button. The asterisk disappears
and break conditions on the channel are disabled.
To enable invalid break conditions on any channel, select that channel from the list, then click the
[Enable] button. The channel is marked with an asterisk (
∗
) to indicate that break conditions are
enabled on the channel.
To clear break conditions on any channel, select that channel from the list, then click the [Delete]
button.
The [Clear All] button allows you to clear all break conditions that have been set.


