Configuring Ethernet Ports
69
Configuring Ethernet
Ports
Making Basic Port
Configuration
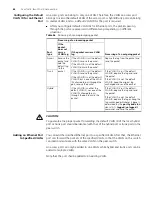
To use the optical interface on a combo port, install the SFP and issue the
undo
shutdown
command in the interface. The corresponding 10/100/1000BASE-T port
will automatically be shutdown.
The
speed
and
mdi
commands are not available on the combo port.
The
mdi
command is not available on the Ethernet ports of the expansion interface
card.
Setting the Ethernet
Port Broadcast
Suppression Ratio
You can use the
broadcast-suppression
commands to restrict the broadcast traffic
allowed to pass through a port. After that, if the broadcast traffic on the port exceeds
the value you set, the system will maintain an appropriate broadcast traffic ratio by
discarding the overflow traffic, so as to suppress broadcast storm, avoid network
congestion and ensure normal network services.
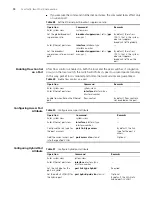
You can execute the
broadcast-suppression
command in system view or Ethernet
port view:
■
If you execute the command in system view, the command takes effect on all
ports.
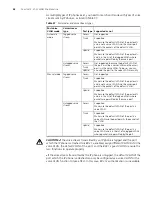
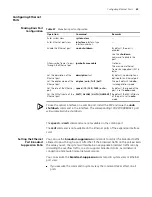
Table 47
Make basic port configuration
Operation
Command
Remarks
Enter system view
system-view
—
Enter Ethernet port view
interface
interface-type
interface-number
—
Enable the Ethernet port
undo shutdown
By default, the port is
enabled.
Use the
shutdown
command to disable the
port.
Allow jumbo frames to pass
through the Ethernet por
jumboframe enable
Optional
The maximum ethernet
frame size supported is 9216
bytes.
Set the description of the
Ethernet port
description
text
By default, no description is
defined for an Ethernet port.
Set the duplex mode of the
Ethernet port
duplex
{
auto
|
full
|
half
}
The port defaults to
auto
(autonegotiation) mode.
Set the rate of the Ethernet
port
speed
{
10
|
100
|
1000
|
auto
}
By default, the speed of the
port is set to
auto
mode.
Set the MDI attribute of the
Ethernet port
mdi
{
across
|
auto
|
normal }
Be default, the MDI attribute
of the port is set to
auto
mode.
Summary of Contents for 4200G 12-Port
Page 10: ...8 CONTENTS...
Page 14: ...4 ABOUT THIS GUIDE...
Page 46: ...32 CHAPTER 5 LOGGING IN THROUGH WEB BASED NETWORK MANAGEMENT SYSTEM...
Page 48: ...34 CHAPTER 6 LOGGING IN THROUGH NMS...
Page 60: ...46 CHAPTER 9 VLAN CONFIGURATION...
Page 64: ...50 CHAPTER 10 MANAGEMENT VLAN CONFIGURATION...
Page 80: ...66 CHAPTER 13 GVRP CONFIGURATION...
Page 98: ...84 CHAPTER 15 LINK AGGREGATION CONFIGURATION...
Page 112: ...98 CHAPTER 18 MAC ADDRESS TABLE MANAGEMENT...
Page 126: ...112 CHAPTER 19 LOGGING IN THROUGH TELNET...
Page 162: ...148 CHAPTER 20 MSTP CONFIGURATION...
Page 274: ...260 CHAPTER 29 IGMP SNOOPING CONFIGURATION...
Page 276: ...262 CHAPTER 30 ROUTING PORT JOIN TO MULTICAST GROUP CONFIGURATION...
Page 298: ...284 CHAPTER 33 SNMP CONFIGURATION...
Page 304: ...290 CHAPTER 34 RMON CONFIGURATION...
Page 338: ...324 CHAPTER 36 SSH TERMINAL SERVICES...
Page 356: ...342 CHAPTER 38 FTP AND TFTP CONFIGURATION...
Page 365: ...Information Center Configuration Example 351 S4200G terminal logging...
Page 366: ...352 CHAPTER 39 INFORMATION CENTER...
Page 378: ...364 CHAPTER 40 BOOTROM AND HOST SOFTWARE LOADING...
Page 384: ...370 CHAPTER 41 Basic System Configuration and Debugging...
Page 388: ...374 CHAPTER 43 NETWORK CONNECTIVITY TEST...
Page 406: ...392 CHAPTER 45 CONFIGURATION OF NEWLY ADDED CLUSTER FUNCTIONS...


