SERIES IP330 INDUSTRIAL I/O PACK 16-BIT HIGH DENSITY ANALOG INPUT MODULE
___________________________________________________________________________________________
- 5 -
Default Hardware Jumper Configuration
When the board is shipped from the factory, it is configured as
follows:
•
Analog input range is configured for a bipolar input with a 10
volt span (i.e. an ADC input range of -5 to +5 Volts).
•
In12 and -12 Volt power supplies are used (sourced
from P1 connector).
•
The default programmable software control register bits at
power-up are described in section 3. The control registers
must be programmed to the desired gain, mode, and channel
configuration before starting ADC analog input acquisition.
Analog Input Range Hardware Jumper Configuration
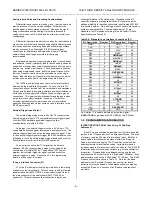
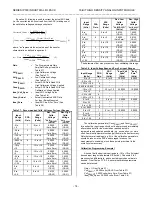
The ADC input range is programmed via hardware DIP switch.
The DIP switch controls the input voltage span and the selection of
unipolar or bipolar input ranges. The configuration of the DIP
switch for the different ranges is shown in the following table. A
switch selected as "ON" would be positioned to the side of the DIP
labeled “ON”. The DIP switch location is shown in Drawing 4501-
590.
Table 2.1:Analog Input Range Selections/DIP Switch Settings
Desired
ADC Input
Range*
(VDC)
Required
Input Span
(Volts)
Required
Input
Type
Switch
Settings
ON
Switch
Settings
OFF
-5 to +5
10
Bipolar
1,3,4,9
2,5,6,7,8
-10 to +10**
20
Bipolar
2,5,6,9
1,3,4,7,8
0 to +5
5
Unipolar
1,3,5,8
2,4,6,7,9
0 to +10**
10
Unipolar
1,3,4,7
2,5,6,8,9
* Assuming a gain of 1.
** These ranges can only be achieved with
±
15V external power
supplies. The input ranges will be clipped if
±
12V supplies are
used, typically to
±
8.5 V maximum inputs.
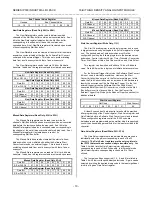
Power Supply Hardware Jumper Configuration
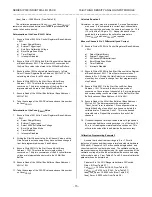
The selection of internal or external analog power supplies is
accomplished via hardware jumpers J1 and J2. J1 (J2) controls
the selection of either the in12 (-12) Volt supply sourced
from P1 connector, or the ex15 (-15) Volt supply sourced
from the P2 connector. The configuration of the jumpers for the
different supplies is shown in Table 2.2. "IN" means that the pins
are shorted together with a shorting clip. "OUT" means that the
clip has been removed. The jumper locations are shown in
Drawing 4501-590.
Table 2.2: Power Supply Selections (Pins of J1 and J2)
Power Supply
Selection*
J1
(1&2)
J1
(2&3)
J2
(1&2)
J2
(2&3)
±
12 Volt (Internal, P1)
OUT
IN
OUT
IN
±
15 Volt (External, P2)
IN
OUT
IN
OUT
* Internal and external supplies should not be mixed (e.g. do not
use +12 Volts with -15 Volts).
Software Configuration
Software configurable control registers are provided for control
of external trigger mode, data output format, acquisition mode,
timer control, interrupt mode, convert channel(s) selection, and
channel gain selection. No hardware jumpers are required for
control of these functions. These control registers must also be
configured as desired before starting ADC analog input
acquisition. Refer to section 3 for programming details.
CONNECTORS
IP Field I/O Connector (P2)
P2 provides the field I/O interface connections for mating IP
modules to the carrier board. P2 is a 50-pin female receptacle
header (AMP 173279-3 or equivalent) which mates to the male
connector of the carrier board (AMP 173280-3 or equivalent). This
provides excellent connection integrity and utilizes gold-plating in
the mating area. Threaded metric M2 screws and spacers are
supplied with the module to provide additional stability for harsh
environments (see Mechanical Assembly Drawing 4501-434). The
field and logic side connectors are keyed to avoid incorrect
assembly.
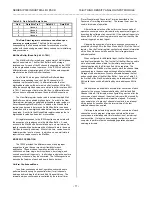
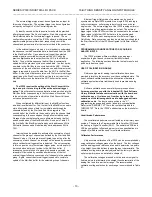
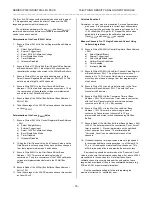
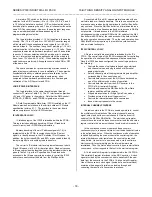
P2 pin assignments are unique to each IP model (see Table
2.3) and normally correspond to the pin numbers of the field I/O
interface connector on the carrier board (you should verify this for
your carrier board). When reading Table 2.3 note that channel
designations are abbreviated to save space. For example, single
ended channel 0 is abbreviated as “S00”; the +input for differential
channel 0 is abbreviated as “D00+”. Both of these labels are
attached to pin 1, but only one is active for a particular installation
(i.e. if your inputs are applied differentially, which is recommended
for the lowest noise and best accuracy, follow the differential
channel labeling for each channel’s + and - input leads).
IMPORTANT: All unused analog input pins should be tied to
analog gorund. Floating unused inputs can drift outside the input
range causing temporary saturation of the input analog circuits.
Recovery from saturation is slow and affects the reading of the
desired channels.
Table 2.3: IP330 Field I/O Pin Connections (P2)
Pin
Description Number Pin
Description Number
S00,D00+ 1 S24,D08- 26
S16,D00- 2 COMMON 27
COMMON 3 S09,D09+ 28
S01,D01+ 4 S25,D09- 29
S17,D01- 5 COMMON 30
COMMON 6 S10,D10+ 31
S02,D02+ 7 S26,D10- 32
S18,D02- 8 COMMON 33
COMMON 9 S11,D11+ 34
S03,D03+ 10 S27,D11- 35
S19,D03- 11 COMMON 36
COMMON 12 S12,D12+ 37
S04,D04+ 13 S28,D12- 38
S20,D04- 14 COMMON 39
COMMON 15 S13,D13+ 40
S05,D05+ 16 S29,D13- 41
S21,D05- 17 SENSE 42
COMMON 18 S14,D14+ 43
S06,D06+ 19 S30,D14- 44
S22,D06- 20 +15
VOLTS 45
COMMON 21 S15,D15+ 46
S07,D07+ 22 S31,D15- 47
S23,D07- 23 -15
VOLTS 48
COMMON 24
EXT
TRIGGER*
49
S08,D08+ 25 SHIELD 50
*
Indicates that the signal is active low.

