background image


36 

LIQUID-FOOT PRO SERIES      MIDI FOOT CONTROLLER 

HOW TO PROGRAM MIDI MESSAGES 

In many areas of the Liquid-Foot, you are presented with a MIDI MESSAGE input capability. 
Examples include programming expression pedals, presets, and instant access switches.  Each of 
these MIDI message input screens behave in the same manner. 


Think of MIDI message programming in its most basic form.  You need to know: 

 what 

MIDI CHANNEL

 will I control for this particular message 

what 

MIDI COMMAND

 will I send to the device on that MIDI CHANNEL 

what

 MIDI DATA

 (parameter) will I send to go with that MIDI COMMAND 

With this basic information, you are now set to program a single MIDI command into the 
request. The first screen of a MIDI message input will begin by asking you to determine which 
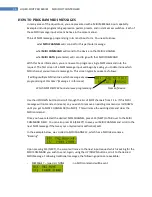
MIDI channel you will send a message to. This screen typically appear as follows: 

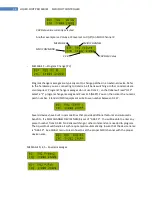
 If editing multiple MIDI entries; which message are we 
programming at this time? (message 1 in this case) 


Which MIDI DEVICE Channel are we programming? 


Name of device 


Use the UP/DOWN buttons to scroll through the list of MIDI channels from 1-16.  If this MIDI 
message will not send a command, or, you wish to remove an existing command, scroll DOWN 
until you get to MIDI  CHANNEL 00 (No MIDI).  This will erase the existing data and clear the 
MIDI command. 

Once you have selected the desired MIDI CHANNEL, press S15 (NEXT) to TAB over to the MIDI 
COMMAND FIELD.  You can also press S16 (SELECT) to save your MIDI CHANNEL and scroll to the 
next MIDI message if that was your only desired modification/edit. 

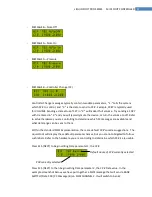
In the example below, we scrolled to MIDI CHANNEL 2, which has a MIDI device name 
“Backing”.  


Upon pressing S15 (NEXT), the cursor will move to the next input request which is asking for the 
MIDI COMMAND you wish to send. Again, using the UP/DOWN buttons, scroll to the desired 
MIDI Message. Following traditional messages, the following options are available: 

-


MESSAGE 7 – (special)- NONE       

; no MIDI command will be sent 


Summary of Contents for Liquid-Foot Jr. Series

Page 1: ...USER S GUIDE Firmware Version 1 58 Copyright 2008 Liquid Control Inc www liquid foot com PATENTS PENDING All Rights Reserved Copyright 2008 DRAFT 1...

Page 2: ...eference Heed all warnings labels cautions and directions Follow all instructions Do not tamper modify or otherwise alter the appliance Do not place excess force on the unit Do not store or place obje...

Page 3: ...ified expression pedals Do not use any Active Pedals that have or require their own power source to operate By connecting any other expression pedals you risk causing malfunction and or damage to the...

Page 4: ...IDI CABLE CHOICES 21 EXAMPLE MIDI CABLE SETUPS 22 AXE FX 7PIN MIDI CABLE 1 WIRE 22 AXE FX 5PIN MIDI CABLE 1 WIRE power 23 AXE FX 5PIN MIDI CABLE 2 WIRES power 24 LINE 6 DEVICES 5 PIN MIDI CABLE 2 WIRE...

Page 5: ...A COMMANDS 53 IA SWITCH OVERRIDE COMMANDS 53 EXPRESSION PEDAL OVERRIDE 54 P2 Song Set List Edit Menu 55 SELECT A SONG TO EDIT 55 EDIT SONG NAME 55 SETTING EACH PRESET FOR THE SONG 55 MIDI MESSAGE PROG...

Page 6: ...DE 66 12 BUTTON MODE 66 MIDI RECEIVE CHANNEL 67 MIDI SYSEX ID 67 BUTTON DELAY 67 MIDI DEVICE NAMES 68 EXPRESSION PEDAL DEFAULT s 68 EXPRESSION PEDAL TYPE 69 EXPRESSION PEDAL CALIBRATE 70 DISPLAY VALUE...

Page 7: ...Automatic Programming from the AXE FX 80 ERASE ALL MEMORY 81 P6 Mode Menu 82 MODE MENU CYCLE 82 PRESET MODE 82 6 BUTTON MODE 83 12 BUTTON MODE 83 SONG MODE 83 SET LIST MODE 84 DIRECT CONTROL MODE 85 H...

Page 8: ...e control of Liquid Tracks Liquid Rig SYSEX MIDI Firmware MIDI bulk dump MIDI Bulk Receive MIDI dump for individual settings SYSEX Sequencer Control Mode external devices and other controllers can con...

Page 9: ...perspective we wanted swift navigation and easy out of the box setup procedures This simple goal ended in the creation of a very useful set of functions Several of these features are industry firsts...

Page 10: ...n in the System Menu S1 S4 Selects an instant access switch when in 4B 3B 8S Button mode s Selects P5 P8 when in 8P mode P2 P3 When entering numbers Pressing P2 will subtract 10 from the current numbe...

Page 11: ...LED will not glow if the current preset was programmed to indicate this IA switch has no effect If a switch is off the user can still press the switch in which case in will go active and turn green S...

Page 12: ...iquid Foot power supply only to this connector when using direct power and not obtaining phantom power via the MIDI OUT port or the TO RIG connectors Only one power source should be connected at a tim...

Page 13: ...h this device The switch pedal must support NO Normally Open switch capability and the connector must only switch the Tip and Sleeve The RING must not be connected when using a switch pedal Damage may...

Page 14: ...ssign each one a unique MIDI channel from 1 16 b Assign a MIDI device name to each channel Global MENU to name MIDI channels BE CAREFUL to correctly spell any device personalities such as LIQTRKS AXE...

Page 15: ...control determine each type of MIDI message that the device is capable of receiving as it relates to your desired actions Examples would be Program Change selecting a preset Continuous Controller CC m...

Page 16: ...ols and more Midi Messages 16 Up to 12 IA Switch override commands can be programmed Global expression pedal is replaced by these if programmed Almost any midi command can be programmed for Expression...

Page 17: ...17 LIQUID FOOT PRO SERIES MIDI FOOT CONTROLLER Song Set List Name 16 characters Assigned Presets 12 Set for 6 or 12 button mode 5 MIDI Commands to Trigger Name 16 characters Assigned Songs 20...

Page 18: ...ts Relate Any combination of midi commands MIDI ON MESSAGES 20 Any combination of midi commands MIDI OFF MESSAGES 20 Stomp on Stomp Off Momentary while holding Step Thru Quick Tap Tap Tempo Button Mod...

Page 19: ...ets but cannot be physically accessed by the user This described how you have access to IA switches S1 S16 also referred to as the PAGE 0 IA Switches Now imagine another page of 16 IA switches lying j...

Page 20: ...26 S27 S28 Virtual Access Physical Access in 8 IA mode S21 S22 S23 S24 Physical Access in 3 4 8IA mode S17 S18 S19 S20 IA SWITCHES PAGE 2 Virtual Access S45 S46 S47 S48 Virtual Access S41 S42 S43 S44...

Page 21: ...e from small to larger than 25Ft Liquid Control will guarantee only cables purchased directly through us Some musical stores sell quality 7Pin cables Use a 7 PIN cable to connect POWER MIDI IN MIDI OU...

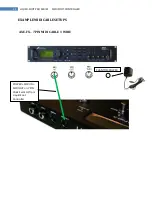
Page 22: ...22 LIQUID FOOT PRO SERIES MIDI FOOT CONTROLLER EXAMPLE MIDI CABLE SETUPS AXE FX 7PIN MIDI CABLE 1 WIRE PHANTOM POWER POWER MIDI IN MIDI OUT on 7 PIN CABLE sent to from Liquid Foot Controller...

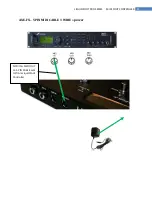
Page 23: ...23 LIQUID FOOT PRO SERIES MIDI FOOT CONTROLLER AXE FX 5PIN MIDI CABLE 1 WIRE power MIDI IN MIDI OUT on 5 PIN CABLE sent to from Liquid Foot Controller...

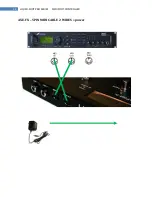
Page 24: ...24 LIQUID FOOT PRO SERIES MIDI FOOT CONTROLLER AXE FX 5PIN MIDI CABLE 2 WIRES power...

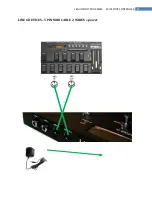
Page 25: ...25 LIQUID FOOT PRO SERIES MIDI FOOT CONTROLLER LINE 6 DEVICES 5 PIN MIDI CABLE 2 WIRES power...

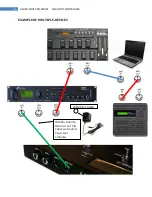
Page 26: ...26 LIQUID FOOT PRO SERIES MIDI FOOT CONTROLLER EXAMPLE OF MULTIPLE DEVICES PHANTOM POWER POWER MIDI IN MIDI OUT on 7 PIN CABLE sent to from Liquid Foot Controller...

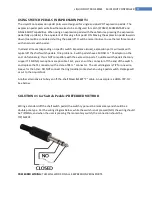
Page 27: ...pedals have a MONO TS adaptor on the end Unfortunately this is NOT compatible with the expression ports To utilize switch pedals that only support TS MONO two options are possible First you can cut th...

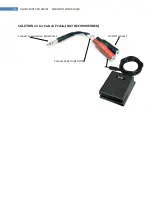
Page 28: ...28 LIQUID FOOT PRO SERIES MIDI FOOT CONTROLLER SOLUTION 2 for Switch Pedals NOT RECOMMENDED Connect to Expression Pedal Port 1 Do NOT connect Connect Pedal to RED TIP...

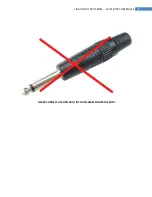
Page 29: ...29 LIQUID FOOT PRO SERIES MIDI FOOT CONTROLLER NEVER CONNECT A MONO PLUG INTO AN EXPRESSION PEDAL PORT...

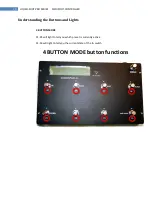
Page 30: ...IDI FOOT CONTROLLER Understanding the Buttons and Lights 4 BUTTON MODE P1 P4 will light to tell you which preset is currently active S1 S4 will light to tell you the current state of the IA switch 4 B...

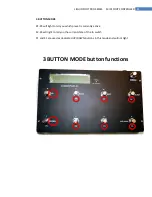
Page 31: ...BUTTON MODE P2 P4 will light to tell you which preset is currently active S2 S4 will light to tell you the current state of the IA switch P1 and S1 are used as dedicated UP DOWN buttons in this mode a...

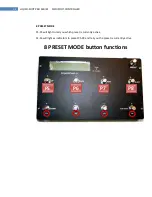
Page 32: ...DI FOOT CONTROLLER 8 PRESET MODE P1 P4 will light to tell you which preset is currently active S1 S4 will light as indicators to preset P5 P8 and tell you the preset is currently active 8 PRESET MODE...

Page 33: ...s multiple uses Pressing it a first time will enter Bank Select Mode where you can then use the UP and DOWN buttons to select presets songs set lists dependent on the mode of operation you are in Pres...

Page 34: ...ions before you overwrite a parameter or setting When in doubt just press the Menu key As used for Menus and while in the menu system Use the P4 Sub Menu key to skip to the next sub menu Pressing P4 w...

Page 35: ...umping forward by seven characters is accomplished by pressing P3 Jumping backwards by seven characters is accomplished by pressing P2 HOW TO ENTER NUMBERS Throughout the Liquid Foot menu system and w...

Page 36: ...MIDI entries which message are we programming at this time message 1 in this case Which MIDI DEVICE Channel are we programming Name of device Use the UP DOWN buttons to scroll through the list of MIDI...

Page 37: ...rolling to determine which CC messages are available and what data range can be sent to them Within the standard MIDI implementation there are default CC s used as suggestions The Liquid Foot will dis...

Page 38: ...that label will read OFF Select a C program change message and Press S15 NEXT You can then enter the numeric patch number Standard MIDI equipment will allow a number between 0 127 Several devices hav...

Page 39: ...some of these functions Below is a general understanding of how to access and select these special functions To access Special Commands while programming a MIDI command press the DOWN or UP button unt...

Page 40: ...splay This is to indicate the Step being triggered is for an IA Switch and the of the step just triggered Step 1 is separated again with a STEP command SP C SPECIAL D1 STEP THRU D2 000 This is followe...

Page 41: ...display will indicate the currently executed step on the top right preceded by a P for Preset P indicates it was a Preset Step that was just processed S indicates it was an IA Switch Step that was jus...

Page 42: ...Layer to S17 S32 Now program S32 as a MOMENTARY switch and program a single ON message as above only select 0 as the parameter so that it switches to Page 0 S1 S16 Now when you press S16 Page 0 it wi...

Page 43: ...broadcast The value broadcast is 127 for the CC you program SENDING A SYSTEM EXCLUSIVE MESSAGE SEQUENCE The PC MAC Software Editor for the Liquid Foot has a section dedicated to the entering of System...

Page 44: ...s will cause a delay in processing and may appear as a hiccup in processing of your presets or IA switches This is normal functioning DELAY PROCESSING FOR A SPECIFIC NUMBER OF MILISECONDS The 2 Data p...

Page 45: ...n as a different preset is selected SET TEMPO COMMAND Data parameter will be set to the tempo in BPM The tempo light will blink in 4 4 timing to the beat set by this special command Each beat begins w...

Page 46: ...button Except the MENU button which doesn t have an LED Please insure that the UP DOWN keys display Amber Buttons P1 P6 display Blue Buttons S1 S16 alternate Red and Green The TEMPO 2nd Function shou...

Page 47: ...is properly connected to the Computer Suggested MIDI SYSEX settings for software are either 256 buffers 256 bytes 40ms delay between buffers Or 1024 buffers 1024 bytes 70ms delay between buffers Send...

Page 48: ...urrently Active Preset Name Set List Mode Set List Mode enables the unit to arrange songs into a set order Each set list can randomly order 20 songs into a sequence known as a set Once a set list is p...

Page 49: ...order set list mode P3 Instant Access Switch Edit Menu Edit the MIDI programming for the ON and OFF states the Type Stomp Latch and SYNC external synchronization device and effect P4 Global Settings...

Page 50: ...More on this later as it requires a proper program command to be established first in the MIDI programming messages discussed below If you plan to load the name of the preset from an external device...

Page 51: ...ere x equals the page number you have just selected Please note that you should press the DOWN button first hold it and then press UP If you press UP first you will save your changes and move to the n...

Page 52: ...nd have it send ALL active button states as you have programmed your controller If an Instant Access switch is configured as available but inactive RED then the device will send all of the off message...

Page 53: ...t setting RESEND IA COMMANDS When a preset is configured to RESEND IA COMMANDS you are asking it to re send any and all commands stored in an IA switch that is initially configured as ON or OFF in the...

Page 54: ...d you will cycle to the next override command and start the programming all over You can program up to 12 override commands Each can be programmed for one IA Switch or you can program 12 separate swit...

Page 55: ...S10 keys to directly type the number Press P2 or SELECT once you have selected the desired preset to edit EDIT SONG NAME To skip over the song name editing press P2 to advance to the next submenu You...

Page 56: ...ough the list of songs and come back to the same song to force a re triggering of song MIDI commands Current Message being programmed Cursor shows current parameter being edited Pressing S14 BACK will...

Page 57: ...preset selection switches By pressing the UP or DOWN button you will select 12 Button Mode Press S16 once your made your selection In 12 button mode the bottom row P1 P6 and the next row up S1 S6 wil...

Page 58: ...ee screen shots above Press DOWN UP at the same time to cycle through all 4 pages of switches Pressing P6 is another way to select a switch if you would like to select a switch numerically press P6 Yo...

Page 59: ...broken up into two separate areas The first set of commands are called global commands and each of these programmed MIDI events will trigger each time the IA Switch is pressed The global section is s...

Page 60: ...f desired button delay speed An example of this is TAP TEMPO This is a case where we want to process the ON commands quickly and reset the unit to immediately process the next incoming IA switch press...

Page 61: ...I clock You may use Quick Tap button type and program your tap tempo CC manually should you choose They will behave identically MIDI ON MESSAGES Message Type Message MIDI Chan Name of MIDI Chan Select...

Page 62: ...nd the last effect in the list is a VOL PAN 4 effect See the Appendix A for a complete ordered list that are selectable for the AXE FX SYNC TO LINE 6 PODxt Select LINE6 POD if you have such device con...

Page 63: ...d Foot device Upon pressing SELECT to save your choice you will be asked which EFFECT within the LIQUID TRACK you plan to synchronize to this IA switch Use the UP DOWN arrows to select the appropriate...

Page 64: ...ong to one of fifteen groups or remain outside of a group By default each IA switch is assigned group number 0 No grouping IA switches that are within the same group have certain behaviors In general...

Page 65: ...witch to clone 1 64 The currently edited switch will mimic the function and state of the cloned IA Switch If the cloned switch is modified pressed it will change the state of the cloned switch So in e...

Page 66: ...Access Switches and will do whatever they have been programmed to do when pressed 12 BUTTON MODE You may switch back and forth between 6 and 12 button preset mode in the Global menu system In 12 butto...

Page 67: ...oot In most cases this should not be necessary Firmware updates will require that the SYSEX ID be set at 127 You may need to temporarily change this to 127 if you have set an alternate ID prior to sen...

Page 68: ...PEDAL DEFAULT s Enter a valid MIDI MESSAGE to be processed with Expression Pedal inputs Typically you would program certain MIDI CHANNEL and CC such as 7 for volume However Liquid Foot will allow you...

Page 69: ...ntary switch is being used as the input calibration of the pedal switch is very important for the proper operation of the switch Press S16 SELECT to scroll to the next expression pedal You will have t...

Page 70: ...gger all the commands as programmed into the switch you point to in the midi programming for this expression pedal in 2 Data parameter Values from 1 64 are valid For example if expression pedal one is...

Page 71: ...expression pedal if you have not pressed S16 SELECT 3 Continue this process for each of the expression pedals you have installed repositioned or otherwise modified from the previous calibration settin...

Page 72: ...very time you press the Preset button even if it s the currently selected on it will reprocess all of the presets MIDI messages synchronizations and IA reprocessing if selected to do so Press SELECT t...

Page 73: ...hes will start off As you change the state by pressing the button that current state will carry over regardless of preset song or setlist changes This global setting effects ALL IA switches If you des...

Page 74: ...set as In Active no light on Further when this feature is turned on re triggering IA switches that have been programmed as In Active will no trigger any MIDI messages By default IA Switches that are...

Page 75: ...le certain set of programming functions lets say we programmed IA switch 64 to be a TUNER By assigning MENU Hold IA 2S with the 64 we are telling the Liquid Foot to trigger the ON messages of IA switc...

Page 76: ...to send SYSEX dumps FIRMWARE or working with the PC EDITOR and your computer or external system is having trouble with timing etc then this mode may help solve the problem You can enter Advanced MIDI...

Page 77: ...a values between 08x and 0Ex messages Step 1 Use the UP DOWN buttons to select the MIDI channel you wish to communicate with Step 2 Press S15 NEXT to move to the next parameter Step 3 Use the UP DOWN...

Page 78: ...ice and load one patch after another until it has loaded all of the patches requested What can this utility do in part or whole 1 Automatically populate the Presets in the Liquid Foot from information...

Page 79: ...Foot it requires a MIDI IN and MIDI OUT signal or if the power is not on for such connected device then you will receive the following message If a device is detected for the first time you will be as...

Page 80: ...ore than 27 presets given there are only 127 presets in a Line6 POD xt Live The Liquid Foot will figure out all of these limitations and only offer options that are plausible given the above TRICK If...

Page 81: ...t the AXE FX corrects the problem itself This will NOT change the patch sound in any way as far as we know Please refer to your AXE FX manual for guidance Recommendation Save preset by pressing STORE...

Page 82: ...ss the associated Preset P1 P6 button that you care to choose It will automatically load that patch When you are in 12 preset button mode then the bank UP DOWN button will behave in the same manner bu...

Page 83: ...n mode preset buttons P1 P6 act as the preset selection buttons Buttons S1 S7 will now also act as preset buttons Only one preset button will light at a time in Preset Mode to indicate which preset bu...

Page 84: ...n mode Currently selected set list Name When you find the set list you would like to activate simply press the MENU button and you will taken to what appears to be SONG mode as identified above in the...

Page 85: ...POD xt device it will display LINE6 POD Series If you connected a Fractal Audio AXE FX it will display FRACTAL AXE FX Once the device is detected press the MENU button to exit the menu system You will...

Page 86: ...he connected device The bottom row will display the patch name as programmed in the connected device SELECTING A PRESET OF THE EXTERNAL DEVICE UP DOWN buttons will cycle through the presets of the con...

Page 87: ...one You MUST place the IA switch into Momentary mode not the default STOMP mode 2 Use an expression pedal If you have a Normally Open Pedal Button then you can use that device instead of a normal expr...

Page 88: ...lp when accidents do happen With undo force you may notice the unit allows itself to flex This is normal operation Under acceptable loads the unit will be rock solid The designer of this unit had a so...

Page 89: ...inputs Operating Mode FIRMWARE PRESET CHANGE REQUESTS IA SWITCH SELECTION MODIFICATION EXPANSION MODULE FEATURES CC CONTROLLERS Data Protection PRESET DUMP RESTORE SONG DUMP RESTORE IA SWITCH DUMP RE...

Page 90: ...nger 2 Rotary 1 Rotary 2 Phaser 1 Phaser 2 Wahwah 1 Wahwah 2 Formant Vol Pan Trem Pan 1 Trem Pan 2 Pitch Filter 1 Filter 2 Drive 1 Drive 2 Enhancer Loop Mixer 1 Mixer 2 NoiseGate Output Controllers Fe...

Page 91: ...nty that the software portion of the product Software will substantially conform to LIQUID s then current functional specifications for the Software as set forth in the applicable documentation The cu...

Page 92: ...mpered with defaced or removed Initial installation installation and removal of the product for repair and shipping costs Operational adjustments covered in the operating manual for the product and no...

Page 93: ...ents thereto Contents are subject to change without prior notice Copyright 2008 by LIQUID CONTROL INC All rights reserved CE Mark Warning This is a Class B product In a domestic environment this produ...

Reviews: