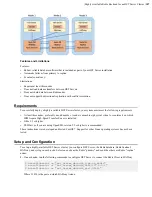
| Highly-Available Redis Backend for an HST Server Cluster |
310
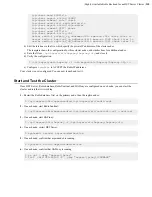
tcp-check send PING\r\n
tcp-check expect PONG
tcp-check comment role\ check
tcp-check send info\ replication\r\n
tcp-check expect string role:master
tcp-check comment QUIT\ phase
tcp-check send QUIT\r\n
tcp-check expect OK
server redis-1
primary_ip_address
:31415 maxconn 1024 check inter 1s
server redis-2
replica1_ip_address
:31415 maxconn 1024 check inter 1s
server redis-3
replica2_ip_address
:31415 maxconn 1024 check inter 1s
b) Edit the last lines in the file, which specify the private IP addresses of the cluster nodes.
The template shows the configuration for three cluster nodes; add similar lines for additional nodes.
c) Save the file as
/opt/aspera/etc/haproxy/haproxy.cfg
and close it.
d) Verify the configuration:
$ /opt/aspera/sbin/haproxy -f /opt/aspera/etc/haproxy/haproxy.cfg -c
e) Configure
iptables
to ACCEPT the Redis IP addresses.
Your cluster is now configured. You can now launch and test it.
Start and Test the Cluster
Once HST Server, Redis database, Redis Sentinel, and HAProxy are configured on each node, you can start the
cluster and test that it is working.
1.
Restart the Redis database, first on the primary node, then the replica nodes:
$ /opt/aspera/sbin/apseraredisd /opt/aspera/etc/redis.conf
2.
On each node, start Redis Sentinel:
$ /opt/aspera/sbin/asperaredisd /opt/aspera/etc/sentinel.conf --sentinel
3.
On each node, start HAProxy:
$ /opt/aspera/sbin/haproxy -f /opt/aspera/etc/haproxy/haproxy.cfg
4.
On each node, restart HST Server:
$ systemctl restart asperanoded.service
5.
On each node, confirm that asperanoded is running:
$ systemctl status asperanoded.service
6.
On each node, confirm that HAProxy is running:
$ ps -ef | grep "aspera\|proxy"
$ lsof -ni:1024-65536 -P | grep "aspera\|proxy\|COMMAND"

