10 Debugging Inspections
10.1 iVu Emulator
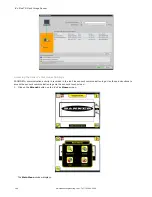
The iVu Emulator is a Windows application that allows you to operate in a Windows environment exactly as you would on
the iVu Series sensor itself. In general, the Emulator is an inspection debugging tool where you can:
•
Import stored inspections and configuration from an iVu Plus TG sensor.
•
Modify inspection parameters on the emulator.
•
Restore the updated configuration back to the sensor.
10.2 How to Round-Trip Debug Using the Emulator
The iVu Emulator is a Windows application that allows you to operate in a Windows environment exactly as you would on
the sensor itself. In general, the Emulator is an inspection debugging tool: you can import stored inspections and a
configuration from an iVu sensor, then modify its parameters on the emulator, and restore the updated configuration back
to the sensor. When you install the iVu Emulator, by default, it is installed in the following folder:
C:\Program Files\Banner Engineering\iVu Series
You can run the Emulator from this folder, but you will need to move files between the USB flash drive and PC. To avoid
moving files, copy the Emulator executable to the USB flash drive, and run the Emulator directly from the USB flash drive.
This "how-to" describes the procedures for doing round-trip debugging either using the iVu Emulator installed on a PC or
using it directly from the USB flash drive.
NOTE: This document refers to saving configuration and inspection logs in folders based on the sensor
name. If you have not yet named the sensor, then folders will be named using the first 8-characters of
the sensor serial number.
10.2.1 How to Debug Using the Emulator from a PC
1. Plug a USB flash drive into the sensor.
2. Save the Inspection Logs to the USB flash drive.
a. On the Main Menu > Inspection Logs > View Logs screen, click the Save icon to save the inspection
logs.
b. When prompted, select Yes to save sensor configuration along with the Inspection Logs. The location of
these files on the USB flash drive displays after the operation is completed. The Inspection Logs are saved
in <USB>:\BANNER\<SENSOR_NAME>\InspLog and the sensor configuration is saved in <USB>:\BANNER
\<SENSOR_NAME>. For example, if the sensor name is myName:
•
Configuration File (CONFIG.CFG) path: <USB>:\BANNER\myName
•
Inspection Logs path: <USB>:\BANNER\myName\InspLog
NOTE: If the sensor has no name, then the folder name is the first 8-characters of the
serial number.
3. Remove the USB flash drive from the sensor and insert it into an available USB port on a Windows PC that has the
iVu Emulator installed.
Important: Make sure the iVu Emulator is NOT running before proceeding to the next step.
4. Copy the Sensor Configuration from the USB flash drive to the folder where the Emulator is installed on the PC. For
example, if the sensor name is myName and the iVu Emulator is installed in the default location on the PC, copy
the file <USB>:\BANNER\myName\CONFIG.CFG to C:\Program Files\Banner Engineering\iVu Series.
5. Copy the Inspection Logs from the USB flash drive (for example, <USB>:\BANNER\myName\InspLog) to the
InspLog folder on the PC (for example, C:\Program Files\Banner Engineering\iVu Series\InspLogs).
6. Start the Emulator.
7. Set the Trigger option to Internal—
a. Go to Main Menu > Imager > Trigger, and select Internal.
b. Set the Trigger Interval as desired.
The iVu Emulator runs with the saved configuration from Step 6 using the saved Inspection Logs from Step
7 as images.
8. Make the desired adjustments.
9. Close the iVu Emulator program. All configuration changes are saved to the CONFIG.CFG file.
iVu Plus TG Gen2 Image Sensor
198
www.bannerengineering.com - Tel: 763.544.3164

