5-16
BE1-BPR BESTlogic
PROGRAMMING CUSTOM PROTECTION SCHEMES
Groups of commands can be saved to an ASCII text file and then uploaded as a group. However, care
should be taken to ensure that every command is terminated with either a carriage return or a semi-colon
and that the length for any line does not exceed 40 characters. Some common method of handshaking must
be enabled at both the relay and the computer uploading the commands. Handshaking such as XON/XOFF
(X1) or RTS/CTS (H1) should be used. Information about configuring handshaking can be found in the
Communication Settings sub-section of Section 4, Functional Description.
Customizing Preprogrammed Schemes
To customize a preprogrammed scheme, follow these steps.
1.
Copy the preprogrammed scheme logic equations to custom memory by using the
LN=<preprogrammed_logic_name> command. All previous equations assigned to the custom logic are
overwritten with the equations from the preprogrammed logic scheme.
2.
Rename the scheme to a unique, non-preprogrammed name by using the LN=<new_name> command.
This allows the scheme to be programmable.
3.
Change the logic equations as needed using the LF, LI, LT, and LO commands. Any equations not
changed will be left as they were.
4.
Review the changes using LINF0 <new_name> or the LF, LI, LT, and LO commands.
5.
If the new logic is to become the active logic, then type LOGIC=<new_name>.
6.
Save the customized scheme using the SAVE command.
Example: Modify the pre-programmed BFL1A logic scheme so that breaker status is defined by the 52A
contact instead of the 52B contact. Give this custom logic scheme the name of BFL1-25A.
The following commands change the equations that use the 52b logical input and rename the
logic scheme.
LN=BFL1
LN=BFL1-52A
LO6=I1/I2
LO12=F3/I1
LOGIC=BFL1-52A
SAVE;Y
Programming Custom Schemes
To program a new scheme follow these steps.
1.
Name the scheme with a unique, non-preprogrammed name by using the LN=<new_name> command.
This allows the scheme to be programmable.
2.
Disable the outputs or function modules not needed by setting them equal to 0. (i.e. LO12=0). All
equations in a group can be programmed or disabled at once by not using a number.
Example 1: LI=8,12 changes all input logic to 8,12.
Example 2: LO=0 clears all output equations before writing new ones.
3.
Change the logic equations as needed using the LF, LI, LT, and LO commands.
4.
Review the changes using LINF0 <new_name> or the LF, LI, LT, and LO commands.
5.
If the new logic is to become the active logic, then type LOGIC=<new_name>.
6.
Use the SAVE command to save the customized logic scheme.
Summary of Contents for BE1-BPR
Page 31: ...BE1 BPR Application 2 17...
Page 42: ...3 4 BE1 BPR Human Machine Interface Figure 3 4 BE1 BPR Relay Vertical Mount Front View...
Page 43: ...BE1 BPR Human Machine Interface 3 5 Figure 3 5 BE1 BPR Relay Vertical Mount Rear View...
Page 49: ...4 6 BE1 BPR Functional Description Figure 4 2 Enhanced BE1 BPR Menu Display Screens...
Page 50: ...BE1 BPR Functional Description 4 7 Figure 4 3 Standard BE1 BPR Menu Display Screens...
Page 94: ...5 4 BE1 BPR BESTlogic Figure 5 1 BESTlogic Function Blocks...
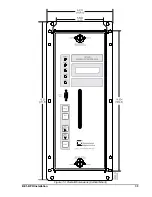
Page 121: ...BE1 BPR Installation 7 3 Figure 7 3 Overall Dimensions Vertical Mount...
Page 122: ...7 4 BE1 BPR Installation Figure 7 4 Overall Dimensions Side View Vertical Mount...
Page 123: ...BE1 BPR Installation 7 5 Figure 7 5 Panel Drilling Diagram Vertical Mount...


